
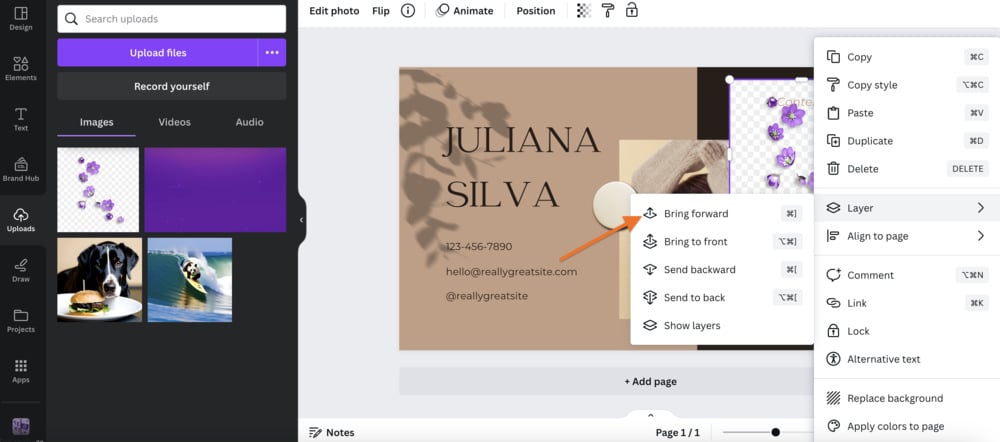
Canva is a popular graphic design tool that provides a wide range of features and functionalities for creating visually appealing designs. One of the key features of Canva is the ability to layer images on top of each other, which offers several benefits:
- Enhanced visual aesthetics: Layering images allows designers to create visually stunning graphics by combining multiple images and elements. By strategically placing images on top of each other, designers can create depth and dimension, adding interest and appeal to their designs.
- Greater creative freedom: Layering images in Canva opens up endless possibilities for creativity. Designers can experiment with different combinations and arrangements of images to achieve the desired effect. They can also apply various effects and filters to each layer, further enhancing the overall design.
- Improved storytelling: Layering images in Canva enables designers to tell a more compelling story through their visuals. By overlaying images with text, graphics, or other design elements, designers can convey messages and emotions more effectively, creating a more engaging experience for viewers.
- Efficient editing: Canva's layering feature makes it easy to edit individual elements within a design without affecting other layers. This allows designers to make precise adjustments and modifications to specific parts of an image, ensuring a more polished and professional result.
In addition to these benefits, Canva also offers other useful features that complement the layering functionality, such as:
| Feature | Description |
|---|---|
| Transparency | Canva allows designers to adjust the opacity of each layer, making it possible to create transparent overlays and blend images seamlessly. |
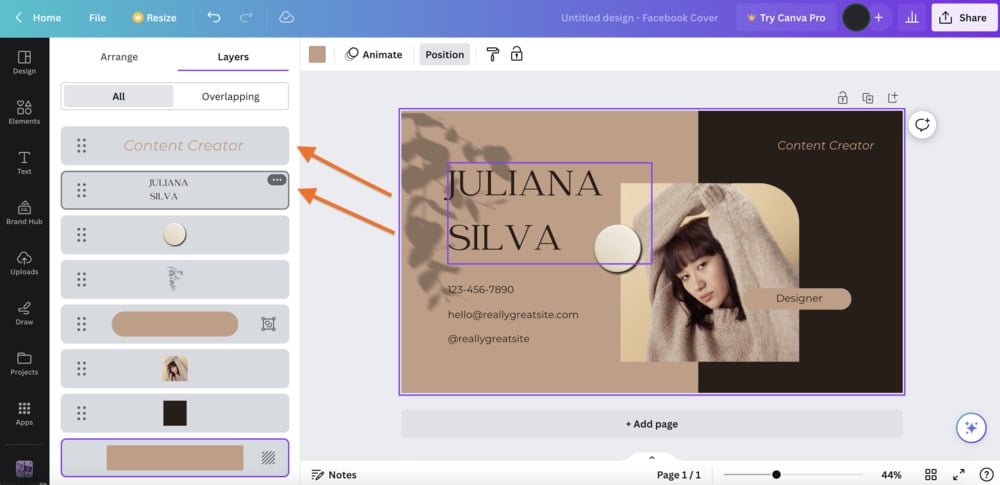
| Layer organization | Canva provides an intuitive layer organization system, allowing designers to easily rearrange, group, and manage their layers, improving workflow and efficiency. |
| Image filters | Canva offers a variety of built-in image filters that can be applied to individual layers, allowing designers to enhance the mood and tone of their designs. |
In conclusion, the ability to layer images in Canva brings numerous benefits to designers, including enhanced visual aesthetics, greater creative freedom, improved storytelling, and efficient editing. Combined with other useful features, Canva's layering functionality empowers designers to create stunning visuals with ease.
Getting Started: Tools and Techniques
When it comes to getting started with any task or project, having the right tools and techniques can make all the difference. Whether you're a beginner or an experienced professional, finding the right resources to help you achieve your goals is crucial. In this article, we will explore some essential tools and techniques that can set you up for success.
1. Research
Before starting any project, it's essential to conduct thorough research. This can help you gain a better understanding of the task at hand, identify potential challenges, and explore possible solutions. Utilize search engines, online databases, books, and other resources to gather information. Keep a record of your findings to refer to throughout the project.
2. Planning
Once you have gathered the necessary information, it's time to create a plan. Define your goals and objectives and determine the steps needed to achieve them. Break down the project into manageable tasks or milestones and assign deadlines to each. Utilize project management tools such as Gantt charts or Kanban boards to visually organize and track your progress.
3. Communication
Clear and effective communication is key to the success of any project. Establish open lines of communication with team members or stakeholders to ensure that everyone is on the same page. Utilize collaboration tools such as Slack or Microsoft Teams to facilitate communication, share updates, and receive feedback.
4. Time Management
Effective time management is crucial to meet deadlines and complete tasks efficiently. Create a schedule or utilize time management techniques such as the Pomodoro Technique to manage your time effectively. Prioritize tasks based on their importance and urgency, and delegate tasks if necessary.
5. Use the Right Tools
Choosing the right tools for your project can greatly enhance your productivity and efficiency. Depending on the nature of your project, you may need specific software or equipment. For example, if you're a graphic designer, you may require Adobe Photoshop or Illustrator. Research and invest in the tools that align with your project requirements.
6. Continuous Learning
To stay ahead in any field, it's important to continuously learn and upgrade your skills. Attend workshops, webinars, or courses related to your field to stay up-to-date with the latest tools and techniques. Networking with professionals in your industry can also provide valuable insights and opportunities for growth.
Conclusion
Getting started on a project can be overwhelming, but with the right tools and techniques, you can set yourself up for success. Conducting thorough research, planning, effective communication, time management, using the right tools, and continuous learning are all critical factors that can help you achieve your goals. Remember to adapt these tools and techniques to your specific project and stay flexible throughout the process.
Also Read This: How Many Gigs Are Allowed in Fiverr?
Step 1: Choosing the Perfect Background
When designing a webpage or any visual design project, choosing the perfect background is crucial as it sets the tone and enhances the overall aesthetic appeal. A well-chosen background can make your content stand out and create a visually pleasing experience for your users.Here are a few key points to consider when selecting the perfect background:
1. Purpose of your website or project: - Before choosing a background, it's essential to understand the purpose of your website or project. Is it a professional business website, an online store, a personal portfolio, or a blog?
Different purposes may require different types of backgrounds, such as a clean and minimalist background for a professional website or a more vibrant and colorful background for a creative portfolio.
2. Color scheme: - The color scheme of your background should harmonize with your overall design. Consider the primary and secondary colors used in your branding or design elements, and choose a background color that complements them. For example, if your brand predominantly uses blue and white, consider a light blue or a neutral white background.
3. Texture or pattern: - Adding texture or pattern to your background can make it more visually interesting and add depth to your design. Consider using subtle textures like grunge, canvas, or linen, or incorporate patterns like stripes, dots, or geometric shapes. Just ensure that the texture or pattern doesn't overpower your content.
4. Image or illustration: - Using an image or illustration as a background can be a great way to add visual impact to your design. Choose a relevant and high-quality image that reflects the theme or subject of your website. If using an illustration, make sure it complements your brand identity and overall design.
5. Responsiveness: - With the increasing use of mobile devices, responsiveness is crucial. Ensure that your chosen background is responsive and adapts well to different screen sizes. Test it on various devices to ensure it looks good and doesn't hinder the readability of your content.Once you have considered these points, it's time to implement your chosen background. Here's a table with different types of backgrounds that you can explore:
| Type of Background | Description |
|---|---|
| Solid Color | A simple and clean background that consists of a single color. |
| Gradient | A background that transitions from one color to another, creating a smooth gradient effect. |
| Pattern | A background that features repeated motifs or designs, adding visual interest. |
| Image | A background that uses a relevant and high-quality image to enhance the overall visual appeal. |
| Video | A dynamic background that includes a video instead of a static image or color. |
Remember, the background you choose should effectively convey your message and align with your overall design. Experiment with different options, seek inspiration from existing websites or design galleries, and trust your aesthetic instincts to select the perfect background for your project.
Also Read This: How to Start as a Freelance Website Developer
Step 2: Adding Your Main Image
Adding a main image to your website can greatly enhance its visual appeal and help convey your message or brand. Here's how you can add your main image using HTML:
- Choose the image you want to use as your main image and save it in a suitable format, such as JPEG or PNG.
- Create a new folder within your website's directory where you'll store all your images. You can name it something like "images" for easy organization.
- Move the main image file into the newly created "images" folder.
- In your HTML file, locate the appropriate section where you want the main image to appear. This could be the header, a hero section, or any other prominent location.
- Within the designated section, insert the following HTML code:
<img src="images/main-image.jpg" alt="Main Image">
Make sure to replace "main-image.jpg" with the actual filename and extension of your main image.
The alt attribute is used to provide alternative text for visually impaired users or in case the image fails to load. It should briefly describe the contents or purpose of the image.
Additional options you can include in the img tag are:
widthandheightattributes to specify the dimensions of the image in pixels or a percentage value.titleattribute to add a tooltip that appears when the user hovers over the image.styleattribute to apply CSS styles directly to the image (e.g., border, margin, etc.).
Here's an example of an img tag with additional attributes:
<img src="images/main-image.jpg" alt="Main Image" width="500" height="300" title="Click to enlarge" style="border: 2px solid black;">
You can experiment with these attributes to customize the appearance of your main image according to your preferences and website design.
Also Read This: How to Cancel a Fiverr Order
Step 3: Incorporating Additional Elements
Once you have designed the basic structure and layout of your webpage using HTML and CSS, it's time to add some additional elements to enhance the functionality and user experience. These elements can include multimedia content, interactive forms, navigation menus, and more.Here are some popular additional elements you can incorporate into your webpage:1. Multimedia Content: - Images: Use the `` tag to add images to your webpage. You can specify the source (`src` attribute), width, height, alt text, and more. - Videos: Embed videos on your webpage using the `


