
Before delving into the specifics of adding bleed in Canva, it's essential to grasp the fundamental concept of bleed in design. Bleed refers to the area beyond the edges of your design canvas that extends to accommodate any potential cutting discrepancies during the printing process. In simpler terms, it is the extra space that ensures your design extends seamlessly to the edge of the final printed product, avoiding any unwanted white borders.
Why is Bleed Important?
Bleed plays a crucial role in the printing and production of designs, especially in projects where images or colors extend to the edges. Without an adequate bleed, there's a risk of having uneven borders or white edges on the final printed material, detracting from the professional appearance of your design.
Consider a business card or a flyer with a vibrant background color that extends to the edges. Without bleed, any slight misalignment during the cutting process could result in a noticeable white border, compromising the intended visual impact.
The Standard Bleed Measurement
While bleed requirements may vary based on the printing specifications and the project, a common standard is a bleed of 0.125 inches (or 3mm) on all sides. This extra space ensures that even if the cutting isn't perfectly precise, there's a margin of error, and the design appears seamlessly extended to the edges.
Adding bleed is particularly important in projects such as:
- Business Cards
- Brochures
- Posters
- Flyers
- Any design with full-bleed images or backgrounds
Understanding Bleed in Canva
In Canva, bleed is incorporated to ensure that your designs are print-ready and maintain their intended visual appeal. The platform simplifies the process, allowing users to add bleed seamlessly to their projects. In the following sections, we'll explore how to add bleed in Canva step by step, along with tips for effective bleed management and common mistakes to avoid.
Importance of Bleed in Canva
Understanding the significance of bleed in Canva is key to producing polished and professional-looking designs. Canva, a popular online design platform, allows users to create visually appealing graphics, but incorporating bleed is essential for ensuring that your designs translate seamlessly from the digital realm to the printed page.
Preserving Design Integrity:
When you design in Canva, especially for print, adding bleed helps maintain the integrity of your visuals. Without bleed, there's a risk that important elements near the edges could get cut off during the printing and trimming process, leading to an unintended and aesthetically displeasing result.
Creating Full-Bleed Designs:
For projects where you want images or colors to extend to the edges of the page, such as business cards or posters, incorporating bleed in Canva is crucial. It ensures that your design doesn't end abruptly, leaving white borders that detract from the overall impact.
Professional Print Output:
Printers often require a bleed area to account for potential variations during the cutting process. Canva's support for bleed allows you to meet these printing standards, ensuring that your designs look professional and polished when translated from digital canvas to physical prints.
Adhering to Print Guidelines:
Many professional printing services have specific requirements for bleed to ensure a smooth and error-free printing process. By incorporating bleed in Canva, you align your designs with industry standards, making it easier to collaborate with printing services and achieve the desired print quality.
Effortless Bleed Addition in Canva:
Canva simplifies the process of adding bleed, making it accessible to users with varying design expertise. Whether you're creating business cards, flyers, or other print materials, Canva's user-friendly interface allows you to include the necessary bleed margins seamlessly, enhancing the overall print-readiness of your designs.
Next, let's explore the step-by-step process of adding bleed in Canva to ensure your designs are print-ready and visually stunning.
Also Read This: How Long to Get Your First Order on Fiverr
How to Add Bleed in Canva
Adding bleed in Canva is a straightforward process that enhances the print readiness of your designs. Follow these step-by-step instructions to ensure your creations maintain their visual appeal when translated from the digital canvas to physical prints.
- Open Your Canva Project: Start by opening the Canva project you're working on or create a new one.
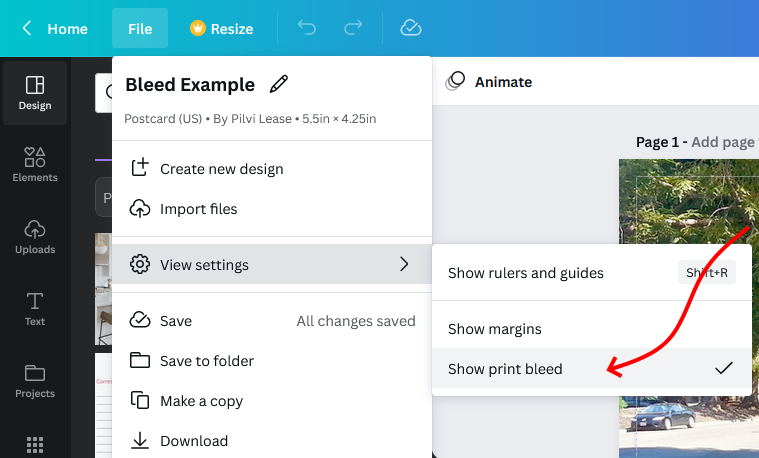
- Access the Page Settings: Navigate to the top corner of the Canva interface and find the "File" option. Click on it, and from the dropdown menu, select "Page Setup."
- Adjust the Dimensions: In the Page Setup menu, you'll find options to adjust the dimensions of your project. To incorporate bleed, add the required bleed measurement to all sides. A common standard is 0.125 inches (3mm). Make sure to maintain the aspect ratio to avoid distortion.
- Apply Changes: Once you've adjusted the dimensions, click on the "Apply Changes" button to confirm the modifications to your canvas size.
- Extend Design Elements: With the new canvas size, extend any design elements (images, backgrounds, or colors) that you want to reach the edges of the final print. Ensure these elements surpass the original canvas boundaries and extend into the added bleed area.
- Review and Save: Take a moment to review your design, paying attention to the extended bleed area. Make any necessary adjustments to ensure a seamless transition from the digital canvas to print. Once satisfied, save your project.
Additional Tips for Effective Bleed Management:
- Use high-resolution images to maintain quality in the extended bleed area.
- Double-check the print guidelines of your chosen printing service to align with their specific bleed requirements.
Standard Bleed Measurements
| Printed Item | Recommended Bleed |
|---|---|
| Business Cards | 0.125 inches (3mm) |
| Brochures | 0.125 inches (3mm) |
| Posters | 0.125 inches (3mm) |
By following these steps and tips, you ensure that your Canva designs are equipped with the necessary bleed, setting the stage for professional and visually appealing printed materials.
Also Read This: What is Display Name in Fiverr?
Tips for Effective Bleed Addition
Adding bleed to your Canva designs is a crucial step in achieving professional and visually stunning printed materials. To optimize the effectiveness of your bleed incorporation, consider the following tips to enhance the overall quality and visual impact of your designs.
- Start with High-Resolution Images: To maintain quality in the extended bleed area, use high-resolution images. This ensures that even when your design is printed, the visuals remain crisp and clear.
- Extend Background Colors or Patterns: If your design includes background colors or patterns, make sure to extend them into the bleed area. This prevents any potential white borders and ensures a seamless transition from digital to print.
- Double-Check Print Guidelines: Different printing services may have specific bleed requirements. Always double-check the print guidelines of your chosen printing service to align your Canva project with their specifications for a flawless printing process.
- Use Bleed as a Design Element: Instead of viewing bleed as merely extra space, incorporate it as a deliberate design element. Extend graphical elements or text into the bleed area strategically to add a dynamic and visually appealing touch to your designs.
- Consider Safety Margins: While bleed is crucial, it's also important to account for safety margins. Keep essential elements, such as text and critical visuals, within the safe zone to prevent any potential cropping during the trimming process.
Common Bleed Measurements
| Printed Item | Recommended Bleed |
|---|---|
| Business Cards | 0.125 inches (3mm) |
| Brochures | 0.125 inches (3mm) |
| Posters | 0.125 inches (3mm) |
Regularly Preview Your Design: Throughout the design process, regularly preview your project to ensure that all bleed elements are extended appropriately. This proactive approach minimizes the risk of overlooking critical details that may impact the final print.
By incorporating these tips into your Canva design workflow, you not only ensure the effective addition of bleed but also elevate the overall quality and professionalism of your printed materials.
Also Read This: Understanding the Industry Behind Fiverr
Common Mistakes to Avoid
While adding bleed in Canva is a crucial step for achieving professional-looking prints, it's equally important to be aware of common mistakes that can compromise the effectiveness of your bleed incorporation. By steering clear of these pitfalls, you ensure that your designs maintain their visual appeal and quality throughout the printing process.
- Neglecting Bleed Requirements: One of the most common mistakes is neglecting the specific bleed requirements of your chosen printing service. Always double-check and adhere to the recommended bleed measurements to align with industry standards.
- Insufficient Image Resolution: Using low-resolution images can result in pixelation and reduced quality, especially in the extended bleed area. Opt for high-resolution images to maintain clarity and sharpness in both the design canvas and bleed margins.
- Forgetting Safety Margins: While bleed is essential, forgetting about safety margins can lead to critical design elements being too close to the edge. Ensure that important text and visuals are within the safe zone to prevent unintended cropping during trimming.
- Overlooking Print Preview: Failing to regularly preview your design throughout the process can result in overlooked details. Regularly check the project preview to catch any issues related to bleed extension and overall design composition.
- Ignoring Bleed as a Design Element: Treat bleed as more than just extra space; consider it as an opportunity to enhance your design. Avoid neglecting the creative potential of bleed by not extending graphical elements or text strategically into the bleed area.
Quick Checklist Before Printing
| Checklist Item | Verify |
|---|---|
| Bleed Measurements | Meet printing service requirements |
| Image Resolution | High-resolution for clarity |
| Safety Margins | Essential elements within safe zone |
| Design Preview | Regularly check for issues |
Regular Quality Checks: Before finalizing your design for printing, conduct a thorough quality check using the provided checklist. This ensures that you've addressed potential pitfalls and guarantees a seamless transition from Canva to the printed page.
By being mindful of these common mistakes and taking proactive measures to avoid them, you enhance the success of your Canva designs, ensuring they not only look impressive on-screen but also translate flawlessly into professional prints.
Also Read This: Top Fiverr Sellers for Blockchain Development in 2024
FAQ
Explore the frequently asked questions about bleed addition in Canva to gain a comprehensive understanding of this essential design concept.
- Q: Why is bleed necessary in design?
- A: Bleed ensures that your designs extend seamlessly to the edges of the final printed product, preventing any unwanted white borders or uneven edges.
- Q: How much bleed should I add to my Canva project?
- A: A common standard is 0.125 inches (3mm) on all sides. However, it's crucial to check the specific requirements of your chosen printing service.
- Q: Can I add bleed to an existing Canva project?
- A: Yes, you can. Open your Canva project, access the Page Setup menu, and adjust the dimensions by adding the necessary bleed measurements to all sides.
- Q: What happens if I neglect to add bleed?
- A: Without bleed, there's a risk of having white borders or uneven edges on the final printed material, compromising the professional appearance of your design.
- Q: Are there specific design elements that should extend into the bleed area?
- A: Background colors, patterns, images, and any design elements that are intended to reach the edges of the final print should extend into the bleed area.
- Q: Can I use Canva's default dimensions for print without adding bleed?
- A: While Canva provides default dimensions for various print materials, it's recommended to add bleed to ensure your designs meet printing standards and look polished in the final prints.
These frequently asked questions offer insights into the importance of bleed in Canva and provide practical guidance on incorporating bleed into your design projects for optimal print readiness.
Conclusion
In conclusion, mastering the Bleed Addition Basics in Canva is a crucial step for any designer looking to create professional and polished prints. The incorporation of bleed ensures that your designs maintain their visual integrity, with no unwanted white borders or uneven edges, making them print-ready and visually impactful.
By understanding the importance of bleed in Canva, you empower yourself to produce high-quality designs that seamlessly transition from the digital canvas to the final printed product. The step-by-step guide provided for adding bleed in Canva, along with tips for effective bleed management and common mistakes to avoid, serves as a comprehensive resource for designers of all levels of expertise.
Remember to leverage bleed not just as extra space but as a design element that enhances the overall aesthetics of your creations. Whether you're working on business cards, brochures, posters, or any other print material, the incorporation of bleed in Canva elevates the professionalism and visual appeal of your designs.
Regularly reviewing your designs, adhering to specific print guidelines, and conducting quality checks before finalizing your project for print are essential practices that contribute to successful bleed incorporation. By following these best practices, you ensure that your Canva designs not only meet industry standards but also exceed expectations, leaving a lasting impression on your audience.
As you embark on your design journey with Canva, consider bleed as a powerful tool that not only ensures print readiness but also enhances the overall quality and impact of your visual creations. Happy designing!


