
Canva is a user-friendly graphic design platform that empowers individuals to create stunning visuals without the need for advanced technical skills. Whether you're designing social media posts, presentations, or promotional materials, Canva's intuitive interface makes the process seamless. Here's a comprehensive guide to help you get started:
1. Account Creation
Begin by signing up for a Canva account. Visit the official website here and click on the "Sign Up" button. Fill in your details or use your Google or Facebook account to log in.
2. Exploring the Dashboard
After logging in, you'll be directed to the Canva dashboard. Familiarize yourself with the layout, where you'll find various design options categorized into templates for social media, presentations, posters, and more.
3. Choosing a Design Type
Select the type of design you want to create. Canva offers a wide range of templates for different purposes. Whether it's a social media post, business card, or flyer, you'll find a template suitable for your needs.
4. Understanding the Toolbar
Take a look at the toolbar on the left side of the screen. Here, you'll find tools to add elements, text, images, and more. The simplicity of the toolbar makes it easy for users to navigate and experiment with different design elements.
5. Accessing Text Tools
Locate the text tool in the toolbar. Clicking on it will reveal various text options, including pre-designed text layouts and the ability to add your own text boxes. This is where you'll start incorporating text into your designs.
6. Navigating the Design Canvas
Once you've chosen a template and added text elements, familiarize yourself with the design canvas. This is where you'll arrange and customize your design further. Drag and drop elements, resize, and experiment until you achieve the desired look.
7. Saving and Exporting
Before finalizing your design, remember to save your work. Canva automatically saves your progress, but it's good practice to use the "Save" button. When satisfied with your design, use the "Download" button to export your creation in various formats such as PNG, JPG, or PDF.
With these essential steps, you're now equipped to embark on your creative journey with Canva. Experiment with different features, and don't hesitate to explore advanced options as you become more comfortable with the platform.
Locating the Text Box Tool
Adding text to your Canva design is a fundamental step in creating engaging visuals. To get started, you'll need to locate the Text Box tool. Follow these steps to find and use this essential feature:
1. Opening a Design
Begin by opening the design where you want to add a text box. If you're starting from scratch, choose a blank canvas or select a template that suits your project.
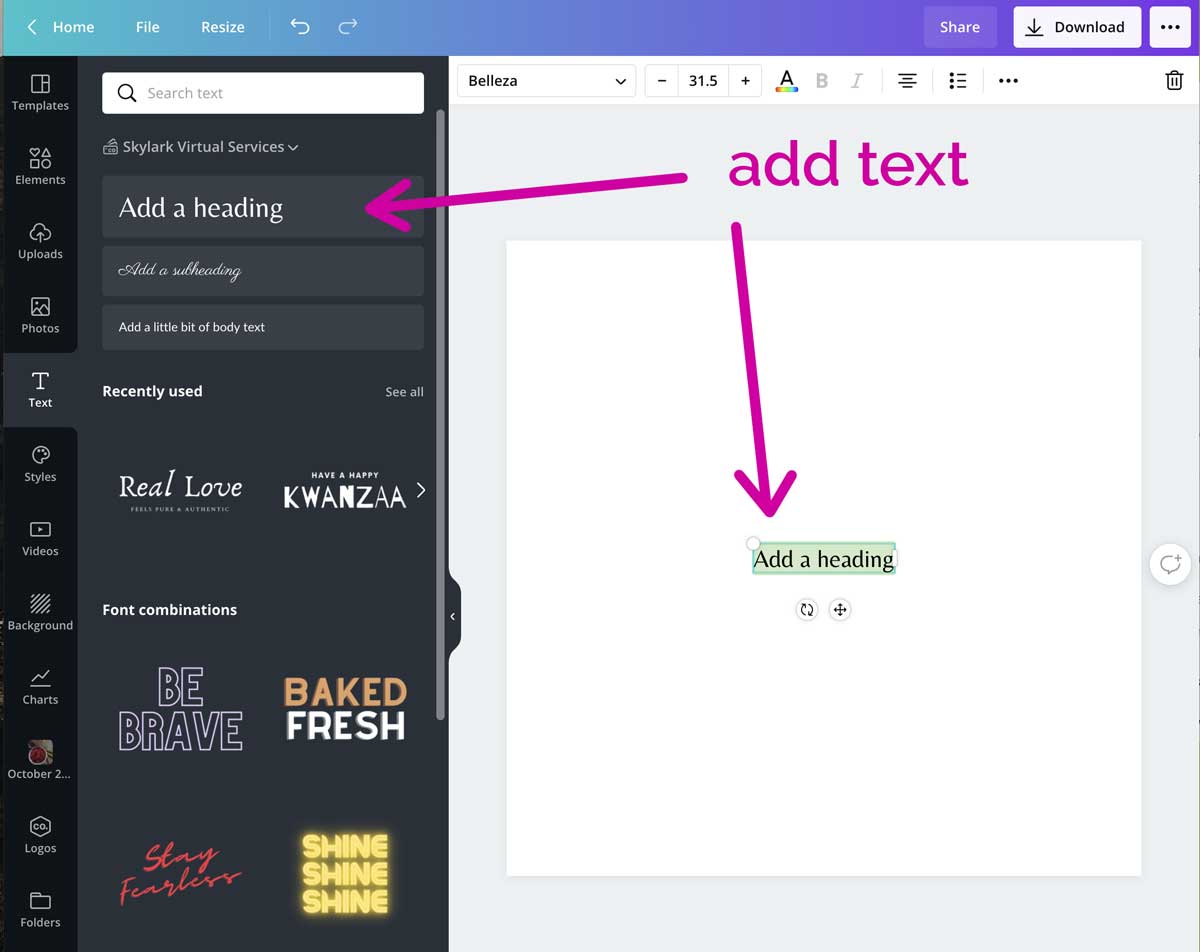
2. Accessing the Text Tools
On the left side of the Canva interface, you'll find the toolbar. Look for the "Text" tool, represented by the letter 'T.' Click on it to reveal a dropdown menu with various text options, including pre-designed text layouts and the option to add a text box.
3. Adding a Text Box
Click on the "Add a text box" option to create a blank text box on your canvas. This is where you can input and customize your text. You can also drag and resize the text box to fit your design layout.
4. Utilizing the Text Toolbar
Once you've added a text box, a text toolbar will appear at the top of the screen. This toolbar allows you to customize your text further. You can change the font, size, color, alignment, and more. Experiment with these options to achieve the desired look for your text.
5. Advanced Text Editing
If you want to add more style to your text, explore the advanced text editing options. Canva provides features like bold, italic, underline, and even the ability to add hyperlinks. Highlight the text you want to modify and use the toolbar to apply these formatting options.
6. Copy and Paste
If you have text content outside Canva that you'd like to include, you can simply copy and paste it into a text box. This makes it easy to import content from other sources directly into your design.
7. Grouping and Layering
As you add text boxes and other elements to your design, it's important to understand how to group and layer them. Use the toolbar options to arrange elements in the desired order, ensuring your design looks polished and professional.
By following these steps, you'll effortlessly locate and utilize the Text Box tool in Canva, opening up a world of possibilities for creative text design in your projects.
Also Read This: What Payment Methods Can I Use on Fiverr?
Creating a Text Box
Now that you've located the Text Box tool in Canva, let's delve into the process of creating a text box and customizing it to suit your design needs. Follow these simple steps to add and enhance text boxes in your Canva projects:
1. Selecting the Text Tool
Start by selecting the Text tool from the toolbar on the left side of the Canva interface. This tool is represented by the letter 'T.'
2. Adding a Blank Text Box
Click on the "Add a text box" option to create a blank text box on your canvas. This blank canvas allows you to input your own text and gives you the flexibility to design it according to your preferences.
3. Inputting Text
Once the text box is created, simply click inside it and type or paste your desired text. You can easily adjust the font style, size, and color using the options available in the Text toolbar that appears at the top of the screen.
4. Formatting Text
Experiment with formatting options to make your text visually appealing. Use bold text to emphasize important points or headings. Italicize for a touch of style, and underline to highlight key information. The toolbar provides a range of formatting tools for creative text customization.
5. Adjusting Text Box Size and Position
Drag the corners of the text box to resize it according to your layout. You can also reposition the text box by clicking and dragging it to a new location on the canvas. This level of control ensures your text seamlessly integrates into your design.
6. Adding Bulleted or Numbered Lists
If your content includes a list, use the text toolbar to create bulleted or numbered lists. This feature is handy for presenting information in an organized and visually appealing manner.
7. Using Tables for Structured Content
For more complex layouts or structured content, consider using tables. Canva allows you to insert tables into text boxes, providing a structured framework for arranging information neatly. Customize the table properties to fit your specific design requirements.
By following these steps, you'll not only create text boxes in Canva but also enhance them with various formatting options, ensuring your text contributes to the overall visual appeal of your design.
Also Read This: How to Make a PDF for Fiverr
Customizing Text Boxes in Canva
Once you've created a text box in Canva, the next step is to explore the various customization options to make your text visually appealing and aligned with your design goals. Here's a detailed guide on how to customize text boxes effectively:
1. Font Styling and Size
Begin by experimenting with the font style and size. Canva offers a diverse range of fonts to choose from. Select a font that complements your design theme and adjust the size to ensure readability. Bold text can be used for headings or to emphasize important information.
2. Color Palette for Text
Utilize the color palette options to make your text stand out. Choose colors that harmonize with your overall design scheme. Canva allows you to customize the color of the text itself and even the background of the text box for added contrast.
3. Text Alignment and Spacing
Ensure your text is well-aligned by using the alignment options available in the Text toolbar. Adjust the spacing between lines and letters to improve readability. Canva's user-friendly interface allows you to fine-tune these settings effortlessly.
4. Text Effects and Decorations
Explore text effects such as shadows, outlines, and reflections to add a creative touch to your text boxes. Be cautious not to overdo it; subtle effects can enhance the overall design without overwhelming the viewer. Experiment with different decorations to find what suits your style.
5. Opacity and Transparency
If you want to create a layered effect or blend text seamlessly with images, adjust the opacity of the text box. This feature allows you to control the transparency, giving your design a more polished and professional appearance.
6. Adding Icons and Emojis
Enhance your text boxes by incorporating icons or emojis that complement your content. Canva provides a vast library of these elements. Simply drag and drop them into your text box and adjust their size and position as needed.
7. Animation for Dynamic Text
For presentations or digital content, consider using Canva's animation features for dynamic text effects. Add subtle animations to your text boxes to capture your audience's attention without distracting from the main message.
8. Incorporating Lists and Tables
For organized and structured content, use the list and table features within text boxes. Bullet points, numbered lists, and tables can help present information in a clear and visually appealing manner.
By taking advantage of these customization options, you can transform simple text boxes into dynamic and eye-catching elements within your Canva designs.
Also Read This: Should I Give a Fiverr Seller My Instagram Login Info?
Tips and Tricks for Text Box Design
Unlock the full potential of text boxes in Canva by implementing these tips and tricks to elevate your design game. These strategies will help you create visually appealing and effective text elements for any project:
1. Consistent Font Choices
Maintain a consistent and cohesive look throughout your design by sticking to a few carefully chosen fonts. Limiting your font choices helps create a polished and professional appearance.
2. Contrast and Readability
Ensure optimal readability by selecting font colors that contrast well with the background. Dark text on a light background or vice versa enhances visibility. Experiment with bold text for headings to create visual hierarchy.
3. White Space for Clarity
Embrace white space around your text boxes to avoid visual clutter. Ample white space enhances readability and gives your design a clean and sophisticated look. Use padding within the text box to achieve this effect.
4. Layering for Depth
Create depth in your design by strategically layering text boxes and other elements. Utilize Canva's layering options to arrange text elements in a visually appealing manner, adding depth and dimension to your overall composition.
5. Font Pairing Techniques
If you choose to use multiple fonts, employ font pairing techniques for a harmonious and complementary look. Combine a bold, attention-grabbing font for headings with a more neutral font for body text to create a balanced design.
6. Gradient and Texture Effects
Experiment with gradient effects or subtle textures within your text boxes to add visual interest. Canva offers a variety of gradient options and textures that can be applied to text, providing a unique and captivating design element.
7. Creative Use of Text Boxes
Think beyond traditional rectangular text boxes. Canva allows you to create custom shapes and utilize unconventional text box placements. Experiment with circular, diagonal, or custom-shaped text boxes to inject creativity into your designs.
8. Collaboration and Feedback
Collaborate with team members or seek feedback from others before finalizing your design. Canva's collaboration features enable you to share your work, receive input, and make improvements collaboratively.
9. Mobile Responsiveness
Consider the mobile responsiveness of your design. Test how your text boxes appear on different devices to ensure a seamless user experience across various screen sizes. Adjust font sizes and spacing as needed for optimal display.
By implementing these tips and tricks, you'll not only enhance the visual appeal of your text boxes but also create designs that captivate and effectively communicate your message in Canva.
Also Read This: What is Better Than Fiverr: Exploring Alternative Platforms for Freelancers
Common Issues and Solutions
While working with text boxes in Canva, users may encounter various challenges. Understanding common issues and their solutions will help you navigate potential hurdles and create a smoother design process. Here are some typical problems and how to address them:
1. Text Cut-off or Overflow
Issue: Sometimes, when the text content is too long, it might get cut off or overflow outside the text box.
Solution: Adjust the size of the text box or consider reducing the font size to ensure that all text remains within the designated space.
2. Font Rendering Differences
Issue: Fonts may appear differently when exported or viewed on different devices.
Solution: Stick to web-safe fonts to minimize discrepancies. Alternatively, convert your text to outlines before exporting to maintain font consistency.
3. Alignment and Spacing Problems
Issue: Text may not align properly or spacing may look uneven.
Solution: Use the alignment tools in the Text toolbar to ensure proper alignment. Adjust line and letter spacing as needed for a polished look.
4. Unwanted Text Box Resizing
Issue: Text boxes may resize unintentionally, disrupting your layout.
Solution: Lock the text box size by clicking on the lock icon in the toolbar. This prevents accidental resizing and maintains your intended design.
5. Limited Font Options
Issue: You might feel restricted by the available fonts in Canva.
Solution: While Canva offers a wide range of fonts, you can also import custom fonts. Upgrade to Canva Pro for additional font choices or upload your own font files.
6. Issues with Text Box Transparency
Issue: Adjusting text box transparency may not yield the expected result.
Solution: Check if there are other elements behind the text box affecting transparency. Make sure to adjust the transparency settings appropriately.
7. Collaborative Editing Challenges
Issue: Collaborating on a design with others may lead to conflicting changes.
Solution: Communicate with collaborators and use Canva's version history feature to revert to previous versions if needed. Coordinate changes to avoid conflicts.
8. Mobile Responsiveness Issues
Issue: Designs may not look as intended on mobile devices.
Solution: Test your design on various screen sizes and adjust text sizes and layouts to ensure mobile responsiveness. Canva's responsive design features can also assist in this aspect.
By proactively addressing these common issues and implementing the suggested solutions, you can enhance your experience with text boxes in Canva and achieve seamless and professional designs.
Also Read This: How to Make a Freelancer Account on Fiverr
FAQ
Explore the frequently asked questions related to adding text boxes in Canva for a better understanding of this essential design feature:
Q1: How do I add a text box in Canva?
A: To add a text box in Canva, simply select the Text tool from the toolbar, click on "Add a text box," and then click anywhere on your canvas to create the text box. You can then input and customize your text within the box.
Q2: Can I change the font and size of the text in a text box?
A: Absolutely! Canva provides various options to customize your text. Use the Text toolbar to change the font, size, color, and other formatting options for the text within your text box.
Q3: How do I resize and move a text box in Canva?
A: To resize a text box, click and drag the corners. To move it, click inside the text box and drag it to the desired location on your canvas. You can also use the alignment tools for precise positioning.
Q4: Are there options for text effects in Canva?
A: Yes, Canva offers various text effects such as shadows, outlines, and reflections. Explore the Text toolbar to access these effects and enhance the visual appeal of your text.
Q5: Can I add bulleted or numbered lists in a text box?
A: Certainly! Use the Text toolbar to create bulleted or numbered lists within your text box. This is a handy feature for organizing information in a structured and visually appealing manner.
Q6: How do I collaborate on a design with others in Canva?
A: Canva allows collaborative editing. Simply click on the "Share" button, enter the email addresses of your collaborators, and assign permissions. You can work on the same design in real-time.
Q7: Is it possible to use custom fonts in Canva?
A: Yes, you can use custom fonts in Canva. Canva Pro offers additional font choices, or you can upload your own font files to create a unique and personalized look for your text.
Q8: How do I ensure my design is mobile-responsive?
A: Test your design on various devices to ensure mobile responsiveness. Adjust text sizes and layouts as needed, and utilize Canva's responsive design features for optimal display on different screen sizes.
Conclusion
Congratulations on mastering the art of adding and customizing text boxes in Canva! In this guide, we've covered everything from locating the Text Box tool to advanced customization techniques. As you continue your design journey, keep these key takeaways in mind:
Embrace Creativity
Text boxes are not just functional elements; they're opportunities for creativity. Experiment with different fonts, colors, and effects to make your text boxes visually engaging.
Consistency is Key
Maintain consistency in font choices, colors, and spacing to create a cohesive design. Consistency enhances the professionalism and aesthetic appeal of your visuals.
Collaborate Effectively
Utilize Canva's collaboration features to work seamlessly with others. Share your designs, gather feedback, and make collaborative edits to produce outstanding results.
Responsive Design Matters
Test your designs on various devices to ensure a seamless user experience. Adjust text sizes and layouts for optimal display on different screen sizes, enhancing accessibility.
Continual Learning
Canva is a dynamic platform with continuous updates and new features. Stay informed about the latest enhancements to make the most of the tools available for your design projects.
With these insights, you're well-equipped to leverage text boxes as powerful elements in your Canva designs. Whether you're creating social media graphics, presentations, or promotional materials, the skills you've gained will contribute to the success of your visual storytelling. Happy designing!


