
Image cropping is a fundamental aspect of graphic design that holds immense significance in creating visually compelling and professional-looking content. It goes beyond the simple act of removing unwanted elements from an image; rather, it plays a crucial role in shaping the overall composition and impact of a design. Let's delve into the reasons why mastering the art of image cropping matters, especially in the context of Canva:
- Composition Enhancement: Image cropping allows designers to carefully frame their visuals, emphasizing the essential elements and eliminating distractions. This, in turn, enhances the overall composition of the design, guiding the viewer's focus to the most important aspects.
- Focal Point Emphasis: By strategically cropping an image, designers can highlight specific focal points, drawing attention to key elements within the visual narrative. This technique is particularly useful for storytelling and conveying a specific message in a design.
- Adaptation to Different Platforms: Different platforms have varying specifications for image dimensions. Mastering image cropping enables designers to tailor their visuals to fit the requirements of specific platforms, ensuring optimal display and engagement across various mediums, such as social media, websites, and print materials.
- Consistent Visual Style: Establishing a consistent visual style is essential for brand identity and recognition. Through precise image cropping, designers can maintain a cohesive look and feel across their projects, reinforcing the brand's aesthetic and leaving a lasting impression on the audience.
Now, let's explore how Canva, a user-friendly graphic design tool, facilitates effective image cropping. Canva provides a seamless interface where users can easily access and utilize the cropping feature to achieve their design goals. The platform offers a variety of tools and functionalities that empower designers to crop images with precision and creativity.
Understanding the importance of image cropping in the broader context of design allows designers to approach their projects with a more intentional and strategic mindset. It's not just about trimming edges; it's about sculpting visual narratives and creating designs that resonate with audiences across diverse platforms and mediums.
Getting Started with Canva
Embarking on your graphic design journey with Canva is an exciting endeavor, and understanding the basics is crucial for a seamless experience. Here's a step-by-step guide to help you get started with Canva and access its powerful image cropping features:
- Create a Canva Account: Begin by signing up for a Canva account. You can choose from various subscription plans, including a free version with essential features and a premium version with additional perks.
- Navigate the Canva Dashboard: Once logged in, familiarize yourself with the Canva dashboard. The intuitive interface provides easy access to a myriad of design options, templates, and tools.
- Select or Upload an Image: Start a new project by selecting the type of design you want to create. You can choose from templates or create a custom design. Upload an image by clicking on the "Uploads" tab and selecting your desired file.
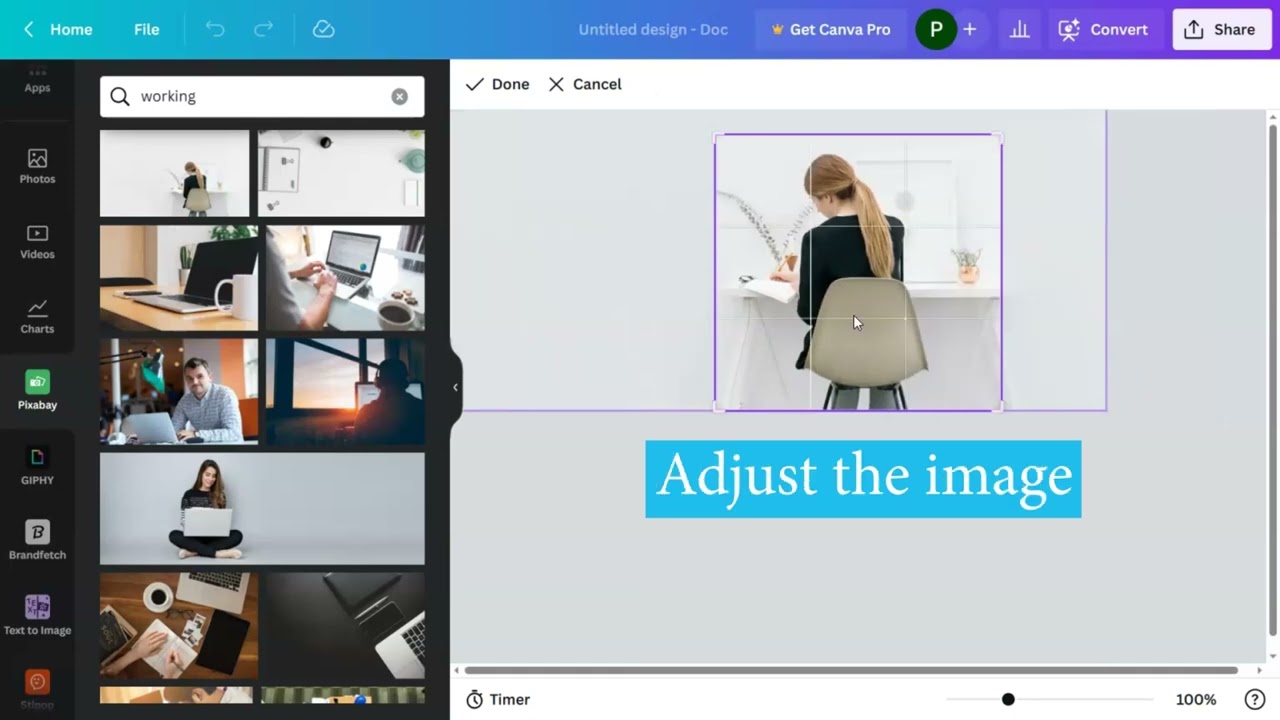
- Access the Cropping Tool: With your image added to the design, locate the cropping tool. It's usually represented by a square or rectangle icon with overlapping corners. Click on this icon to open the cropping panel.
- Basic Cropping: Canva's cropping tool allows for basic adjustments. Drag the corners or edges of the cropping frame to modify the dimensions. Ensure the "Lock" icon is active to maintain the original aspect ratio, or deactivate it for freeform cropping.
Now, let's take a closer look at the cropping tool in Canva and its essential features:
| Feature | Description |
|---|---|
| Aspect Ratio Lock | Toggle this feature to maintain the original aspect ratio or enable freeform cropping. |
| Grid and Alignment | Utilize the grid and alignment options to ensure precision in cropping and maintain visual harmony. |
| Rotate and Flip | Experiment with rotating and flipping options within the cropping tool for creative adjustments. |
As you navigate Canva's cropping features, don't hesitate to experiment and explore. The platform's user-friendly design encourages creativity, making it easy for both beginners and experienced designers to achieve their desired results. Stay tuned for our upcoming sections, where we'll delve into advanced cropping techniques and provide tips for optimizing your designs in Canva!
Also Read This: Thriving as a Social Media Freelancer
Understanding Aspect Ratios
Aspect ratios play a pivotal role in image cropping, influencing the visual impact and presentation of your designs. An aspect ratio is the proportional relationship between the width and height of an image, and understanding it is crucial for creating visually appealing graphics. Let's delve into the significance of aspect ratios and how they come into play in the context of image cropping:
When it comes to graphic design, different platforms and mediums have specific requirements for image dimensions. Aspect ratios help maintain consistency and ensure that your visuals look optimal across various devices and spaces. Here are some key aspects to consider:
- Common Aspect Ratios: Familiarize yourself with common aspect ratios used in design, such as 16:9 for widescreen displays, 1:1 for square formats (commonly used in social media), and 4:3 for standard screens. Each ratio conveys a different visual experience, so choose one that aligns with your design goals.
- Platform-Specific Ratios: Different platforms, whether it's social media, websites, or print, may have specific aspect ratio requirements. It's essential to adapt your designs to fit these ratios to ensure your content looks well-proportioned and professional.
- Impact on Composition: The aspect ratio of an image significantly influences its composition. For example, a widescreen format might be suitable for cinematic visuals, while a square format may work better for showcasing individual elements with equal importance.
Now, let's break down the concept of aspect ratios within the context of Canva:
| Aspect Ratio | Common Use |
|---|---|
| 16:9 | Widescreen presentations, videos, and digital displays. |
| 1:1 | Square format for social media posts and profile pictures. |
| 4:3 | Standard screens, presentations, and some social media platforms. |
As you navigate Canva's cropping tool, pay attention to the aspect ratio options available. Whether you're maintaining the original ratio for consistency or experimenting with creative variations, understanding aspect ratios will empower you to make informed decisions during the image cropping process. Stay tuned for our step-by-step guide on effectively utilizing aspect ratios in Canva to enhance your designs!
Also Read This: How to Create a Fiverr Profile: A Step-by-Step Guide
Step-by-Step Guide to Cropping in Canva
Cropping images in Canva is a straightforward process, but mastering the nuances can greatly enhance the visual impact of your designs. Follow this step-by-step guide to make the most of Canva's cropping features and create compelling visuals:
- Open Your Project: Begin by opening your Canva project or starting a new one. Ensure you've uploaded the image you want to crop to the design.
- Access the Cropping Tool: Locate the cropping tool within Canva. It's typically represented by a square or rectangle icon with overlapping corners. Click on this icon to open the cropping panel.
- Choose an Aspect Ratio: Before making any adjustments, decide on the aspect ratio for your image. You can maintain the original ratio for consistency or opt for a specific ratio that suits your design goals. Use the dropdown menu in the cropping panel to select the desired aspect ratio.
- Adjust the Crop Frame: Drag the corners or edges of the cropping frame to adjust the dimensions. If you've chosen a specific aspect ratio, the frame will maintain that ratio. To crop freely, deactivate the "Lock" icon on the cropping panel.
- Utilize Grid and Alignment: Canva provides grid and alignment options to assist in precise cropping. Enable the grid to guide your adjustments, and use alignment tools to ensure elements within the frame are well-positioned.
- Rotate and Flip: Experiment with the rotate and flip options within the cropping tool for creative adjustments. This is particularly useful when you want to explore unconventional compositions.
- Review and Confirm: Take a moment to review your cropped image within the design. Ensure that it aligns with your vision and enhances the overall composition. Once satisfied, click on the "Apply" or "Done" button to confirm your crop.
Understanding the step-by-step process of cropping in Canva allows you to maintain precision and creativity in your designs. Whether you're crafting social media posts, presentations, or any other visual content, this guide empowers you to tailor your images to perfection.
Remember, practice makes perfect. Experiment with different aspect ratios, cropping techniques, and creative adjustments to discover the full range of possibilities within Canva's cropping tool. Stay tuned for our exploration of advanced cropping techniques in the next section, where we'll delve into non-destructive cropping, custom shapes, and more!
Also Read This: How Much Can You Earn from Fiverr as a Beginner
Advanced Cropping Techniques
As you become more proficient with image cropping in Canva, it's time to explore advanced techniques that can elevate your designs to new levels of creativity and sophistication. Let's delve into these advanced cropping techniques, unlocking a realm of possibilities within Canva's versatile graphic design platform:
- Non-Destructive Cropping: Canva allows you to crop images without permanently altering the original. To achieve non-destructive cropping, duplicate the image layer before applying the crop. This way, you can always revert to the original if needed, offering flexibility in your design process.
- Custom Shapes: Break away from traditional rectangular or square crops by using custom shapes. Canva provides a variety of shape elements that can serve as unique frames for your images. Experiment with circles, triangles, or other shapes to add a distinctive touch to your visuals.
- Overlay and Masking: Enhance the visual appeal of your cropped images by incorporating overlays and masking. Apply semi-transparent shapes or textures over your images to create intriguing effects. Masking allows you to reveal specific portions of an image while concealing others, adding depth and complexity to your designs.
- Creative Composition: Think outside the conventional boundaries of cropping by experimenting with creative compositions. Tilt or angle your crops, overlap images, or create dynamic arrangements. This technique adds a dynamic and artistic flair to your designs, catching the viewer's eye with unexpected visual elements.
Now, let's explore these advanced cropping techniques in a practical context:
| Technique | Description |
|---|---|
| Non-Destructive Cropping | Duplicate the image layer before cropping to maintain the original and have the flexibility to revert or make further adjustments. |
| Custom Shapes | Experiment with Canva's shape elements to create unique frames and break away from traditional cropping conventions. |
| Overlay and Masking | Add overlays or use masking techniques to introduce textures, shapes, or reveal specific parts of an image for creative effects. |
| Creative Composition | Explore dynamic compositions by tilting, angling, or overlapping images to bring an artistic and attention-grabbing quality to your designs. |
By incorporating these advanced cropping techniques, you'll not only enhance your design skills but also infuse a unique and professional touch into your visual content. Stay tuned for our final section where we'll provide valuable tips for achieving consistent and professional results in your Canva designs!
Also Read This: What Does Rendering Mean in Fiverr?
FAQ
Here are some frequently asked questions about image cropping in Canva, along with detailed answers to help you navigate the process seamlessly:
Q: Can I undo a crop in Canva?
A: Yes, you can undo a crop in Canva. If you've applied a crop and wish to revert to the original image, simply click on the "Undo" button (usually represented by a backward arrow) in the toolbar. This will step back through your actions, allowing you to undo the crop.
Q: Can I crop an image to a specific size or dimension?
A: Absolutely. Canva provides an option to set a specific aspect ratio or dimension for your crop. When using the cropping tool, select the desired aspect ratio from the dropdown menu in the cropping panel. This ensures that your crop adheres to the specified size.
Q: What is the difference between destructive and non-destructive cropping?
A: Destructive cropping permanently alters the original image, while non-destructive cropping preserves the original and allows you to make changes without affecting the base image. To achieve non-destructive cropping in Canva, duplicate the image layer before applying the crop.
Q: How do I align elements within the cropped frame?
A: Canva offers grid and alignment options to help you align elements precisely within the cropped frame. Activate the grid for visual guidance, and use alignment tools to ensure elements are positioned accurately.
Q: Can I rotate or flip an image within the cropping tool?
A: Yes, you can. The cropping tool in Canva includes options for rotating and flipping an image. These features allow you to explore creative compositions and orientations within the cropped frame.
These frequently asked questions cover essential aspects of image cropping in Canva. If you have additional queries or encounter challenges, Canva's support resources and community forums are valuable places to seek further assistance. Now that you're armed with knowledge, confidently venture into the world of image cropping and design with Canva!
Also Read This: The Best Description Samples For A Data Entry Profile on Fiverr
Tips for Consistent and Professional Results
Achieving consistent and professional results in your Canva designs involves a combination of technical skill, creativity, and attention to detail. Here are some valuable tips to ensure your images are not only visually appealing but also convey a polished and cohesive aesthetic:
- Define a Visual Style: Before diving into your design, establish a consistent visual style that aligns with your brand or project. Define color schemes, typography, and overall design elements that you'll consistently apply throughout your images.
- Use Templates Wisely: Canva offers a plethora of templates for various design purposes. While templates can be a great starting point, customize them to suit your specific needs. This ensures that your designs remain unique and tailored to your brand or message.
- Maintain a Consistent Aspect Ratio: Stick to a specific aspect ratio for your images to maintain a uniform look across your designs. Consistency in aspect ratios is crucial, especially if you're creating content for multiple platforms or mediums.
- Pay Attention to Alignment: Proper alignment is key to a professional-looking design. Use Canva's alignment tools to ensure that elements within your cropped images are well-positioned and balanced. This attention to detail enhances the overall visual harmony.
- Experiment with Filters and Effects: Canva offers a range of filters and effects that can add a touch of professionalism to your images. However, use them judiciously. Overusing filters can detract from the clarity and impact of your designs.
- Optimize for Different Platforms: If you're creating content for various platforms, consider the specific requirements of each. Optimize your images for social media, websites, or print by adjusting dimensions, aspect ratios, and resolutions accordingly.
- Seek Feedback: Before finalizing your designs, seek feedback from peers, colleagues, or your target audience. Fresh perspectives can provide valuable insights and help you identify areas for improvement.
- Practice Non-Destructive Editing: Embrace non-destructive editing techniques, especially when experimenting with advanced cropping. Duplicate layers before making significant changes to preserve the original image and maintain flexibility in your design process.
By incorporating these tips into your Canva design workflow, you'll be well-equipped to consistently produce professional and visually engaging images. Remember, the key is a balance between creativity and precision, ensuring that your designs effectively communicate your message while maintaining a polished and cohesive aesthetic.
Conclusion
Congratulations on navigating the intricacies of image cropping in Canva! In this comprehensive guide, we've explored the fundamental concepts, step-by-step processes, and advanced techniques to empower you in mastering this essential skill. As we conclude, let's recap the key takeaways and encourage you on your continued journey in graphic design:
- Importance of Image Cropping: Image cropping is more than a mere editing function; it's a powerful tool for enhancing composition, focus, and overall aesthetics in your designs.
- Getting Started with Canva: Whether you're a beginner or a seasoned designer, the user-friendly interface of Canva provides a solid foundation for your graphic design endeavors. From accessing the cropping tool to adjusting dimensions, Canva offers a versatile platform for your creative expressions.
- Understanding Aspect Ratios: Aspect ratios play a crucial role in maintaining consistency across different platforms. By understanding common ratios and adapting your designs accordingly, you ensure that your visuals are well-proportioned and visually appealing.
- Step-by-Step Guide: The step-by-step guide provided insights into the cropping process within Canva. From choosing aspect ratios to utilizing grid and alignment features, these techniques enable you to craft precise and visually striking designs.
- Advanced Cropping Techniques: Elevate your designs by exploring advanced techniques such as non-destructive cropping, custom shapes, and creative compositions. These techniques add a layer of sophistication and uniqueness to your visual creations.
- FAQ and Tips: Addressing common questions about Canva's cropping features and providing tips for achieving professional results, we've equipped you with the knowledge needed to troubleshoot challenges and refine your design skills.
As you continue honing your skills in Canva and exploring the boundless possibilities of image cropping, remember that practice and experimentation are key. Don't hesitate to push your creative boundaries and embrace the dynamic nature of graphic design. Your unique voice and style will undoubtedly shine through as you apply these insights to your future projects.
Thank you for joining us on this journey. May your designs be impactful, engaging, and a true reflection of your creative vision. Happy designing!


