
Canva provides a robust set of outlining tools that empower users to enhance the visual impact of their designs. These tools are versatile and user-friendly, making the outlining process accessible to both beginners and experienced designers alike.
1. Stroke and Border Options:
Canva offers a variety of stroke and border options, allowing you to define the edges of your elements precisely. You can customize the thickness, color, and style of the outline to complement your design theme. This feature is particularly useful when you want to create a defined border around shapes or text.
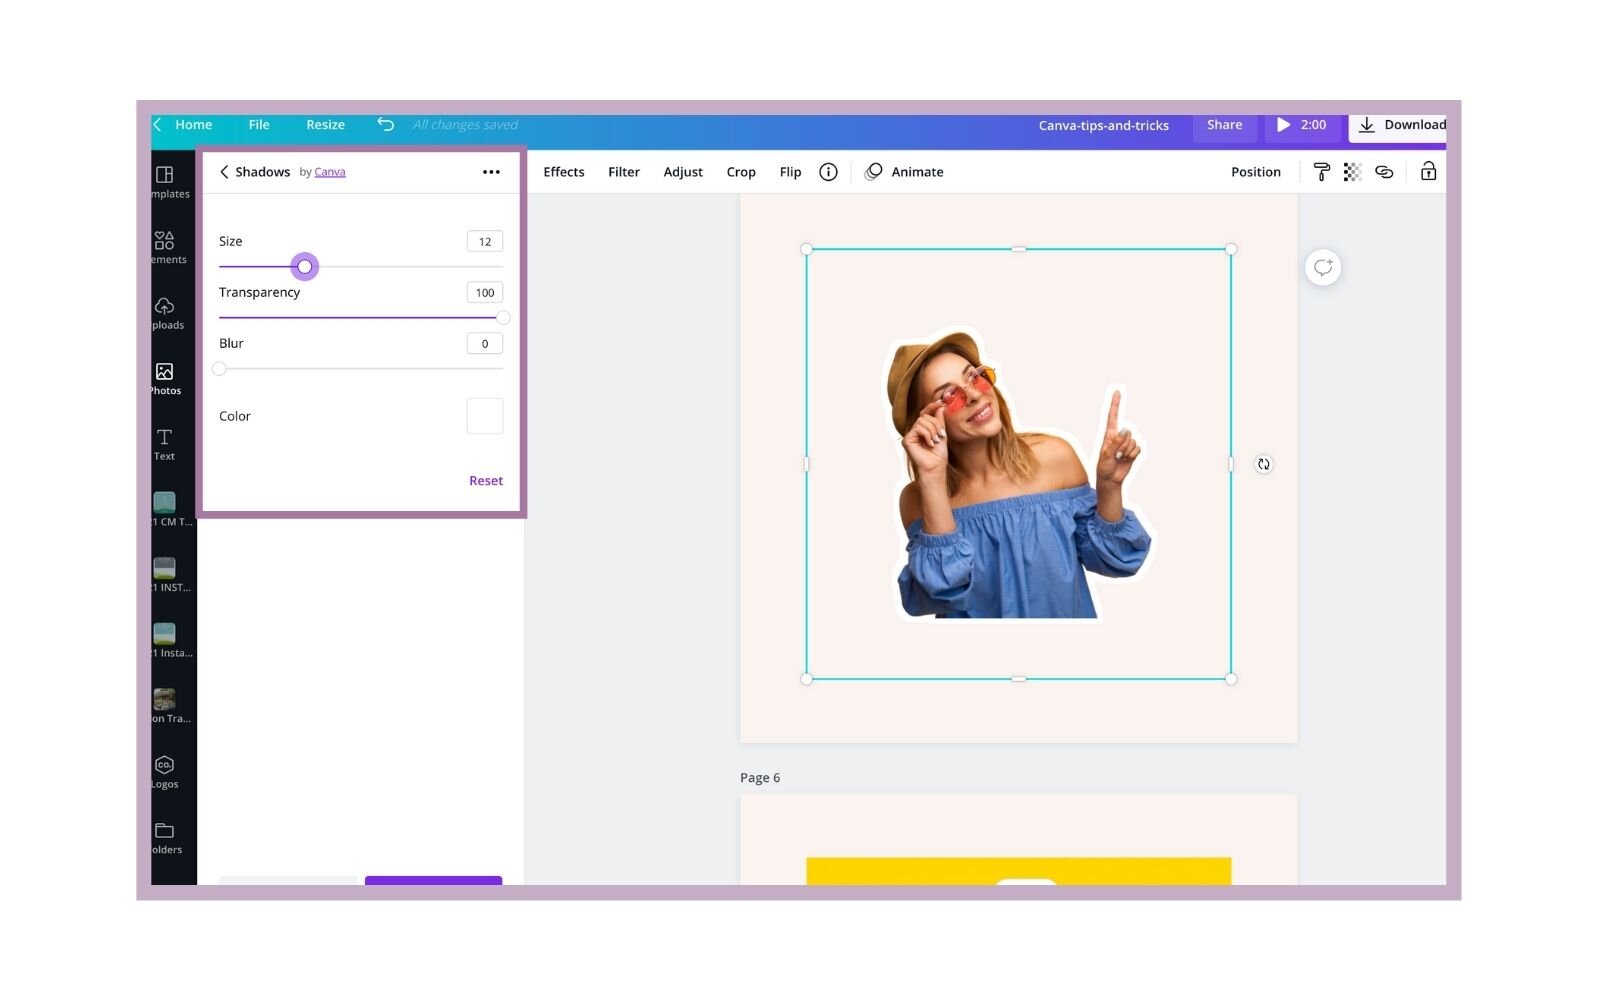
2. Shadow Effects:
Utilize Canva's shadow effects to add depth and dimension to your outlined elements. Shadows can be adjusted in terms of opacity, angle, and distance, providing a subtle yet impactful way to highlight your designs. This tool is perfect for creating a professional and polished look for your visuals.
3. Glow and Neon Effects:
For a more dynamic and eye-catching outline, explore the glow and neon effects in Canva. These options allow you to add a vibrant and luminous touch to your outlined elements, making them stand out against the background. Experiment with different colors and intensities to achieve the desired effect.
4. Transparency Settings:
Adjust the transparency of your outlines to strike the right balance between prominence and subtlety. Canva's transparency settings enable you to create elegant and blended outlines that seamlessly integrate with your overall design. This feature is especially handy when working on layered compositions.
5. Layering and Ordering:
Take advantage of Canva's layering and ordering options to control the arrangement of outlined elements in your design. Proper layering ensures that outlines do not overlap incorrectly and allows you to fine-tune the visual hierarchy of your composition.
Whether you're outlining text, shapes, or images, Canva's array of tools gives you the flexibility to achieve the desired aesthetic for your designs. Experiment with different combinations and settings to discover the full potential of Canva's outlining features.
Step-by-Step Guide to Outlining in Canva
Embarking on the journey of outlining in Canva is a creative endeavor that can significantly enhance the visual appeal of your designs. Follow this comprehensive step-by-step guide to master the art of outlining:
- Open Canva: Log in to your Canva account or sign up if you're new. Access the Canva editor to begin your design process.
- Create a New Design: Start a new design project based on your specific requirements. Whether it's a social media post, presentation, or any other format, Canva provides templates for various design needs.
- Import or Add Elements: Upload the image or elements you want to outline. You can use the existing elements in Canva or upload your own images for customization.
- Select the Element: Click on the element you wish to outline. This could be text, shapes, or images within your design canvas.
- Access Outlining Tools: Look for the outlining tools in the toolbar. Depending on the version of Canva you're using, these tools may include stroke and border options, shadow effects, glow, neon effects, and transparency settings.
- Adjust Outline Settings: Customize the outline settings according to your design preferences. Experiment with different stroke thickness, colors, shadow angles, and transparency levels until you achieve the desired look.
- Layering and Ordering: Pay attention to the layering and ordering of elements. Ensure that outlined elements are appropriately positioned in relation to other design elements for a visually cohesive result.
- Preview and Refine: Take advantage of Canva's preview feature to see how your outlined design looks in its entirety. Make any necessary refinements to achieve the perfect balance and harmony in your composition.
Additionally, consider using the following table as a quick reference guide for Canva's outlining tools:
| Tool | Function |
|---|---|
| Stroke and Border Options | Define the edges of elements with customizable thickness, color, and style. |
| Shadow Effects | Add depth and dimension with adjustable opacity, angle, and distance. |
| Glow and Neon Effects | Create vibrant and luminous outlines for a dynamic visual impact. |
| Transparency Settings | Adjust the transparency of outlines for elegant and blended effects. |
| Layering and Ordering | Control the arrangement of outlined elements for proper visual hierarchy. |
By following these step-by-step instructions and utilizing Canva's diverse outlining tools, you'll be well on your way to creating visually stunning and professionally outlined designs.
Also Read This: Do You Pay After Services Have Been Rendered on Fiverr?
Tips for Choosing the Right Outlining Style
Choosing the right outlining style in Canva is crucial for achieving the desired impact in your designs. Here are valuable tips to guide you in selecting the perfect outlining style for various scenarios:
- Consider the Design Theme: Align the outlining style with the overall theme of your design. For professional and corporate designs, a clean and subtle outline may be more suitable, while creative and bold designs could benefit from vibrant and dynamic outlining styles.
- Balance Thickness: Adjust the thickness of the outline based on the size and type of element you are outlining. Larger elements may require thicker outlines for visibility, while smaller details may benefit from finer strokes.
- Harmonize with Colors: Ensure that the color of the outline complements the colors used in the rest of your design. Harmonizing colors creates a cohesive and polished look, enhancing the overall visual appeal.
- Experiment with Shadow and Glow: Explore the use of shadow and glow effects in conjunction with outlining. Shadows can add depth, while glows create a striking effect. Balance these effects to avoid overwhelming the design.
- Consider Readability: If you are outlining text, prioritize readability. Choose an outlining style that enhances the visibility of the text without overshadowing the content. Bold and clear outlines work well for improving text legibility.
- Adapt to Platform Requirements: If your design will be shared on specific platforms (e.g., social media), consider the platform's visual specifications. Some platforms may have guidelines that influence the ideal outlining style for optimal presentation.
- Review Industry Standards: Familiarize yourself with outlining styles commonly used in your industry. Adhering to industry standards can convey a sense of professionalism and align your designs with prevailing trends.
- Combine Styles for Emphasis: Don't hesitate to combine multiple outlining styles within a design to emphasize different elements. Experimenting with a variety of styles can add depth and interest to your visual composition.
As a quick reference, consult the following table summarizing key considerations for choosing the right outlining style:
| Consideration | Guidance |
|---|---|
| Design Theme | Align with the overall theme for cohesion. |
| Balance Thickness | Adjust based on element size for visibility. |
| Harmonize with Colors | Ensure the outline color complements the design. |
| Experiment with Effects | Use shadow and glow effects judiciously for impact. |
| Consider Readability | Prioritize legibility when outlining text. |
| Adapt to Platform | Align with visual specifications of the intended platform. |
| Review Industry Standards | Familiarize yourself with prevailing industry outlining styles. |
| Combine Styles for Emphasis | Experiment with multiple styles to highlight different elements. |
By considering these tips and utilizing the outlined guidance, you'll be equipped to make informed decisions and choose the perfect outlining style to elevate your designs in Canva.
Also Read This: How Many Gigs Can I Create on Fiverr?
Common Mistakes to Avoid
While outlining in Canva can significantly enhance your designs, it's essential to be aware of common mistakes that can detract from the overall visual impact. Here's a list of pitfalls to avoid when working with outlining in Canva:
- Overdoing Effects: Resist the temptation to overuse outlining effects such as shadows, glows, or neon effects. Overdoing these effects can lead to a cluttered and visually overwhelming design. Opt for moderation to maintain a professional and polished appearance.
- Ignoring Element Proportions: Pay attention to the proportions of the elements you're outlining. Using overly thick outlines on small details or thin outlines on large elements can disrupt the visual balance of your design. Ensure that the outline thickness complements the size and type of each element.
- Neglecting Color Harmony: Failing to harmonize the color of the outline with the overall color scheme of your design can result in a disjointed and unprofessional look. Choose colors that complement and enhance the overall visual appeal of your composition.
- Skipping Readability Checks: If you're outlining text, overlooking readability checks is a common mistake. Ensure that the outlined text remains legible against the background. Adjust the outline color and thickness to maintain optimal readability.
- Disregarding Platform Guidelines: Different platforms may have specific guidelines for visual elements. Ignoring these guidelines when creating outlined designs for social media or other platforms can lead to issues with formatting and presentation. Always adhere to platform specifications for a seamless experience.
- Underestimating Layering: Proper layering is crucial when outlining multiple elements. Failing to organize layers appropriately can result in overlaps and unintended visual distortions. Pay attention to the layering order to maintain the intended composition.
- Ignoring User Accessibility: Consider the accessibility of your outlined designs. Ensure that users with varying visual abilities can still engage with and comprehend the content. High contrast and clear outlines contribute to a more inclusive design.
- Forgetting Preview Checks: Neglecting to preview your outlined design before finalizing can lead to unpleasant surprises. Always take the time to preview your work to identify and rectify any issues before sharing or publishing.
Refer to the following table for a concise summary of common mistakes and recommended practices:
| Mistake | Recommendation |
|---|---|
| Overdoing Effects | Moderation in using outlining effects for a polished look. |
| Ignoring Element Proportions | Ensure outline thickness complements each element's size. |
| Neglecting Color Harmony | Harmonize outline color with the overall design scheme. |
| Skipping Readability Checks | Adjust outline color and thickness for optimal text readability. |
| Disregarding Platform Guidelines | Adhere to platform specifications for consistent presentation. |
| Underestimating Layering | Organize layers to prevent overlaps and distortions. |
| Ignoring User Accessibility | Create designs with high contrast for better accessibility. |
| Forgetting Preview Checks | Preview designs to identify and address issues before finalizing. |
By steering clear of these common pitfalls and following the recommended practices, you'll ensure that your outlined designs in Canva maintain a high level of professionalism and visual appeal.
Also Read This: How to Open a Gig on Fiverr
FAQs
Exploring the world of outlining in Canva may raise questions, and we're here to provide answers to some frequently asked questions. Let's address common queries to enhance your understanding of Canva's outlining features:
-
-
Q: Can I outline any element in Canva?
-
A: Yes, Canva allows you to outline various elements, including text, shapes, and images. Simply select the element you want to outline and use the available outlining tools in the toolbar.
-
-
Q: Are there predefined outlining styles in Canva?
-
A: Canva provides a range of outlining tools with customizable options. While there may not be predefined styles, you can tailor the thickness, color, and effects to create your unique outlining style.
-
-
Q: How can I remove an outline from an element?
-
A: To remove an outline, select the element and navigate to the outlining tools. Set the outline thickness to zero or choose the option to remove the outline, depending on the version of Canva you're using.
-
-
Q: Can I animate outlined elements in Canva?
-
A: As of the current version, Canva doesn't offer built-in animation for outlined elements. However, you can export your design and use external tools to add animations if animation is a specific requirement.
-
-
Q: How do I ensure my outlined text remains readable?
-
A: Maintain text readability by choosing an appropriate outline color and thickness. Ensure there is enough contrast between the text and background to enhance legibility.
-
-
Q: Can I use outlining for print designs?
-
A: Yes, outlining in Canva can be applied to designs intended for print. However, consider the resolution and color profile requirements for print to ensure optimal output.
-
-
Q: Are there keyboard shortcuts for outlining in Canva?
-
A: While Canva offers various keyboard shortcuts, specific shortcuts for outlining may vary. Check Canva's official documentation or use the keyboard shortcut menu within the editor for the most up-to-date information.
For a quick reference, consult the following table summarizing key FAQs and answers:
| Question | Answer |
|---|---|
| Can I outline any element in Canva? | Yes, you can outline text, shapes, and images in Canva using the outlining tools. |
| Are there predefined outlining styles in Canva? | No predefined styles, but you can customize thickness, color, and effects for a unique style. |
| How can I remove an outline from an element? | Select the element, go to outlining tools, and set thickness to zero or choose the option to remove the outline. |
| Can I animate outlined elements in Canva? | Canva doesn't offer built-in animation, but you can use external tools post-export. |
| How do I ensure my outlined text remains readable? | Choose an appropriate outline color and thickness, ensuring contrast with the background. |
| Can I use outlining for print designs? | Yes, apply outlining to designs for print, considering resolution and color profile requirements. |
| Are there keyboard shortcuts for outlining in Canva? | Check Canva's documentation or the keyboard shortcut menu for the latest information. |
By addressing these FAQs, you'll be better equipped to navigate Canva's outlining features and make the most of your design journey.
Also Read This: How to Optimize My Fiverr Gig
Showcasing Outlined Designs
Witness the transformative power of outlining in Canva as we delve into showcasing outlined designs that exemplify creativity and professionalism. These examples illustrate the diverse applications and visual impact of outlining in design:
-
-
Graphic Illustrations:
-
Explore graphic illustrations where outlining is used to define intricate details, add depth, and create a visually captivating composition. Whether it's illustrating characters, objects, or landscapes, outlining contributes to the overall aesthetic appeal.
-
-
Branding and Logos:
-
Discover how outlining plays a crucial role in branding and logo design. Logos often utilize clean and precise outlines to ensure brand recognition and convey a sense of professionalism. The outlining serves to define the logo's elements and enhance their visibility.
-
-
Social Media Graphics:
-
Uncover the impact of outlining in social media graphics. From posts to cover images, outlining helps create attention-grabbing visuals that stand out in crowded feeds. Bold outlines, combined with vibrant colors, contribute to the overall visual appeal of social media content.
-
-
Typography and Text Designs:
-
Explore the use of outlining in typography and text-based designs. Outlining text can add emphasis, create stylish headers, and enhance the overall readability of textual content. Experiment with different outline styles to elevate the typography in your designs.
-
-
Product Packaging:
-
Examine product packaging designs that leverage outlining to highlight key elements and create a polished look. Outlining can be used to emphasize product features, logos, and branding elements, contributing to a cohesive and attractive packaging design.
-
-
Event Posters and Flyers:
-
See how outlining enhances event posters and flyers. Whether promoting concerts, workshops, or festivals, outlining can be employed to create eye-catching event visuals. The use of outlining ensures that important details and graphics are prominently displayed.
-
-
Web Design Elements:
-
Witness the application of outlining in web design elements. From buttons to icons, outlining adds a layer of sophistication and clarity to various web components. Well-crafted outlines contribute to an intuitive and visually appealing user interface.
-
-
Artistic Compositions:
-
Explore artistic compositions where outlining transcends traditional design boundaries. Artists and creators often use outlining as a stylistic choice, pushing the boundaries of creativity and expressing unique visual narratives.
For a closer look at these showcased designs, refer to the following table highlighting key design categories and their respective outlining applications:
| Design Category | Outlining Application |
|---|---|
| Graphic Illustrations | Define intricate details and add depth to illustrations. |
| Branding and Logos | Ensure brand recognition and convey professionalism in logos. |
| Social Media Graphics | Create attention-grabbing visuals in social media content. |
| Typography and Text Designs | Add emphasis, style, and readability to textual content. |
| Product Packaging | Highlight key elements and contribute to attractive packaging. |
| Event Posters and Flyers | Enhance visuals for promoting events with eye-catching designs. |
| Web Design Elements | Add sophistication and clarity to various web components. |
| Artistic Compositions | Express unique visual narratives through artistic choices. |
By exploring these showcased designs, you'll gain inspiration for incorporating outlining into your own creative projects, unlocking the full potential of Canva's outlining features.
Also Read This: Why Did VoiceoverPete Get Banned from Fiverr?
Benefits of Outlining in Canva
Unlock the full potential of your designs by harnessing the benefits of outlining in Canva. Discover how incorporating outlining into your creative process can elevate the visual appeal and overall professionalism of your projects:
-
-
Enhanced Visibility:
-
Outlining allows you to define and emphasize elements within your design, ensuring they stand out against the background. This enhanced visibility is particularly useful for highlighting key information, such as text, logos, or important graphics.
-
-
Professional Polishing:
-
Give your designs a polished and professional look with the precision of outlining. Whether it's refining the edges of shapes, creating clear distinctions in text, or adding a finishing touch to illustrations, outlining contributes to a refined and sophisticated aesthetic.
-
-
Visual Hierarchy:
-
Establish a clear visual hierarchy in your designs by strategically using outlining. By varying the thickness and style of outlines, you can guide the viewer's attention to specific elements, creating a logical flow and emphasizing the importance of certain components.
-
-
Creative Versatility:
-
Explore a wide range of creative possibilities with Canva's outlining tools. From subtle and elegant strokes to bold and dynamic outlines, the versatility allows you to adapt the outlining style to suit the unique requirements of each design, making your creations truly distinctive.
-
-
Distinctive Branding:
-
Outlining plays a crucial role in creating distinctive branding elements. Logos, brand names, and key visuals can benefit from carefully crafted outlines that contribute to brand recognition. Consistent use of outlining across designs reinforces brand identity.
-
-
Improved Readability:
-
When used thoughtfully, outlining can enhance the readability of text in your designs. Clear and well-defined outlines around text elements improve legibility, making your content more accessible and impactful for your audience.
-
-
Efficient Highlighting:
-
Efficiently highlight specific elements within your design using outlining. Whether you want to draw attention to a call-to-action button, a special offer, or a particular feature, outlining provides a practical and aesthetically pleasing method of highlighting focal points.
-
-
Consistent Design Language:
-
Establish a consistent design language across your projects by incorporating outlining as a recurring visual element. Consistency in outlining styles creates a cohesive look, making your designs instantly recognizable and reinforcing your design brand.
By embracing the benefits outlined above, you'll not only enhance the visual appeal of your designs but also elevate the overall quality and impact of your creative endeavors in Canva.
Conclusion
Congratulations on embarking on the journey of outlining in Canva! As we conclude this exploration, let's recap the key takeaways and encourage you to continue infusing creativity and professionalism into your designs:
-
-
Empowering Creativity:
-
Canva's outlining tools empower you to unleash your creativity and add that perfect finishing touch to your designs. Experiment with different styles, effects, and applications to discover the full range of creative possibilities at your fingertips.
-
-
Professional Touch:
-
By mastering the art of outlining, you bring a professional touch to your visual compositions. The refined edges, enhanced visibility, and polished aesthetics contribute to designs that captivate and leave a lasting impression.
-
-
Strategic Application:
-
Strategically apply outlining to guide visual hierarchy, highlight key elements, and create a distinctive design language. Whether you're working on branding, social media graphics, or print materials, the strategic use of outlining elevates your designs.
-
-
Adaptability and Consistency:
-
Enjoy the adaptability and consistency that Canva's outlining features offer. Tailor outlining styles to suit different design needs while maintaining a consistent visual language across your projects, reinforcing your brand identity.
-
-
User Engagement:
-
Consider the benefits of improved visibility, readability, and efficient highlighting in engaging your audience. Outlining becomes a valuable tool for capturing attention, conveying information effectively, and creating designs that resonate with your target audience.
-
-
Ongoing Exploration:
-
As you continue your design journey, remember that outlining is a dynamic and versatile tool. Stay curious, explore new possibilities, and keep pushing the boundaries of your creativity. The world of design is ever-evolving, and your unique contributions play a significant role in shaping it.
In conclusion, embrace the power of outlining in Canva as a means to amplify your creative expression and achieve designs that make a lasting impact. Your artistic journey is a continuous adventure, and with Canva's outlining features, you have a powerful ally to bring your visions to life.


