
In the realm of design, margins play a pivotal role in determining the visual harmony and readability of your creations. Margins are the spaces between the content and the edges of your canvas. Achieving precision in these margins is crucial for a clean and professional design in Canva.
Why Are Margins Important?
Margins provide breathing space for your content, preventing it from feeling cramped. They contribute to visual balance and guide the viewer's eyes through the design. In Canva, understanding the significance of margins is the first step towards creating aesthetically pleasing and well-structured visuals.
How Canva Handles Margins
Canva simplifies the process of setting margins, making it accessible even for those without extensive design experience. Users can easily adjust margins through intuitive controls, ensuring a seamless design process.
Step-by-Step Guide to Setting Margins in Canva
- Open your Canva design project.
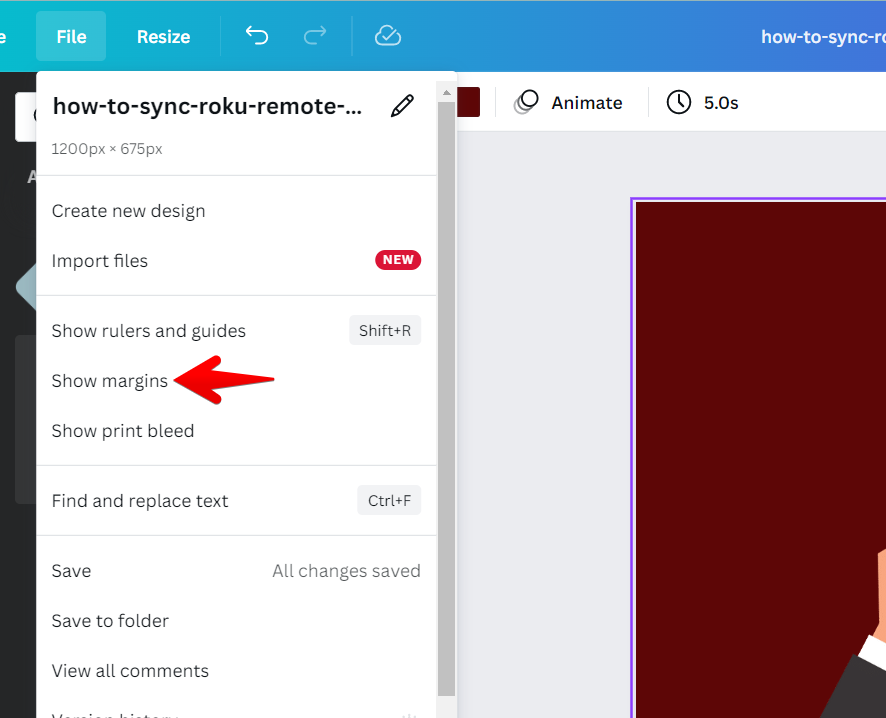
- Locate the "File" menu and select "Page Setup."
- Within the Page Setup menu, find the "Margins" option.
- Adjust the margin values according to your preference. Canva allows for precise numerical input or dragging the margin lines visually.
- Click "Apply" to confirm your margin settings.
Tips for Optimal Margins
1. Consistency is Key: Maintain consistent margins throughout your design for a cohesive look.
2. Consider Content Hierarchy: Adjust margins to highlight important elements and guide the viewer's focus.
3. Whitespace Matters: Embrace whitespace as it enhances the overall readability and elegance of your design.
Common Mistakes to Avoid
Avoid these pitfalls to ensure your designs benefit from precision in margins:
- Overcrowding Content: Too narrow margins can make your design feel cluttered.
- Ignoring Alignment: Misaligned elements can disrupt the visual flow.
Understanding margins in Canva empowers you to create designs that not only capture attention but also convey a sense of professionalism and attention to detail. As we delve deeper into the intricacies of design precision, the next section will guide you through the practical steps of setting margins in Canva.
Step-by-Step Guide
Setting margins in Canva is a straightforward process that significantly enhances the overall look and feel of your design. Follow these simple steps to ensure precision in your margins:
- Open Your Canva Design Project: Log in to your Canva account and open the project you're working on. Whether it's a social media graphic, presentation, or any other design, the margin adjustments can be applied universally.
- Access the "File" Menu: Locate the "File" menu, usually found in the top left corner of the Canva interface. Click on it to reveal a dropdown menu.
- Select "Page Setup": Within the dropdown menu, you'll find the "Page Setup" option. Click on it to access settings related to your canvas.
- Find the "Margins" Option: Look for the "Margins" section within the Page Setup menu. This is where you can customize the margins according to your design requirements.
- Adjust Margins: Canva provides flexibility in adjusting margins. You can either input precise numerical values for the margins or visually adjust them by dragging the margin lines.
- Click "Apply": Once you've set the desired margins, click the "Apply" button to confirm and implement your changes.
By following these steps, you'll have successfully set precise margins for your Canva project. It's important to note that these margins will apply to the entire canvas, providing a consistent and polished look across all elements.
Additional Tips:
- Experiment with Different Margin Sizes: Depending on your design goals, try adjusting margins to see how it impacts the overall composition.
- Consider the Output Medium: If your design will be printed, ensure that your chosen margins account for any potential cropping during the printing process.
Effortlessly incorporating these margin adjustments into your Canva workflow will elevate your designs, making them visually appealing and refined. In the next section, we'll explore practical tips for achieving optimal margins, enhancing the overall aesthetic of your creations.
Also Read This: How to Rank on Fiverr: A Comprehensive Guide
Tips for Optimal Margins
Ensuring optimal margins in your Canva designs is essential for creating visually appealing and well-balanced content. Here are some practical tips to guide you towards achieving the perfect margin settings:
- Consistency is Key: Maintain consistent margin widths throughout your design. This consistency creates a sense of cohesion and professionalism.
- Consider Content Hierarchy: Adjust margins to emphasize the hierarchy of your content. Use wider margins for headers and important elements to guide the viewer's focus.
- Embrace Whitespace: Whitespace, or negative space, is a powerful design element. Allow for sufficient whitespace around your content to enhance readability and create a clean, uncluttered look.
- Balance and Symmetry: Achieve visual balance by ensuring that margins are balanced on all sides of your content. This symmetry contributes to a harmonious and polished design.
Additional Tips for Specific Design Types:
| Design Type | Margin Considerations |
|---|---|
| Social Media Graphics | Opt for slightly wider margins to ensure that your key message or graphic is not cut off when the image is displayed on different platforms. |
| Presentations | Use generous margins to provide a frame for each slide, enhancing the overall professionalism of your presentation. |
| Printed Materials | Consider the printing margins of your chosen printing service. Adjust your Canva margins accordingly to avoid any unintended cropping. |
Experiment and Iterate: Don't hesitate to experiment with different margin sizes to see how they impact the overall aesthetics of your design. Iterate and fine-tune until you achieve the desired look.
By incorporating these tips into your design process, you'll not only set optimal margins but also elevate the visual appeal and professionalism of your Canva creations. In the next section, we'll explore common mistakes to avoid when working with margins in Canva.
Also Read This: Payment Frequency for Freelancers
Common Mistakes to Avoid
While setting margins in Canva can significantly enhance your design, there are common mistakes that designers may fall prey to. Steering clear of these pitfalls is crucial for achieving polished and professional visuals:
- Overcrowding Content: One of the most prevalent mistakes is setting margins too narrow, resulting in cramped content. Adequate whitespace is essential for a balanced and visually pleasing design.
- Ignoring Alignment: Misaligned elements can disrupt the visual flow of your design. Ensure that all elements are properly aligned within the set margins for a cohesive look.
- Inconsistent Margins: Failing to maintain consistent margin widths can create a disjointed appearance. Consistency is key to a professional and well-organized design.
- Neglecting Content Hierarchy: Disregarding the hierarchy of your content in relation to margins can lead to a design that lacks focus. Important elements should have wider margins to draw attention.
Case Studies:
| Scenario | Mistake | Solution |
|---|---|---|
| Website Banner | Text and graphics crowded due to narrow margins. | Widened margins to provide breathing space, improving overall readability. |
| Social Media Post | Uneven margins resulted in a visually unbalanced composition. | Ensured consistent margins on all sides for a more harmonious design. |
Learn from Mistakes:
Understanding and learning from these common mistakes is crucial for growth as a designer. Regularly reviewing and refining your designs based on past experiences will lead to continual improvement.
By avoiding these common pitfalls, you'll be better equipped to create designs that not only look professional but also effectively communicate your intended message. As we move forward, we'll delve into frequently asked questions (FAQs) related to setting margins in Canva.
Also Read This: How to Finalize an Order on Fiverr
FAQs
As designers explore the intricacies of setting margins in Canva, certain questions commonly arise. Here, we address these frequently asked questions to provide clarity and guidance:
Q: Can I Set Different Margins for Different Sections of My Design?
A: Currently, Canva allows users to set uniform margins for the entire canvas. If you require different margins for specific sections, consider creating separate designs or adjusting the layout within a single design.
Q: How Do I Ensure Consistency Across Multiple Designs?
A: To maintain consistent margins across multiple designs, establish a standard margin width and apply it consistently. Save a template with your preferred margins to streamline the process for future projects.
Q: What's the Recommended Margin Size for Social Media Graphics?
A: For social media graphics, it's advisable to have slightly wider margins to prevent important elements from being cut off when the image is displayed on various platforms. Experiment with different sizes to find the optimal balance.
Q: Can I Adjust Margins After Completing My Design?
A: Yes, you can modify margins even after completing your design. Simply revisit the "Page Setup" menu, adjust the margins as needed, and click "Apply" to implement the changes.
Quick Tips for Efficient Margin Management:
| Tip | Explanation |
|---|---|
| Save Margin Preferences in Templates | Create templates with your preferred margin settings for different design types to streamline your workflow. |
| Use Canva's Guides for Precision | Enable Canva's guides to ensure accurate placement of elements within your set margins. |
By addressing these FAQs and providing additional tips for efficient margin management, designers can navigate the Canva interface with confidence and optimize their designs for a professional finish. In the concluding section, we'll summarize the key takeaways and reinforce the importance of precision in design through well-set margins.
Also Read This: How to Take a Skill Test on Fiverr
Case Studies
Real-world examples offer valuable insights into the impact of precise margins on design quality. Let's explore two case studies that highlight the significance of setting margins in Canva:
| Scenario | Challenge | Solution | Outcome |
|---|---|---|---|
| Website Banner Design | The initial design had text and graphics crowded due to narrow margins, resulting in a visually overwhelming banner. | Widened the margins to provide ample breathing space around the content, ensuring a more balanced composition. | The revised design not only looked more professional but also improved overall readability, making it more engaging for website visitors. |
| Social Media Post Creation | The designer neglected to maintain consistent margins on all sides, leading to an uneven and visually unbalanced composition. | Ensured consistent margins across the entire post, creating a harmonious layout and guiding the viewer's focus effectively. | The final design conveyed a sense of professionalism and coherence, garnering positive responses and engagement on social media. |
Key Takeaways from Case Studies:
- Margins Impact Readability: In both cases, the adjustments made to margins directly influenced the readability of the content. Wider margins provided a clearer visual hierarchy, making the designs more effective.
- Consistency Enhances Professionalism: Consistent margins contributed to a more professional and polished appearance. It created a sense of organization and structure in the designs.
These case studies emphasize the practical implications of setting margins in Canva. Designers can learn from these real-world examples to enhance their own projects and deliver visually compelling content. As we conclude our exploration, let's summarize the key insights and reinforce the importance of precision in design through well-established margins.
Also Read This: How Easy Is It to Make Money on Fiverr?
Benefits of Precision in Design
Understanding and implementing precision in design, particularly in setting margins in Canva, offers a range of benefits that contribute to the overall quality and impact of your visual content:
- Professional Aesthetics: Precise margins create a sense of professionalism and attention to detail in your designs, elevating them to a higher standard.
- Improved Readability: Well-defined margins provide breathing space for content, enhancing readability and preventing visual clutter that can hinder comprehension.
- Visual Balance: Setting margins strategically contributes to visual balance, guiding the viewer's eyes smoothly across the design and creating a harmonious composition.
- Enhanced Focus: Optimal margins allow you to emphasize key elements, guiding the viewer's focus and ensuring important content stands out effectively.
Efficient Communication:
Precision in design, including margin settings, is a form of effective communication. It conveys a message of professionalism, organization, and thoughtful presentation, fostering positive engagement with your audience.
Brand Credibility: Consistently applying precision in your designs establishes a level of brand credibility. It communicates to your audience that you value quality and take the time to refine every aspect of your visual content.
As you integrate precision into your design process, particularly when setting margins in Canva, you not only enhance the aesthetics of your creations but also strengthen the overall impact and effectiveness of your visual communication. In conclusion, let's summarize the key insights shared throughout this blog post and reinforce the importance of ensuring precision in design for a professional and engaging visual experience.
Conclusion
As we conclude our exploration into the world of design precision, with a focus on setting margins in Canva, it's evident that attention to detail plays a crucial role in creating visually compelling content. The journey from understanding the significance of margins to exploring practical tips, common mistakes, and real-world case studies has provided valuable insights for designers at every level.
Key Takeaways:
- Margins Matter: The careful consideration of margins is not just a technical aspect but an integral part of design that influences aesthetics, readability, and overall impact.
- Consistency is Crucial: Maintaining consistent margin widths contributes to a cohesive and professional appearance across various design elements and projects.
- Learn from Mistakes: Exploring common mistakes and case studies offers opportunities for growth and improvement in your design journey.
- Communication through Design: Precision in setting margins is a form of communication, conveying professionalism and enhancing brand credibility.
By applying the tips, avoiding common pitfalls, and learning from real-world examples, designers can create content that not only meets but exceeds the expectations of their audience. Whether you're crafting social media graphics, presentations, or any other visual content in Canva, the principles of precision remain fundamental.
Remember, each adjustment to margins is a step towards refining your design skills and presenting your creative ideas with clarity and impact. As you continue your design endeavors, may precision be your guide, leading to visually stunning and professionally crafted creations.


