
Before diving into the intricacies of element navigation, it's essential to familiarize yourself with Canva's intuitive interface. Canva offers a user-friendly workspace designed to simplify the graphic design process for both beginners and professionals.
1. Dashboard Overview:
The Canva dashboard serves as your creative hub, presenting an array of options to start a new project, access templates, or continue previous designs. The left sidebar provides quick access to project types, while the main canvas occupies the central space for design work.
2. Key Elements Identification:
Identifying the primary elements on Canva's interface is crucial for effective navigation. These include:
- Tools Panel: Located on the left, it houses various design tools such as text, elements, and background.
- Top Menu: The top menu offers options for file management, undo/redo, and project settings.
- Canvas: The central canvas is where your design comes to life, and it's essential to understand how to interact with elements within this space.
3. Workspace Customization:
Canva allows users to customize their workspace to suit their preferences. You can zoom in and out, toggle grid lines, and even switch between light and dark modes for a personalized design experience.
4. Elements Panel:
The Elements Panel on the right provides access to a vast library of elements, from illustrations and icons to photos and shapes. This panel is integral to our discussion on element navigation, as it's where you'll select, manipulate, and organize design elements.
5. Page Management:
Understanding how Canva handles pages in a design is essential. The Pages Panel on the left enables you to add, delete, and navigate between different pages within a project, allowing for comprehensive multi-page designs.
As you embark on your design journey in Canva, a solid grasp of its interface will set the foundation for seamless element navigation. In the next sections, we'll explore the practical aspects of moving elements within the canvas, ensuring your designs are not only visually appealing but also well-organized.
Basic Element Handling
Now that we've familiarized ourselves with Canva's interface, let's delve into the fundamental aspects of handling elements within the canvas. Basic element handling involves selecting, moving, and arranging elements to compose your desired design. Here's a comprehensive guide to mastering these foundational skills:
1. Selecting Elements:
The first step in handling elements is selecting them. Click on any element within the canvas to activate it. You'll know an element is selected when its bounding box appears, indicating it's ready for manipulation.
2. Dragging and Dropping:
Canva simplifies element manipulation with an intuitive drag-and-drop feature. Once an element is selected, click and hold the mouse button to drag it to your desired location on the canvas. Release the mouse button to drop the element into place.
3. Resizing Elements:
Effortlessly adjust the size of elements by selecting the corner handles of the bounding box. Hold and drag to resize proportionally, or use the side handles for non-proportional adjustments. This flexibility ensures precise control over your design elements.
4. Rotating Elements:
For added creativity, Canva allows you to rotate elements easily. Select an element, and circular rotation handles will appear. Click and drag these handles to achieve the desired rotation angle, providing dynamic perspectives to your design.
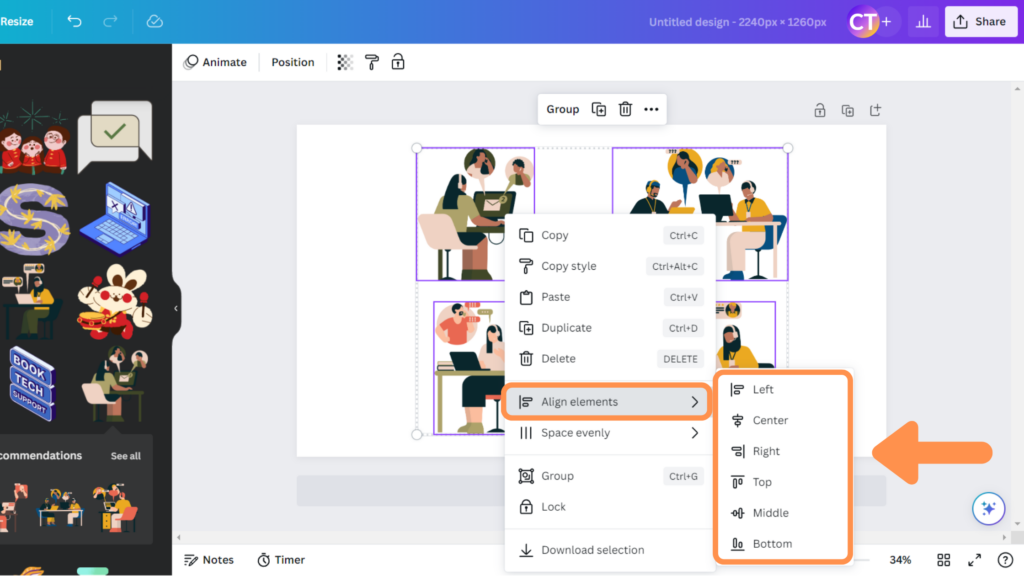
5. Alignment Options:
Canva provides alignment tools to maintain order in your design. Utilize the alignment options in the toolbar to align elements vertically, horizontally, or distribute them evenly. This ensures a polished and organized look to your composition.
6. Layering Elements:
Understanding the layering system is crucial. The layer order determines which elements appear in front or behind others. Use the Arrange menu to bring elements forward, send them backward, or even group them for streamlined editing.
7. Undo and Redo:
Embrace the freedom to experiment by utilizing the undo and redo functions. Mistakes happen, and these shortcuts (Ctrl+Z for undo and Ctrl+Y for redo) ensure you can refine your design without fear of irreversible errors.
By mastering these basic element handling techniques, you're well on your way to creating visually appealing designs with precision and efficiency. In the upcoming sections, we'll explore advanced techniques and keyboard shortcuts to elevate your Canva design skills even further.
Also Read This: How to Start Getting Jobs on Fiverr
Advanced Element Navigation Techniques
Now that you've honed your skills in basic element handling, let's elevate your Canva design game with advanced navigation techniques. These methods provide a deeper level of control and organization, allowing you to create intricate and polished designs effortlessly.
1. Grouping and Ungrouping Elements:
Streamline your workflow by grouping related elements together. Select multiple elements, right-click, and choose "Group." This simplifies complex designs, allowing you to move and manipulate grouped elements as a single unit. Conversely, if you need to edit individual elements within a group, use the "Ungroup" option.
2. Layering for Effective Organization:
Effective layering is key to managing the visual hierarchy of your design. The Layers Panel on the right provides an overview of all elements in your project. Utilize the drag-and-drop functionality within this panel to reorder layers, ensuring elements appear in the desired arrangement.
3. Alignment and Distribution Options:
Refine the precision of your designs with Canva's alignment and distribution tools. Select multiple elements, access the alignment options in the toolbar, and effortlessly align them vertically, horizontally, or distribute them evenly. This ensures a polished and professional look to your composition.
4. Copying and Pasting Elements Efficiently:
Save time by copying and pasting elements with precision. Select an element, right-click, and choose "Copy." Move to your desired location, right-click again, and select "Paste." This allows you to replicate elements effortlessly, maintaining consistency in your design.
5. Utilizing Keyboard Shortcuts:
Boost your efficiency with Canva's keyboard shortcuts. Memorize commonly used shortcuts such as Ctrl+C for copy, Ctrl+V for paste, and Ctrl+G for group. These shortcuts significantly speed up your design process, making navigation more seamless.
6. Advanced Selection Techniques:
Master the art of precise selection by holding down the Shift key while clicking on multiple elements. This allows you to manipulate specific elements without affecting others, providing granular control over your design composition.
7. Collaboration Features:
Collaborate seamlessly with team members by utilizing Canva's collaboration features. Share designs with others, leave comments, and work on projects collaboratively, enhancing overall workflow and productivity.
By incorporating these advanced element navigation techniques into your Canva toolkit, you'll have the tools to create intricate, professional designs efficiently. In the next sections, we'll explore keyboard shortcuts and responsive design strategies to further enhance your Canva experience.
Also Read This: How Does Fiverr Work for Freelancers?
Keyboard Shortcuts for Element Navigation
Efficiency in Canva design is often synonymous with mastering keyboard shortcuts. These time-saving commands provide a quick and seamless way to navigate through elements, enhancing your overall design workflow. Let's explore some essential keyboard shortcuts to elevate your Canva experience:
1. Copy and Paste:
Speed up your design process by using keyboard shortcuts for copy and paste. Press Ctrl+C to copy selected elements and Ctrl+V to paste them into your desired location. This eliminates the need for multiple clicks and streamlines your workflow.
2. Grouping and Ungrouping:
Grouping elements is a powerful organizational tool. Press Ctrl+G to group selected elements together. Conversely, if you need to edit individual elements within a group, use Ctrl+Shift+G to ungroup them. These shortcuts enhance efficiency, especially in complex designs.
3. Undo and Redo:
Experiment with confidence by utilizing the undo and redo shortcuts. Press Ctrl+Z to undo your last action and Ctrl+Y to redo it. These shortcuts offer a safety net, allowing you to refine your design without fear of irreversible mistakes.
4. Select All:
When you need to select all elements on the canvas, use Ctrl+A. This shortcut is particularly useful when you want to apply a universal change or manipulate all elements simultaneously.
5. Cut and Delete:
Quickly remove selected elements from the canvas by using Ctrl+X to cut and Delete to delete. These shortcuts streamline the process of eliminating unwanted elements without interrupting your creative flow.
6. Move Elements Precisely:
Enhance precision in element movement with keyboard shortcuts. Use the arrow keys to nudge selected elements pixel by pixel. Combine arrow keys with Shift for larger increments, providing fine-tuned control over element placement.
7. Bring to Front/Send to Back:
Manage layering effortlessly with Ctrl+] (Bring to Front) and Ctrl+[ (Send to Back). These shortcuts allow you to adjust the stacking order of elements, ensuring the desired visual hierarchy in your design.
Mastering these keyboard shortcuts will significantly boost your efficiency in Canva, making element navigation a breeze. In the following sections, we'll explore responsive design techniques and common troubleshooting tips to further enhance your Canva proficiency.
Also Read This: Why Use Fiverr to Find a Writer
Responsive Design and Element Movement
Creating designs that seamlessly adapt to different platforms is a hallmark of a skilled designer. In this section, we'll explore responsive design strategies in Canva, ensuring your elements move harmoniously across various devices and screen sizes.
1. Grid Systems and Alignment:
Canva's grid system plays a crucial role in responsive design. Utilize the grid to align elements precisely, maintaining consistency across different breakpoints. Aligning elements to the grid ensures a clean and organized layout that translates well to various screen sizes.
2. Element Percentage Sizing:
Instead of fixed pixel sizes, consider using percentage-based sizing for elements. This allows them to scale proportionally when viewed on different devices. Adjust element dimensions by percentage to ensure a responsive and fluid design that adapts to various screen resolutions.
3. Preview for Different Devices:
Canva offers a device preview feature that allows you to see how your design will appear on desktop, tablet, and mobile screens. Use this feature to assess and adjust element placement and sizing for optimal visibility and usability across devices.
4. Dynamic Font Sizing:
Text is a crucial element in any design, and dynamic font sizing ensures readability across devices. Instead of fixed font sizes, use relative units like em or rem to allow text to scale appropriately based on the user's device settings.
5. Test and Iterate:
Responsive design is an iterative process. Test your design on various devices, gather feedback, and make necessary adjustments. Regular testing ensures that your elements not only move responsively but also maintain the intended aesthetic and functionality across the board.
6. Breakpoint Considerations:
Identify key breakpoints in your design where the layout may need to adjust significantly. Adjust element positioning, sizing, and visibility at these breakpoints to create a seamless transition between different screen sizes.
| Device | Recommended Breakpoints |
|---|---|
| Desktop | 1200px and above |
| Tablet | 768px - 1199px |
| Mobile | 767px and below |
By implementing these responsive design strategies and considering the movement of elements across various devices, you'll ensure that your Canva designs look professional and perform well, regardless of the user's chosen platform. In the next section, we'll address common challenges in element placement and provide troubleshooting tips to overcome them.
Also Read This: How Do I Change My Fiverr Password?
Common Challenges and Troubleshooting
While navigating through Canva's design journey, you may encounter common challenges in element placement and manipulation. Understanding these challenges and knowing how to troubleshoot them is essential for maintaining a smooth workflow. Let's explore some typical issues and their solutions:
1. Accidental Element Misplacement:
Mistakes happen, and elements may be unintentionally moved or resized. To address this, utilize the Ctrl+Z shortcut for undoing actions. If you've made multiple changes, you can use the undo history in the toolbar to revert to a specific point in your design process.
2. Challenges in Large Projects:
In complex designs with numerous elements, managing layers and maintaining organization can become challenging. Create a systematic naming convention for layers, group related elements, and utilize folders in the Layers Panel to keep your project well-organized. This ensures easy navigation and reduces the likelihood of errors.
3. Element Overlapping Issues:
Overlapping elements can cause visual clutter and confusion. Utilize Canva's alignment and distribution tools to ensure elements are precisely positioned. If overlapping persists, adjust the layer order using the Ctrl+] (Bring to Front) and Ctrl+[ (Send to Back) shortcuts.
4. Collaboration Conflicts:
When collaborating on a design with others, conflicts may arise due to simultaneous edits. Canva provides real-time collaboration features, but conflicts can still occur. Communicate effectively with your team, and if conflicts arise, review and merge changes to ensure a harmonious design process.
5. Element Selection Challenges:
Precise selection of elements is crucial, especially in intricate designs. If you're having trouble selecting a specific element, use the Shift key to add or subtract elements from the selection. Additionally, zoom in for a closer view to facilitate accurate selection.
6. Exporting and Printing Issues:
When exporting or printing your design, ensure that elements are within the printable area. Check the print preview to identify any issues and adjust element sizes or positions accordingly. This ensures that your designs look as intended in the final output.
By proactively addressing these common challenges and employing troubleshooting techniques, you'll navigate through your Canva design projects more efficiently. In the concluding sections, we'll provide answers to frequently asked questions (FAQ) about Canva element navigation and summarize key takeaways from this comprehensive guide.
Also Read This: Where is Fiverr Located? Exploring the Global Presence of Fiverr
FAQ
Explore answers to frequently asked questions about Canva element navigation to enhance your proficiency and overcome common challenges.
Q1: How can I undo multiple actions in Canva?
A: Canva allows you to undo multiple actions using the undo history in the toolbar. Click on the clock icon, review your recent actions, and revert to a specific point in your design process.
Q2: Is it possible to collaborate on a Canva design in real-time?
A: Yes, Canva offers real-time collaboration features. Share your design with team members, and multiple users can work on the same project simultaneously. Communication is key to resolving conflicts that may arise during collaborative editing.
Q3: What should I do if I accidentally overlap elements in my design?
A: Utilize Canva's alignment and distribution tools to precisely position elements and reduce overlapping. If issues persist, adjust the layer order using shortcuts such as Ctrl+] (Bring to Front) and Ctrl+[ (Send to Back).
Q4: How can I troubleshoot element selection challenges in intricate designs?
A: For precise selection, use the Shift key to add or subtract elements from the selection. Additionally, zoom in for a closer view to facilitate accurate selection in intricate designs.
Q5: Can I export or print my Canva design without any issues?
A: Ensure a smooth export or printing process by checking the print preview and verifying that elements are within the printable area. Adjust element sizes or positions if needed to ensure the desired output.
These frequently asked questions provide valuable insights into resolving common concerns during Canva element navigation. If you have additional queries, explore Canva's comprehensive help resources or community forums for further assistance.
Conclusion
Congratulations on mastering the art of element navigation in Canva! Throughout this comprehensive guide, we've explored the intricacies of moving elements with ease, from basic handling to advanced techniques and responsive design strategies. Let's summarize the key takeaways:
1. Understand Canva's Interface: Familiarize yourself with Canva's dashboard, key elements, and workspace customization options to navigate with confidence.
2. Master Basic Element Handling: Learn to select, drag, resize, and rotate elements efficiently. Explore alignment options and layering for precise organization.
3. Explore Advanced Techniques: Dive into grouping, layering, and utilizing keyboard shortcuts to enhance your workflow. Collaborate effectively with Canva's teamwork features.
4. Embrace Responsive Design: Ensure your designs adapt seamlessly to different devices by utilizing grid systems, percentage sizing, and dynamic font sizing.
5. Troubleshoot Common Challenges: Address accidental misplacements, large project challenges, overlapping issues, collaboration conflicts, selection challenges, and export/printing concerns with effective troubleshooting techniques.
Remember, Canva is a powerful tool that evolves with your design skills. Regular practice, experimentation, and staying informed about updates will contribute to your growth as a proficient Canva designer. Whether you're creating graphics for social media, presentations, or print, mastering element navigation will undoubtedly elevate the impact of your designs.
Keep exploring, stay creative, and enjoy the journey of crafting visually stunning and well-organized designs with Canva!


