
If you’re looking to dive into the world of freelancing, Fiverr is the perfect place to start. With millions of potential clients seeking various services, setting up an account on this platform opens up doors to a plethora of opportunities. This guide will walk you through the process of creating a Fiverr account in simple, easy-to-follow steps, ensuring you get started on the right foot. Whether you’re a graphic designer, writer, or digital marketer, you'll find that navigating Fiverr can be a seamless experience with the right setup.
Step 1: Visit the Fiverr Website
The first step to embarking on your Fiverr journey is to visit their website. Here’s how to do it:
- Open Your Browser:
Launch your preferred web browser. This could be Chrome, Firefox, Safari, or any other browser you're comfortable using.
- Enter the Fiverr URL:
In the address bar, type in www.fiverr.com and press 'Enter'. This will take you directly to the Fiverr homepage.
- Explore the Homepage:
Once you land on the Fiverr homepage, take a moment to explore. You’ll notice various categories of services, popular gigs, and ongoing promotions. This is a good chance to familiarize yourself with the platform and see what kind of services are trending.
- Check for Updates:
Fiverr frequently updates its interface and features, so keep an eye out for any announcements or banners that might provide useful information.
Once you've visited the site, you'll be one step closer to setting up your Fiverr account. The next steps will guide you through the account creation process, making it easy to start offering your services!
Also Read This: Do You Get Paid Right Away on Fiverr?
Step 2: Click on 'Join' to Create an Account
Now that you’re excited to delve into the world of freelance work on Fiverr, the next step is to create an account. This is where things begin to get real!
To start, simply navigate to the Fiverr homepage. In the top right corner, you’ll see a shiny button labeled 'Join'. This button is your gateway to becoming a part of the Fiverr community. Give it a click!
When you click on ‘Join,’ you’ll be greeted with a familiar sight—a registration form that’s simple and user-friendly. Fiverr aims to make it easy for everyone, even if you’re not tech-savvy. Here’s a quick rundown of what you’ll need to do:
- *Click on ‘Join’: Seriously, it’s as easy as that!
- Fill Out the Necessary Fields: You’ll be prompted to enter your email address and a password. Make sure you choose a secure password to keep your account safe.
- Accept the Terms: Make sure to read the terms and conditions—no one wants any surprises, right?
After hitting that delightful 'Join' button, you’re one step closer to sharing your skills with the world. Consider this your first step into the vibrant marketplace of Fiverr!
Also Read This: How to Receive Payment on Fiverr
Step 3: Sign Up Using Your Email or Social Media

Once you’ve clicked that enticing ‘Join’ button, it’s time to make a crucial decision: how do you want to sign up? Fiverr gives you two fantastic options—using your email or connecting through social media. Let’s break it down.
If you choose to sign up with your email, all you need to do is:
- Enter Your Email Address: This should be an account you regularly check, as Fiverr might send you important updates.
- Create a Password: Make this strong but memorable. A mix of letters, numbers, and symbols is a great idea!
- Click 'Continue': This takes you one step closer to setting up your profile!
On the flip side, signing up with social media is a breeze. Fiverr lets you connect through:
- Facebook: Log in with your Facebook account and grant Fiverr access (don't worry, they don't post to your timeline!)
- Google*: Prefer Google? Just click the button and you’re in!
Whichever method you choose, Fiverr will guide you through the next steps smoothly. So, go ahead, select your preferred option, and get ready to dive deeper into your Fiverr adventure!
Also Read This: How to Set Up Selling Editing Services on Fiverr
Step 4: Complete Your Profile
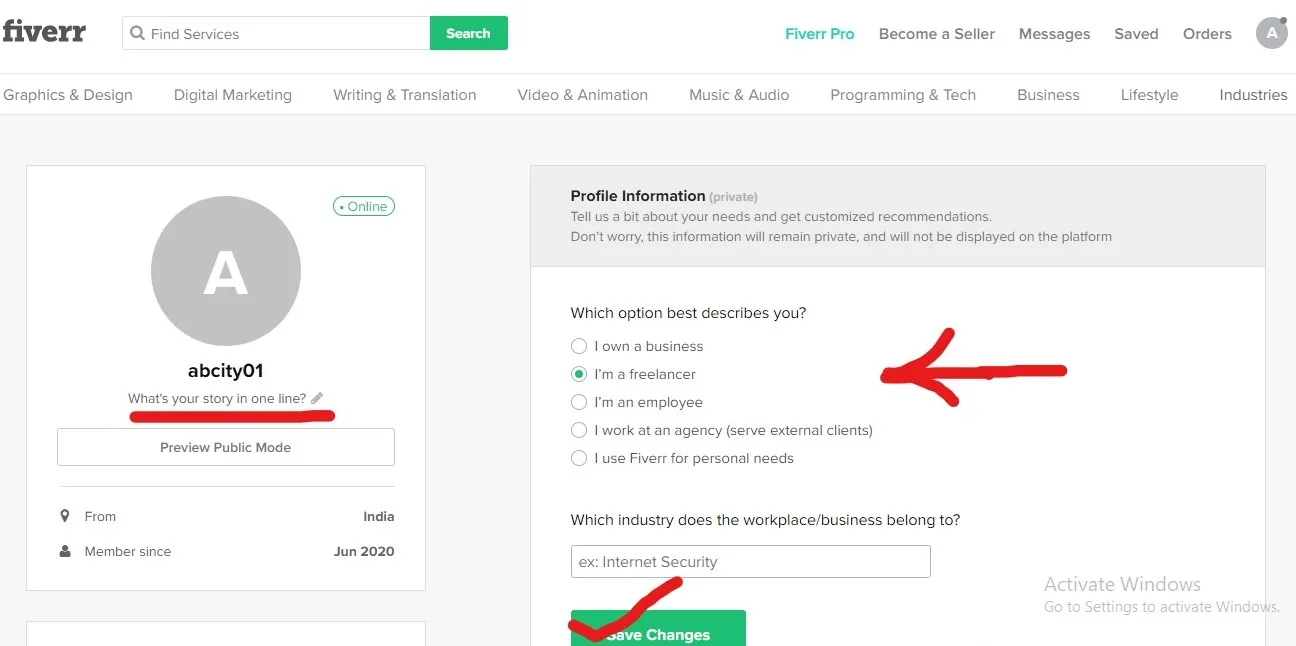
Once you've signed up for your Fiverr account, it's time to make your profile shine! Completing your profile is crucial because it gives potential clients a sense of who you are and what you offer. A well-crafted profile can set you apart from the competition, so let's dive into the key elements you need to consider.
1. Profile Picture: Your profile picture should be clear, professional, and friendly. People are more likely to engage with a human face, so avoid logos or abstract images. If you’re offering services like graphic design or photography, you might even consider using one of your own creations as your image.
2. Username: Choose a username that reflects your brand or the services you provide. Keep it simple and easy to remember. You want to create a name that resonates with the type of gigs you want to offer.
3. Description: Your profile description is your chance to sell yourself. Share your skills, experiences, and what makes you unique. Aim for a friendly tone, but keep it professional. Include keywords related to your services to improve your visibility in search results.
4. Skills: Fiverr allows you to list your top skills, and it's essential to be strategic here. Choose skills closely related to the services you want to offer. This not only helps potential clients find you but also makes you appear more credible.
5. Education and Certifications: If you have relevant education or certifications, showcase them here. It adds an extra layer of trust and shows that you are serious about your work.
Take your time with this step; an impressive profile can attract the right clients!
Also Read This: Does Fiverr Pay? Everything You Need to Know
Step 5: Set Your Preferences and Notifications
Congratulations on completing your profile! Now it’s time to fine-tune your experience by setting your preferences and notifications on Fiverr. This step is often overlooked, but making these adjustments can enhance your workflow significantly.
1. Language Preferences: Choose the languages you feel comfortable communicating in. This not only helps you connect better with your clients but also increases the likelihood of getting projects that fit your language skills.
2. Notification Settings: Fiverr allows you to customize how you receive notifications. You can choose to get alerts via email or through the Fiverr app. Decide what works best for you! For example:
- New messages: Get notified when a client sends you a message.
- Order updates: Stay updated on order status changes.
- Promos and offers: Receive notifications about special Fiverr promotions.
3. Availability Settings: Make sure to set your availability status. This is essential if you’re juggling multiple projects or if you have specific times when you’re open for business. It helps manage client expectations.
4. Payment Preferences: Ensure your payment methods are set up correctly. You can choose to receive payments through various methods, such as PayPal or bank transfers. Setting this up right away will ensure you can focus on your work without worrying about getting paid.
By customizing these settings, you create a working environment that feels tailored to your needs. Happy freelancing!
Also Read This: Top List of Fiverr Jobs for Students Without Investment
Step 6: Create Your First Gig
Alright, now that you've made it through the initial steps of creating your Fiverr account, it's time to roll up your sleeves and get creative. Your first gig is your chance to shine and showcase your skills, so let’s get into the nitty-gritty of setting it up!
Here’s a simple breakdown of what you need to do:
- Select a Gig Title: This is your first impression, so make it catchy but clear. Aim for around 80 characters that highlight your service.
- Choose a Category: Fiverr will guide you through selecting the most appropriate category for your gig. Make sure it really matches what you offer.
- Add Tags: Tags help potential buyers find your gig. Include relevant keywords that describe your service—focus on about five tags.
- Describe Your Offering: Write a detailed description that explains what you’re offering, how it benefits the buyer, and what you’ll deliver. Keep it engaging and easy to read!
- Set Your Pricing: Fiverr allows for tiered pricing. Think about what you want to offer at each level (basic, standard, premium) and ensure your prices reflect the value you're providing.
- Upload Eye-Catching Media: Use high-quality images or videos to showcase your gig. This is a visual platform—make it pop!
- Review and Publish: Double-check everything, make sure it’s as polished as it can be, and hit the publish button!
Remember, the more effort you put into your gig, the better your chances of attracting customers. Happy gigging!
Also Read This: How Old Do You Need to Be to Work on Fiverr?
Step 7: Explore the Platform and Get Involved
With your first gig up and running, it’s time to dive deeper into the Fiverr universe. Exploring the platform and engaging with the community can help you boost your visibility and refine your offerings.
Here are some great ways to get involved:
- Browse Other Gigs: Check out what similar sellers are offering. This can give you inspiration for your own gigs and help you understand competitive pricing.
- Join Fiverr Forums: The forums are filled with fellow freelancers eager to share tips and experiences. Engaging in these discussions can provide you with valuable insights.
- Participate in Seller Events: Fiverr often hosts webinars and events where you can learn from top sellers. Make sure to take advantage of these offerings.
- Follow Fiverr on Social Media: Keeping up with Fiverr's social media accounts can keep you informed about platform updates and new features.
- Create a Portfolio: As you complete gigs, gather your work to create a portfolio that potential buyers can check out. This builds trust and showcases your expertise.
- Ask for Feedback: After delivering services, kindly request reviews from your clients. Positive reviews enhance your credibility and attract more customers.
Remember, the more interconnected you are with the Fiverr community, the more opportunities you'll uncover! Happy exploring!
How to Setup a Fiverr Account: A Step-by-Step Guide
Setting up a Fiverr account is a straightforward process that can open doors to freelance opportunities and help you monetize your skills. Follow this step-by-step guide to create your Fiverr profile and start offering your services today.
Step 1: Visit the Fiverr Website
Begin by navigating to fiverr.com. Here, you’ll find the option to sign up for an account.
Step 2: Create an Account
Click on the “Join” button at the top right corner. You can sign up using:
- Your email address
- Your Google account
- Your Facebook account
After entering your preferred method, follow the prompts to complete the registration process.
Step 3: Verify Your Email
Once you sign up, check your email for a verification link from Fiverr. Click the link to verify your account.
Step 4: Set Up Your Profile
After verification, log in to your Fiverr account and go to your profile settings. Here’s what to include:
- Profile Picture: Upload a clear and professional photo.
- Profile Description: Write a brief introduction about your skills and services.
- Languages: Indicate the languages you speak.
- Skills: List relevant skills that you can offer on Fiverr.
Step 5: Create Your First Gig
To offer your services, you’ll need to create a "Gig." Here’s a simple framework:
| Description | Details |
|---|---|
| Title | Write a catchy and clear title for your service. |
| Category | Select the appropriate category for your gig. |
| Pricing | Set your price, and consider offering tiered packages. |
| Delivery Time | Determine how long it will take you to complete orders. |
| Requirements | List any information you need from buyers to start. |
Step 6: Publish Your Gig
Once you complete all fields, click the “Publish” button. Your gig is now live for potential buyers to see!
Step 7: Promote Your Gig
After publishing, promote your gig through social media, forums, or communities to attract buyers.
With these steps, you’re now ready to dive into the world of freelancing on Fiverr. Setting up a Fiverr account is the first step toward sharing your talents and earning money. Best of luck!


