
Creating a new gig on Fiverr can be an exciting journey, especially if you're eager to showcase your skills and connect with potential clients. Whether you're a graphic designer, writer, coder, or offer any other service, Fiverr provides a platform to monetize what you love doing. In this guide, we'll walk you through the process, starting from setting up your account to crafting the perfect gig that attracts buyers. Let’s dive right in!
Step 1: Sign in to Your Fiverr Account
Before you can start creating your gig, you need to be logged into your Fiverr account. If you're new to Fiverr, it’s essential to register first. Here’s how you can sign in:
- Visit the Fiverr Website:
Open your preferred web browser and go to www.fiverr.com.
- Click on "Log In":
On the top right corner of the homepage, you’ll see a "Log In" button. Click it to proceed.
- Enter Your Credentials:
You'll be prompted to enter your email and password. In case you registered using a social media account, you can log in via that platform as well. Just click on the appropriate social media icon (like Facebook or Google) to continue.
- Security Verification:
Sometimes, Fiverr might ask you to complete a captcha to verify you’re a human. Just follow the prompts, and you’re good to go!
- Your Dashboard:
Once logged in, you'll be directed to your Fiverr dashboard. This is where all the magic happens—your gigs, orders, and messages will be right at your fingertips.
Being signed in is your first step toward creating a gig that reflects your unique offerings. So, make sure you have a functional account, and let’s get started on your gig creation adventure!
Also Read This: How Many Buyer Requests on Fiverr: Understanding the Request System
Step 2: Navigate to the 'Selling' Menu
Alright, now that you've logged into your Fiverr account, it’s time to kickstart the process of creating your very own gig. The first step in this journey is to find the 'Selling' menu located on the Fiverr dashboard. This area holds the keys to all the magic you're about to create!
To find the 'Selling' menu, simply look for it on the left-hand side of your screen. It’s usually marked in bold, making it easy to spot. Once you locate it, give it a click! This action will open up a dropdown menu that reveals a few more exciting options.
- Manage Gigs: This is where you can see all your existing gigs and their performance.
- Add New Gig: This is your golden ticket to start crafting a new service to offer!
- Orders: Keep track of the gigs you've completed and any ongoing projects.
So, take a moment to explore! The 'Selling' menu is where the heart of your Fiverr business beats. Once you're familiar with this space, you're ready to move on to the next step.
Also Read This: What Can I Do in Fiverr? A Comprehensive Guide
Step 3: Click on 'Gigs'

Now that you've navigated to the 'Selling' menu, your next stop is to click on the 'Gigs' option. This step is critical because, let’s face it, creating gigs is what Fiverr is all about!
Once you click on 'Gigs', you'll be directed to a screen that showcases all the gigs you’ve created before. But don’t worry if you’re just getting started; it’ll be mostly empty! Here’s what you can expect:
- If you have existing gigs, they’ll be displayed here with performance metrics, allowing you to see what’s working and what might need a little touch-up.
- You’ll also see a prominent button labelled “Create New Gig”. This is your starting point for crafting an exciting new offering!
By clicking on this button, you’ll enter a series of prompts guiding you through the gig creation process. This is where your ideas come to life, so be ready to express your unique skills. So go ahead, click on 'Gigs', and let the creativity flow!
Also Read This: Recommended Charge for a Freelance Project Manager
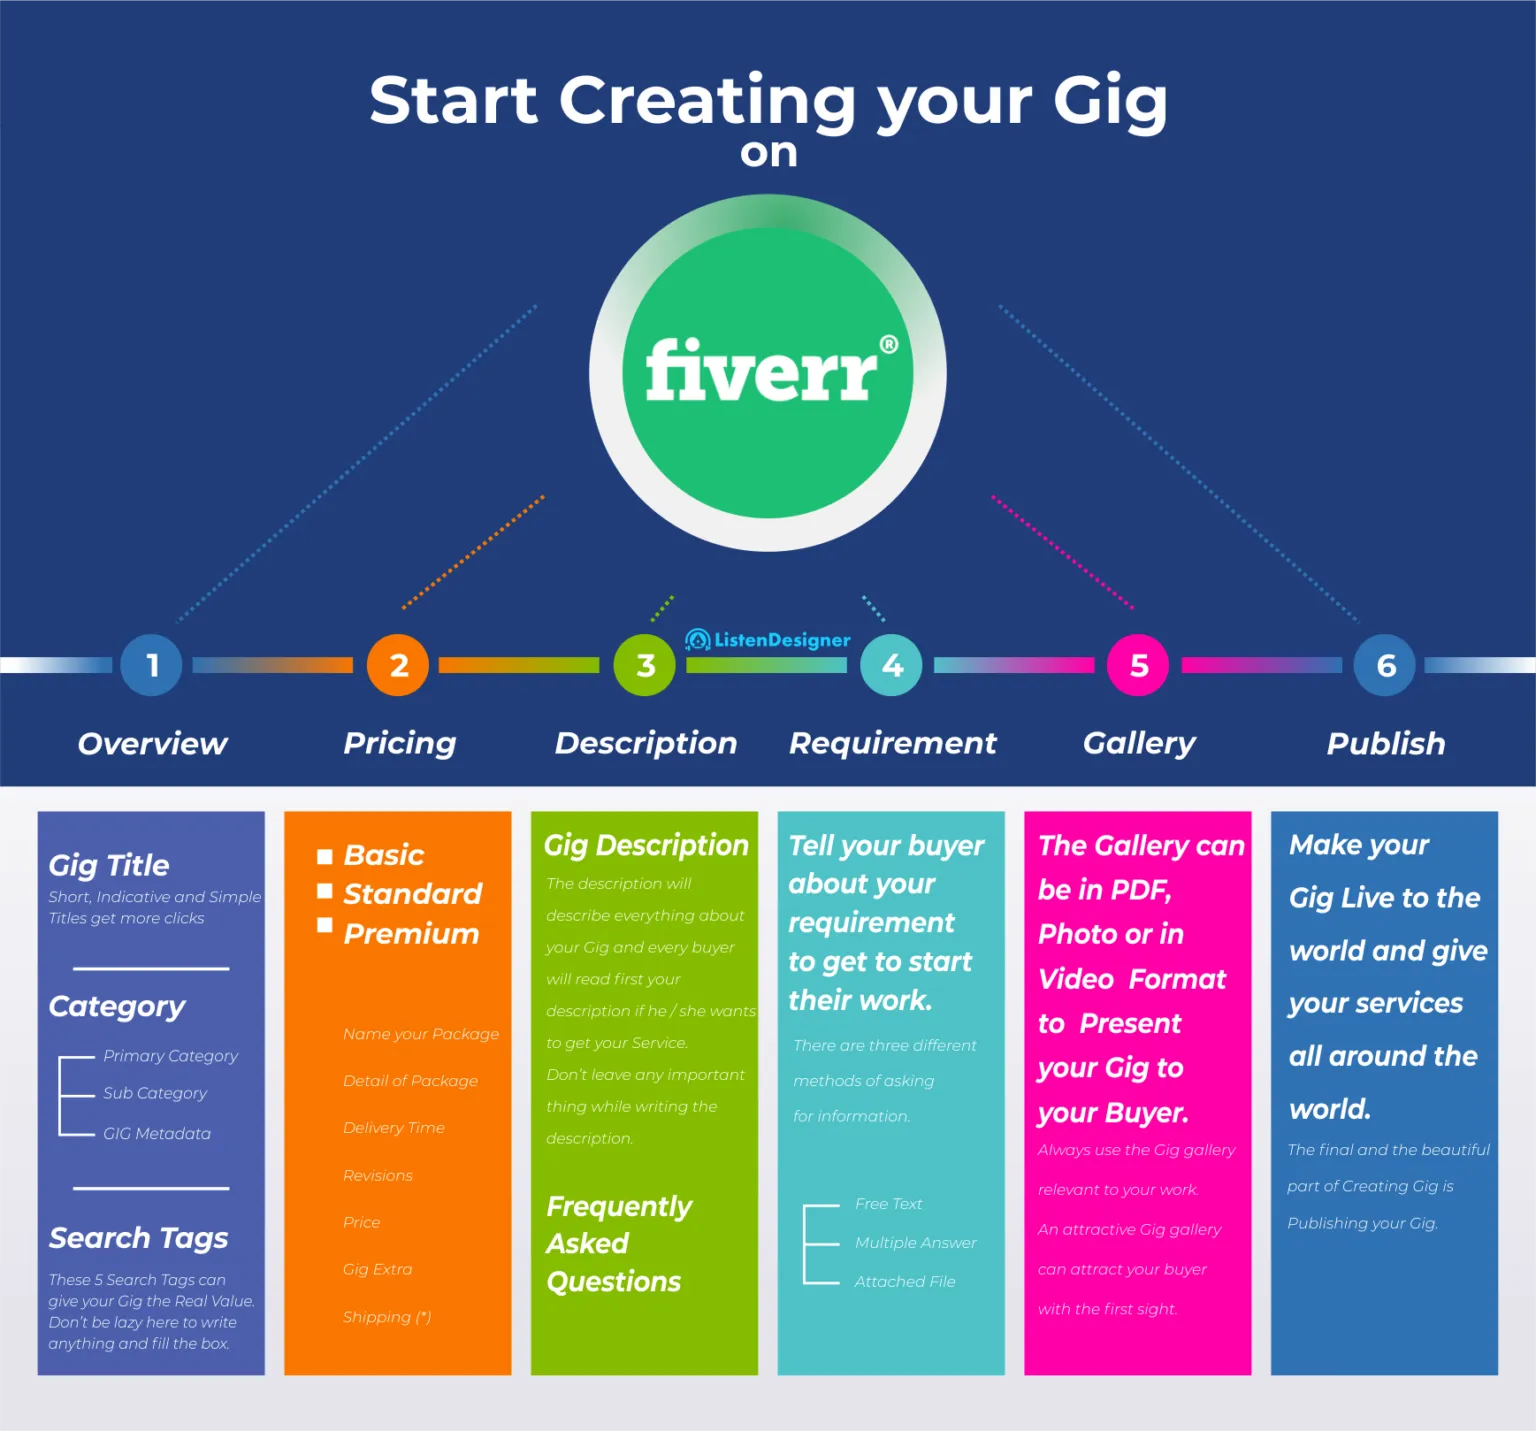
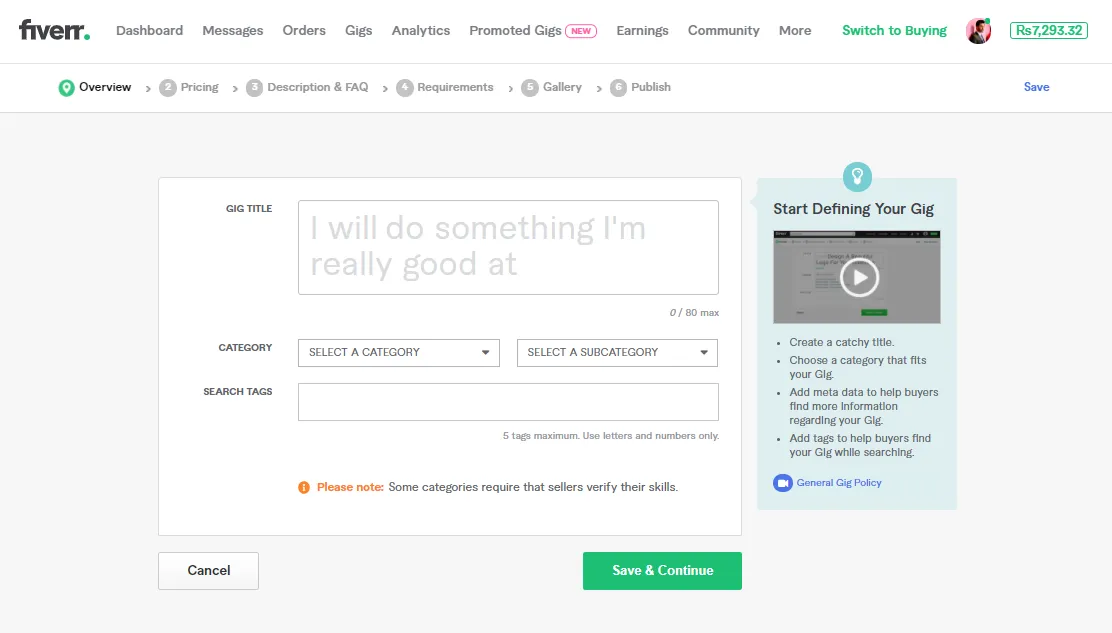
Step 4: Create a New Gig
Alright, you’re getting closer to launching your Fiverr journey! Creating a new gig is like getting your storefront ready—it’s the first impression potential clients will have of you. So, let’s make it shine!
To start, go to your Fiverr profile and click on the “Selling” drop-down menu. You'll see an option that says “Gigs.” Click on it, and then you'll find the “Create a New Gig” button. Boom! You’re on your way!
Now, think about the service you’re offering. What sets you apart? This is your chance to list down everything you’re skilled at. Here’s a quick checklist for you to consider:
- What unique skill do you have?
- Can you solve a problem that others can’t?
- What specific audience are you targeting?
- What’s your selling price?
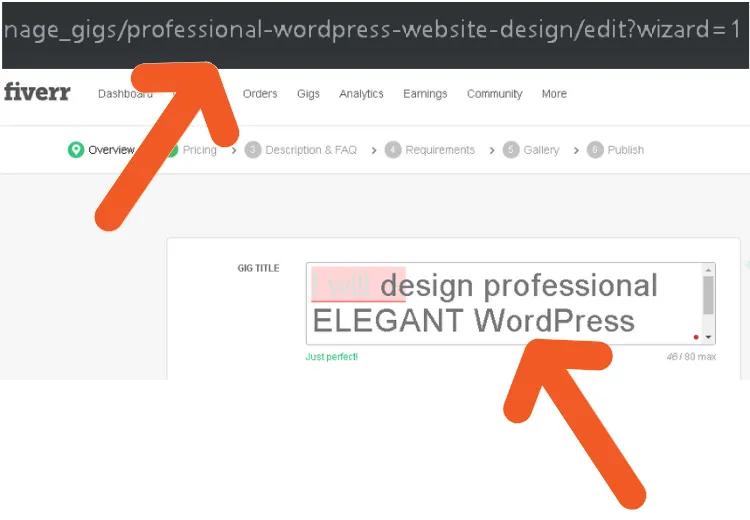
Once you have those details, fill out the required fields. For example, you’ll need to choose a catchy title. Think of it like a headline that draws people in. Include strong keywords that potential buyers might search for. A good title can make all the difference!
As you make your gig, don’t forget to include relevant categories and tags. These will help your gig get found. Just think of it as sorting your laundry—everything has a place, and it’ll make your life easier later on!
Also Read This: How to Promote Fiverr Gigs on Your Website
Step 5: Fill in the Gig Details
Now it’s time to fill in the gig details. This is where the magic happens! Get ready to showcase your skills and let your personality shine.
The first field you’ll encounter is the “Description.” This is your elevator pitch, so be clear and exciting. Highlight what you offer and how it benefits the buyer. Consider using bullet points for clarity and to break down information. Here’s a simple structure:
- What You'll Get: List the exact services you’ll provide.
- Why Choose Me? Briefly explain your experience and qualifications.
- FAQs: Address common questions upfront to ease potential buyer concerns.
Next up is the “Pricing” section. Fiverr offers three packages: Basic, Standard, and Premium. It's almost like creating a menu. You might want to offer different timeframes or additional services at each level. Just ensure that your pricing is competitive, but also reflects the value of your work!
Lastly, you’ll want to add some visuals to make your gig even more appealing. High-quality images or videos can help demonstrate what you can do. Buyers are more likely to click on a gig that has eye-catching visuals.
So, take your time with these details. They’re key to capturing attention and converting views into sales. Your gig is your personal brand—make it as fabulous as you are!
Also Read This: How to Change Your Review on Fiverr: A Step-by-Step Guide for 2020
Step 6: Set Your Pricing
When it comes to setting your pricing on Fiverr, you want to strike a balance between attracting clients and ensuring you're compensated fairly for your skills. Here’s how to approach it:
- Research the Market: Before deciding on a price, take a look at what others in your niche are charging. This will give you a benchmark and help you understand the going rates.
- Consider Your Experience: If you’re just starting out, you might want to set your prices a little lower to attract your first clients. Conversely, if you have substantial experience or unique skills, don’t shy away from pricing yourself higher.
- Offer Different Price Tiers: Fiverr allows you to set multiple packages (Basic, Standard, and Premium). Consider offering different levels of service at varying price points to cater to a wider audience. For instance:
- Account for Time and Skill: Don’t forget to factor in the time it takes to complete each gig and the value of your skills. It should reflect not just what you think you’re worth, but what clients are willing to pay for the quality.
| Package | Price | Details |
|---|---|---|
| Basic | $10 | A simple service with minimal features. |
| Standard | $30 | Includes additional features and faster delivery. |
| Premium | $60 | Comprehensive service with all bells and whistles. |
Ultimately, it’s all about finding a sweet spot where clients feel they’re getting value while you’re compensated adequately for your efforts.
Also Read This: Is Placeit Against Fiverr Rules?
Step 7: Add Gig Extras
Once you’ve set your base price, Gig Extras are your chance to boost your earnings significantly without needing to change your core offering. They’re additional services that customers can purchase along with the main gig, and they can really enhance your profitability.
- Think About Value: When considering what extras to offer, think about how you can add value to your service. What complementary services can you provide that clients would appreciate? For example:
- Faster delivery time
- Additional revisions
- Extended support or consultation
- Set Reasonable Prices: Ensure the prices of your Gig Extras are reasonable and reflect the added value. They should complement your main service without being prohibitively expensive.
- Keep the Customer Experience in Mind: Make it easy for clients to see what extras they can add to their order. Use clear language and be upfront about what each extra entails.
- Promote Your Extras: Don’t forget to mention your Gig Extras in your gig description. Often, clients don’t realize they can customize their order unless you highlight these options.
By adding Gig Extras thoughtfully, not only can you increase your overall earnings, but you also enhance the customer’s experience by offering them tailored options that meet their specific needs. It’s a win-win!
Also Read This: How Many Gigs Can You Create on Fiverr?
Step 8: Select Delivery Time
Choosing the right delivery time for your Fiverr gig is crucial because it sets client expectations and can significantly affect your sales. People often look for quick turnaround times, but it's essential to balance speed with the quality of your work.
Here's how to nail down your delivery time:
- Understand Your Workflow: Before you decide on a delivery time, assess how long it typically takes you to complete a task. Be realistic! Think about any potential obstacles that could slow you down.
- Research Competitors: Check out what similar gigs are offering in terms of delivery time. If most delivery times in your niche are 3 days, it might be wise to offer a comparable timeframe to stay competitive.
- Set Multiple Options: Consider offering different delivery options to cater to various clients. For example:
- Standard Delivery: 5 days
- Express Delivery: 2 days (at an additional cost)
- Communicate Clearly: Be transparent about your delivery time in your gig description. This helps to set client expectations and reduces the likelihood of misunderstandings.
- Be Flexible: After you gain experience, adjusting your delivery times based on feedback and demand will help optimize your gig for success!
Also Read This: How to Set Up a Credit Card on Fiverr
Step 9: Upload Relevant Content
One of the essential steps in creating a successful Fiverr gig is to upload relevant content that showcases your skills and grabs potential clients' attention. It's not just about the text; visual elements play a significant role too!
Here are some tips on what to include:
- Gigs Title and Description: Make sure they’re clear and descriptive. Your title should reflect your service clearly, while your description should provide a concise overview of what buyers can expect.
- Eye-Catching Gig Images: A professional image can make all the difference. Use high-quality visuals that represent your service. If you’re offering graphic design services, showcasing your best designs will attract more buyers. Don't forget to adhere to Fiverr’s image guidelines!
- Video Introduction: Consider creating a short video where you introduce yourself and your service. Research shows that gigs with videos tend to convert better! Keep it engaging, clear, and under 60 seconds.
- Portfolio Samples: If you have previous work, include samples relevant to the gig. This builds trust and demonstrates your skill set. Use 'Before and After' images if applicable!
- FAQs: Anticipate common questions and upload a comprehensive FAQ section to provide instant answers. It helps to reduce the need for buyers to message you and can expedite the purchase process.
By focusing on these elements, you will create a compelling and informative gig that is irresistible to potential clients!
Also Read This: Top 10 Fiverr Gigs for Augmented Reality in 2024
Step 10: Publish Your Gig
Congratulations! You’re now just one step away from sharing your skills and services with the world. Publishing your gig on Fiverr is incredibly simple, but it’s also the moment where all your hard work pays off. So, let’s dive into what you need to do to officially make your gig live!
Once you've completed all required fields, double-check your gig for any last-minute tweaks. You don't want to rush through this part! Make sure to review:
- Title: Is it catchy and relevant?
- Description: Have you clearly outlined what you're offering?
- Pricing: Are your packages competitive yet fair?
- Images/Videos: Do they represent your work accurately?
After ensuring everything is in tip-top shape, look for the “Publish” button, usually located at the bottom of the page. With just one click, your gig will officially be active on the Fiverr marketplace! But, hold on a second—there are a couple more things to keep in mind:
- Promotion: Share your gig on social media or relevant forums to increase visibility.
- Feedback: Encourage early buyers to leave feedback to build your reputation.
And voilà! You’ve successfully published your gig on Fiverr. Just remember, it’s crucial to keep an eye on how it performs and be ready to make adjustments along the way. Happy selling!
Conclusion
Creating a gig on Fiverr can be a thrilling journey that allows you to turn your passions into profits. Whether you’re an experienced freelancer or a complete newbie, the steps we've discussed will help you establish a solid foundation for your business. Here’s a quick recap of the key steps:
| Steps | Description |
|---|---|
| 1. Create Your Account | Sign up and set up your Fiverr profile. |
| 2. Define Your Skill | Identify what service you want to offer. |
| 3. Research Competitors | Check out similar gigs to understand the market. |
| 4. Craft Your Gig | Write a compelling gig title and description. |
| 5. Set Pricing | Decide on packages that reflect your work. |
| 6. Add Requirements | Specify what you need from buyers to get started. |
| 7. Include Media | Add images or videos to showcase your work. |
| 8. Optimize for SEO | Use keywords to help buyers find you. |
| 9. Review and Adjust | Tweak your gig based on insights and performance. |
| 10. Publish | Go live and start earning! |
Remember, patience and persistence are key. Don’t be discouraged if you don’t land gigs immediately; keep refining your offers and engaging with the Fiverr community. With time and dedication, you'll see your efforts turn into success. Now, it’s time for you to roll up your sleeves and start making that gig! Good luck!


