
Creating your first gig on Fiverr can be a thrilling experience! Whether you're a freelance graphic designer, a skilled writer, or a passionate musician, Fiverr offers an incredible platform to showcase your talents and skills. In this post, we’ll walk you through the essential steps and considerations to get your gig up and running. Let’s dive in!
Understanding Fiverr: A Quick Overview

Fiverr is an online marketplace that connects freelancers with clients looking for various services, often referred to as "gigs." Launched in 2010, it has grown into one of the leading platforms for freelancers, boasting millions of users worldwide. Here’s a closer look at the core aspects of Fiverr:
- Service Variety: Fiverr hosts an extensive range of categories including graphic design, copywriting, digital marketing, programming, and more. Almost any service that can be digitized can be sold here.
- Flexible Pricing: Gigs on Fiverr can start as low as $5, but experienced freelancers often scale their prices based on their expertise or project complexity. You can set multiple price tiers with added features to maximize your earnings.
- User-Friendly Interface: The platform is designed to be intuitive. Clients can easily browse through categories, check out freelancer profiles, and place orders. As a seller, uploading your gig is straightforward, with clear guidelines that help you present your services effectively.
- Feedback and Ratings: Fiverr operates on a review system, where clients can leave feedback based on their experience. This feature is crucial for building your reputation and attracting more clients, so providing quality service is key!
Fiverr is not just about selling services; it’s about building relationships. The more you engage with clients and improve your offerings, the more successful you will be!
Also Read This: How to Do Buyer Request on Fiverr
Step 1: Creating Your Fiverr Account
Creating your Fiverr account is the very first step toward making your mark on this bustling platform. It’s incredibly simple, and I’m here to guide you through the process!
First, head over to the Fiverr website and click on the "Join" button. You’ll have a couple of options to sign up: using your email address, Google account, or Facebook account. Choose the method that feels most comfortable for you. Here’s a quick breakdown:
- Email Address: Enter your email and create a secure password. Make sure to pick something memorable!
- Google/Facebook: Click on the respective button, and you’ll be logged in without needing to remember an additional password.
After signing up, you’ll receive a confirmation email. Don’t forget to click the link inside to verify your account! Now that you’re officially part of the Fiverr community, it’s time to set up your profile.
Your profile is your digital business card, so make it shine! Upload a friendly, professional profile picture, and write a brief bio highlighting your skills and experiences. Be genuine; people connect with real faces and stories.
Once your profile is complete, you’ll be well on your way to setting up your first gig. Exciting, right?
Also Read This: How to See Buyer Requests on Fiverr
Step 2: Choosing the Right Category for Your Gig
Now that you have your Fiverr account up and running, it's time to dive into a crucial aspect of getting started: choosing the right category for your gig. This step is essential because it helps potential buyers find your services more easily.
Fiverr has a plethora of categories to choose from, so here’s how to narrow down your options:
- Identify Your Skills: Take a moment to consider what skills or services you can offer. Are you a graphic designer? A writer? A voice-over artist? Knowing your strengths will help you select the right category.
- Research Existing Gigs: Browse through Fiverr to see what others in your niche are doing. Look for gaps you could fill or unique twists you could add to existing gigs.
- Use Fiverr’s Search Bar: Type in keywords related to your services. This can provide you insights into which categories are most popular and what specific gigs attract the most attention.
Once you've settled on a category, make sure to select relevant subcategories as well. The more precise you are, the easier it’ll be for buyers to find you!
Keep in mind that the right category not only showcases your service but also sets the tone for your gig description, pricing, and overall presentation. So choose wisely and ensure it resonates with your expertise!
Also Read This: How Do You Block Someone in Fiverr?
Step 3: Crafting a Compelling Gig Title
Alright, let’s get down to business! Your gig title is the first thing potential clients will see, and it’s absolutely crucial that it grabs their attention. Think of it as your shop window – you want it to be inviting and informative, but also catchy!
Here are some tips to help you craft that perfect gig title:
- Be Clear: Your title should clearly describe what you’re offering. Avoid vague language that could confuse potential buyers.
- Use Keywords: Incorporate relevant keywords that clients might search for. For example, if you're offering graphic design services for logos, a title like "Professional Logo Design Services" will work wonders.
- Keep It Short: Aim for a title that's concise but informative. Ideally, you want to keep it under 80 characters to ensure it displays well on the Fiverr platform.
- Convey Your Value: Highlight unique selling points. If you're known for quick delivery, you could title it as "Fast & Creative Logo Design within 24 Hours."
Remember, a compelling gig title is your ticket to getting noticed in the sea of Fiverr offerings! So put on your thinking cap and get creative!
Also Read This: What is Fiverr Business?
Step 4: Writing an Engaging Gig Description
Now that you’ve got a catchy title, it’s time to dive deep into your gig description. This is your opportunity to really connect with potential buyers and explain why they should choose you over countless other sellers. Here's how to make your gig description as engaging as possible:
- Start with a Hook: Kick off your description with a strong opening that captures attention. You might ask a question or state a fact that resonates with your target audience. For example, "Need a stunning logo that elevates your brand?"
- Be Specific: Clearly outline what you are offering and how it benefits the buyer. List the services you provide, what they can expect, and any packages you offer.
- Tell Your Story: Share a bit about yourself and your expertise. Why are you the right person for the job? This helps build trust!
- Use Bullet Points: Make your description easy to read! Bullet points help break up the text and highlight key offerings.
| Essential Elements of a Gig Description | Description |
|---|---|
| Overview of Service | What exactly are you offering? |
| Benefits | How will your service help the buyer? |
| Unique Selling Points | What makes you stand out from the competition? |
| Call to Action | Encourage buyers to place their order or contact you. |
In conclusion, an engaging gig description not only informs but also persuades potential buyers, making it an essential part of your Fiverr journey. Get writing, and watch the orders roll in!
Also Read This: How Long Does Fiverr Take to Clear Payments?
Step 5: Setting Your Pricing and Packages
Alright, let’s dive into the nitty-gritty of pricing! Setting the right price for your gig on Fiverr can feel like walking a tightrope—you want to attract customers but also ensure you're valuing your work properly. So, how do you strike that balance?
First, take some time to research. Look at similar gigs in your niche and see what others are charging. Notice the differences in their offerings and their pricing structures. Here's a simple breakdown:
- Basic Package: This is your entry-level offer. It’s typically the lowest price, aimed at attracting clients who might be on the fence about your services.
- Standard Package: This usually builds upon the basic one, offering more value at a slightly higher price. Think of adding additional features or a quicker delivery time.
- Premium Package: This is the deluxe offer, providing the maximum value and services. It should be priced higher, reflecting the added value you’re delivering.
As you set these prices, keep in mind:
| Package | Price Range |
|---|---|
| Basic | $5 - $15 |
| Standard | $20 - $50 |
| Premium | $60 and above |
Remember, Fiverr takes a commission on your earnings, so factor that into your pricing strategy. It might take some trial and error, but soon you'll find the sweet spot that works for you!
Also Read This: ¿Para Qué Sirve Fiverr? Descubre Todo sobre esta Plataforma de Freelancing
Step 6: Adding Gig Extras for More Revenue
Once your gig is set up and ready to go, let’s talk about gig extras! Think of these as little add-ons that can significantly boost your earnings. It’s like offering a basic burger and then letting customers add fries or a drink for a few extra bucks.
Gig extras are additional services that you can offer beyond your initial gig package. Here’s why they’re fantastic:
- Increased Earnings: By providing more options, you’ll have the potential to earn more from each order. Customers love the ability to customize their experience.
- Upselling Opportunity: If a customer is already interested in your service, they might be inclined to add extras that enhance their order.
- Flexibility: You have the freedom to create extras that reflect your skills, whether it’s a faster delivery time, revisions, or even additional work.
Popular gig extras include:
- Express delivery
- Additional revisions
- Social media promotion
- Source files or additional formats
When setting prices for your gig extras, keep them proportionate to your package prices, making sure they provide real value and enticing offers for clients. It’s all about being strategic and creative!
Also Read This: What Jobs Can I Do on Fiverr?
Step 7: Uploading High-Quality Images and Videos
When it comes to creating your first gig on Fiverr, visuals are everything! Think of your gig images and videos as the shiny storefront of your online shop—it's the first thing buyers see, and it can make or break their decision to click on your gig. So, let's focus on how to make these visuals pop!
*1. Use High-Resolution Images: Always upload images that are clear and high-quality. A pixelated or blurry image can scream "amateur," and we want you to be seen as a pro! Aim for a minimum resolution of 72 DPI (dots per inch) for your images.
2. Showcase Your Work: If you're offering graphic design, photography, or another visual service, include samples of your best work. This gives potential buyers a taste of what they can expect and builds trust.
3. Add Text Overlays: Sometimes, adding a little text to your images can clarify what you're offering. For example, include key details like "Logo Design," "15 Social Media Posts," or "Custom Illustrations" directly on the image.
4. Create a Video: A gig video can significantly boost your chances of getting orders. This doesn't have to be super fancy; just a simple introduction of yourself and your services can work wonders. Aim to keep it under 60 seconds.
5. Test Your Thumbnails: Your first image acts as a thumbnail, so make sure it's eye-catching! Try out different styles and see which one gets the most clicks.
In summary, high-quality visuals can convey professionalism and entice potential clients. Take the time to upload well-crafted images and videos; they’ll be worth it!
Also Read This: The Ultimate Guide to the Best Fiverr Gigs to Sell
Step 8: Optimizing Your Gig for Search
Now that your gig is looking sharp, it’s time to make sure it gets seen! Just like you wouldn’t want to hide a great book in the back of a library, you want your gig to be front and center in searches. Here’s how to optimize your gig for Fiverr’s search algorithm:
1. Use Relevant Keywords: Think about the words potential buyers would use to search for a gig like yours. If you're a logo designer, keywords like "custom logo design" or "professional logo creator" may work. Include these keywords in:
- Your gig title
- The gig description
- Your tags
2. Write a Compelling Description:* Use your gig description to not only describe what you offer but also to naturally include those keywords. Focus on the benefits and what sets you apart from the competition.
| Tip | Description |
|---|---|
| Fill Out All Fields | Don't leave any mandatory fields blank. The more complete your gig, the better it performs. |
| Update Regularly | Keep your gigs fresh by updating your descriptions, images, or prices periodically. |
| Encourage Reviews | Positive reviews can boost your ranking, so ensure customer satisfaction to get those five-star ratings! |
In essence, optimizing your gig for search is all about aligning your content with what buyers are actively looking for. Do your research, stay relevant, and watch your gig climb the ranks!
Also Read This: How to Remove Your Fiverr Account from Payoneer
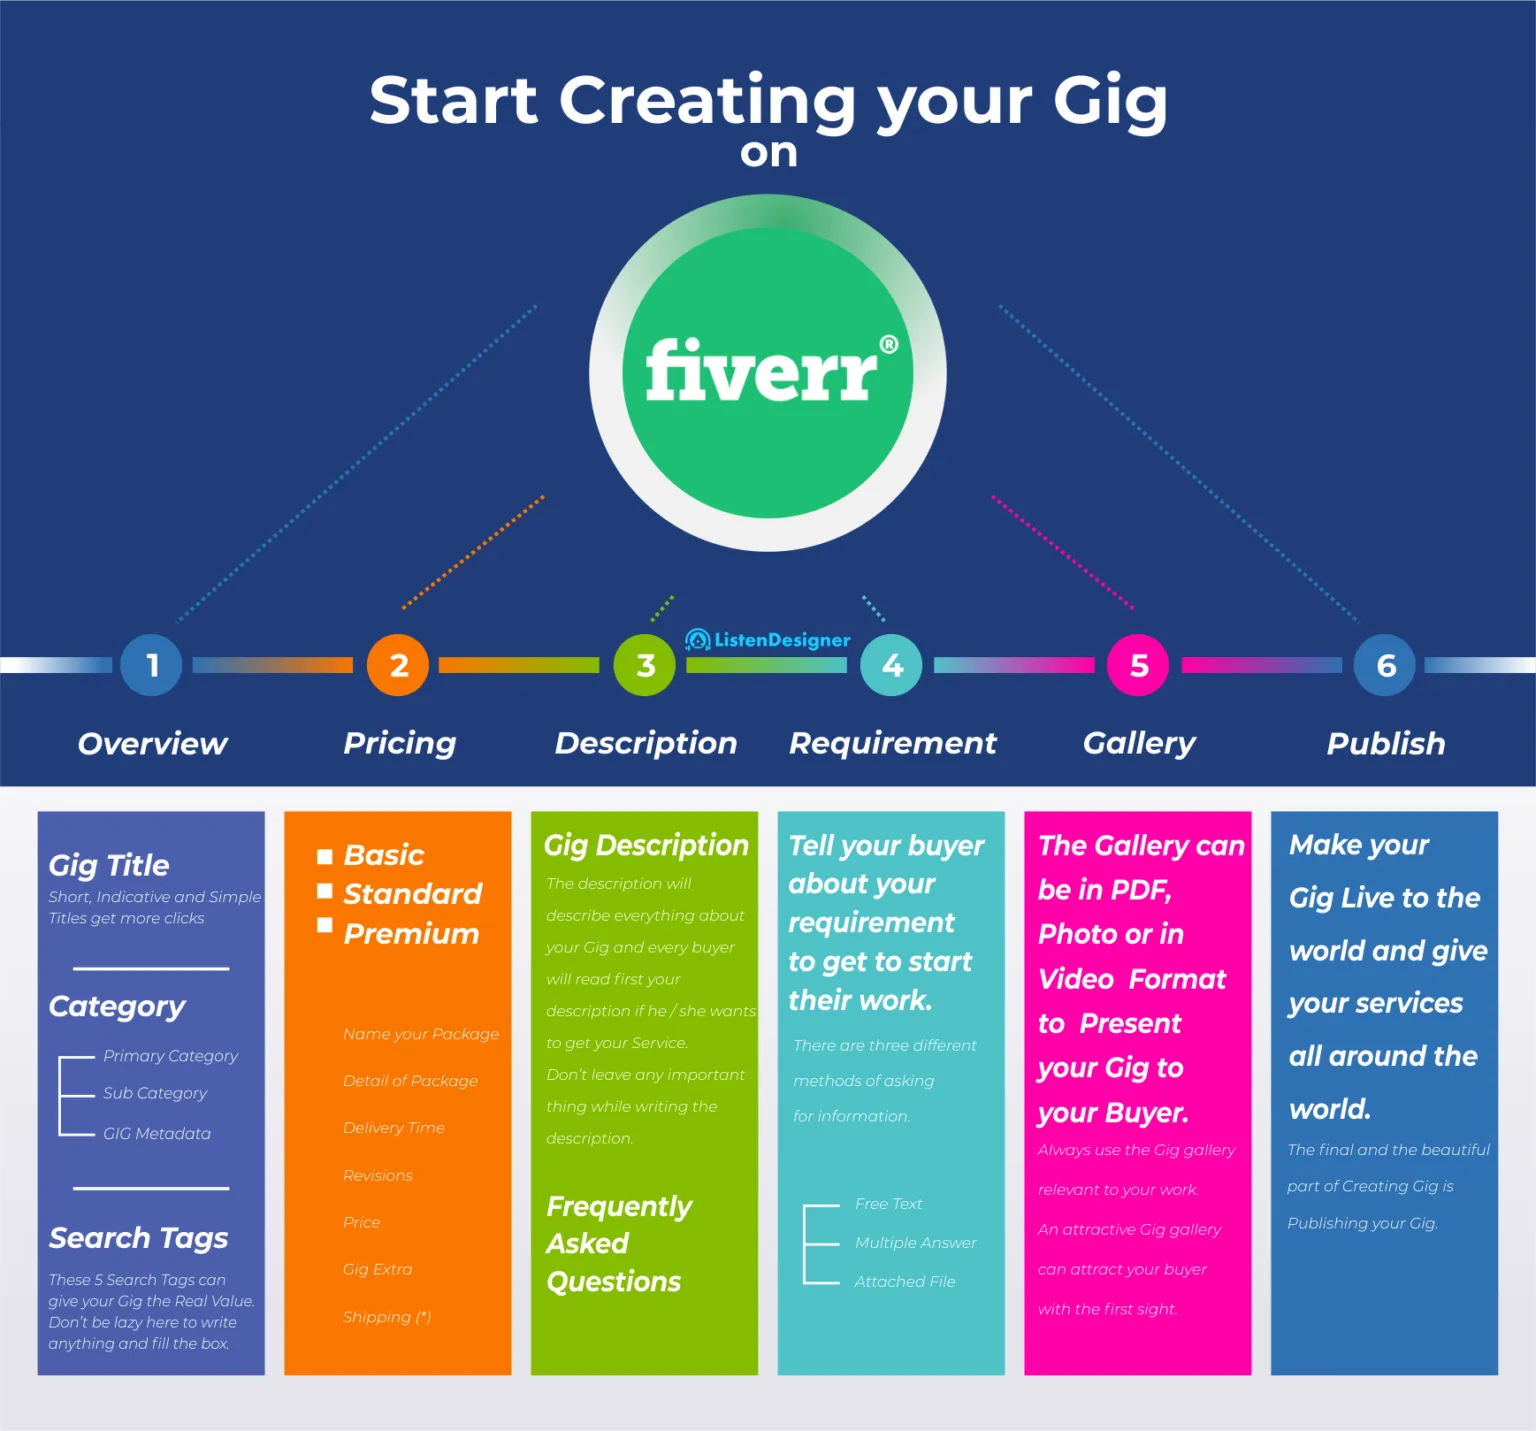
Step 9: Publishing Your Gig
Once you’ve put in all the hard work to create your gig, it’s time for the exciting moment: publishing it! But hold on—before you hit that 'Publish' button, let’s ensure everything is in tip-top shape. Here’s what you need to check:
- Review Your Information: Make sure your title, description, and categories are all correct. A little typo can make a big difference!
- Check Your Pricing: Double-check that your pricing is not only competitive but also reflective of the value you're providing. You want to attract buyers without undervaluing your skills.
- Feature Images: Ensure your images are high-quality and represent your work accurately. They should look professional, as they’re the first thing clients see.
- Include Relevant Tags: Tags help potential buyers find your gig easily. Think about what your audience might be searching for and include those keywords.
Once you’ve verified everything, you can publish your gig. How exciting is that? Your new gig is now live! Don’t forget to take a moment to celebrate this achievement. You’ve taken a significant step towards becoming a successful seller on Fiverr, and that deserves a little recognition!
Also Read This: What Are the Highest Paying Gigs on Fiverr?
Promoting Your Gig: Tips and Tricks
Now that your gig is live, the work isn’t quite over yet—it’s time to let the world know about it! Here are some effective tips and tricks to promote your gig:
- Leverage Social Media: Share your gig on platforms like Facebook, Twitter, and Instagram. Use relevant hashtags and engage with potential clients. Post snippets of your work and direct followers to your Fiverr gig.
- Join Online Communities: Participate in forums or groups related to your niche. By sharing your expertise and providing value, you can naturally promote your gig to interested members.
- Offer Limited-Time Discounts: Create a sense of urgency by offering a special discount for a limited time. This tactic can help nudge potential clients to take action.
- Ask for Reviews: Once you start getting orders, politely ask your clients to leave reviews. Positive feedback can significantly improve your credibility and attract more customers.
Remember, promoting your gig is an ongoing process. Keep experimenting with different strategies until you find what works best for you. The more proactive you are in marketing your gig, the more successful you’ll be on Fiverr!
How to Create Your First Gig on Fiverr
Fiverr is a popular online marketplace that allows freelancers to offer their services, also known as gigs, to a global audience. If you're looking to launch your freelance career or earn some extra income, creating your first gig on Fiverr is a great place to start. Here’s a comprehensive guide to help you get set up.
Step 1: Sign Up and Set Up Your Profile
Before you can create a gig, you need to register on Fiverr. Follow these simple steps:
- Go to the Fiverr website and click on the "Join" button.
- Choose a registration method (email, Facebook, Google, or Apple).
- Complete your profile by adding a professional photo and relevant details about your skills and experience.
Step 2: Create Your Gig
Once your profile is set up, it’s time to create your gig:
- Click on “Selling” in the top menu, then select “Gigs.”
- Click on the “Create a New Gig” button.
Step 3: Fill In the Details
Provide all necessary details for your gig:
| Section | Description |
|---|---|
| Title | Create a catchy title that describes your service. |
| Category | Select a category that fits your gig. |
| Description | Write a detailed description highlighting what you offer. |
| Pricing | Set competitive prices for your services. |
Step 4: Publish Your Gig
Review everything to ensure accuracy, then hit the “Publish Gig” button. Congratulations, your gig is now live on Fiverr!
By following these steps, you'll be well on your way to establishing your freelance presence on Fiverr. Just remember to promote your gig and provide excellent service to attract more clients.
Conclusion
Creating your first gig on Fiverr is a straightforward process that can open doors to numerous freelance opportunities. Stay proactive, continuously improve your offerings, and success will follow.


