
If you've ever thought about making some extra cash from your skills without having to sit at your computer, then creating a gig on Fiverr using your phone is the way to go! Fiverr has revolutionized the gig economy, allowing freelancers to showcase their talents to a global audience. Plus, doing it all from your phone means you can work from just about anywhere! In this guide, we’ll walk through the steps to get you set up and started on your Fiverr journey right from your mobile device.
Step 1: Download the Fiverr App
The first step to creating your gig on Fiverr? Downloading the Fiverr app! It’s straightforward and quick—perfect for those who are always on the go. Here’s what you need to do:
- Go to Your App Store: Depending on your device, head over to the Google Play Store (for Android users) or the Apple App Store (for iOS users).
- Search for Fiverr: In the search bar, type “Fiverr” to locate the official app.
- Download and Install: Hit the “Install” button and wait for the app to download. It shouldn’t take long, so grab a coffee and relax!
- Create an Account: Once the app is installed, open it and either create a new account or log in to your existing one.
That's it! You’re now ready to dive into the freelance world with your smartphone. Before you start creating your gig, take a little time to explore the app. Check out various gigs by other freelancers to gather some inspiration and see how they present themselves and their services. The best part? You can do all of this while you’re lounging at home or waiting in line at the grocery store!
Also Read This: Annual Earnings of Freelance Artists
Step 2: Create an Account or Log In
Alright, let's get the ball rolling! The second step in creating your Fiverr gig is to either create a new account or log into your existing one. Here’s how you can do it:
If you're new to Fiverr, don't worry—it’s super easy to sign up.
- Download the Fiverr App: First things first, head over to the App Store or Google Play and download the Fiverr app.
- Sign Up: Open the app, and tap on “Join”. You can sign up using your email, Google account, or even your Facebook account.
- Complete Your Profile: Once you’re in, Fiverr will prompt you to fill out some details to complete your profile. This might include your name, skills, and interests. The more details you provide, the better.
If you've already got an account, simply follow these steps:
- Open the App: Launch the Fiverr app on your phone.
- Log In: Tap on “Sign In” and enter your credentials. It’s as easy as pie!
After signing up or logging in, take a moment to familiarize yourself with the app's interface. You'll be using it quite a bit during this process!
Also Read This: The Ultimate Guide to Selling Products on Etsy
Step 3: Navigate to the Selling Section
You’re doing great! Now that you’re all set up with your account, it’s time to navigate to the selling section of Fiverr. This is where the magic really starts to happen! Here’s how you can find it:
- Home Screen: After logging in, you’ll land on the home screen of the app.
- Profile Tab: Look for the “Profile” tab at the bottom. It usually features a person icon.
- Switch to Selling: Once in your profile, swipe left or look for the “Switch to Selling” option. Tap on that; it’s your gateway to offer your services!
Now that you’re in the selling segment, you’ll notice several options available to you. Here’s a quick breakdown:
| Options | Description |
|---|---|
| Create a New Gig | This is where you’ll describe the service you intend to sell. |
| Manage Gigs | Edit or delete your existing gigs from here. |
| Stats | Track your performance and sales metrics. |
Now you’re ready to dive in and create your first gig! Stay tuned for the next steps, where we'll guide you through the fun part: actually setting up your services.
Also Read This: How to Find Profitable Keywords for Your Fiverr Gig
Step 4: Select 'Create a New Gig'
Now that you've set up your Fiverr account on your phone, it's time to dive into the exciting part—creating your first gig! This is where you offer your services and showcase what you can do. So let’s get started!
To create a new gig, follow these simple steps:
- Open the Fiverr App: Launch the Fiverr app on your mobile device and log in to your account.
- Access the Selling Menu: Once you are logged in, tap on the 'Menu' icon, usually represented by three horizontal lines, located in the top-left corner of the screen.
- Select 'Selling': From the drop-down menu, find and tap on the 'Selling' option. This will take you to a page where you can manage your gigs.
- Choose 'Gigs': In the Selling menu, there’s a section called 'Gigs.' Tap on it to see your existing gigs (if any) or start creating a new one.
- Click on 'Create a New Gig': Look for the 'Create a New Gig' button, typically found at the top of the Gigs page, and tap on it. This is your gateway to the gig creation process!
Congratulations! You’ve just taken the first step towards showcasing your skills and services on Fiverr. Now, let’s move on to the next exciting step!
Also Read This: How to Follow Up with Someone on Fiverr to Hire You
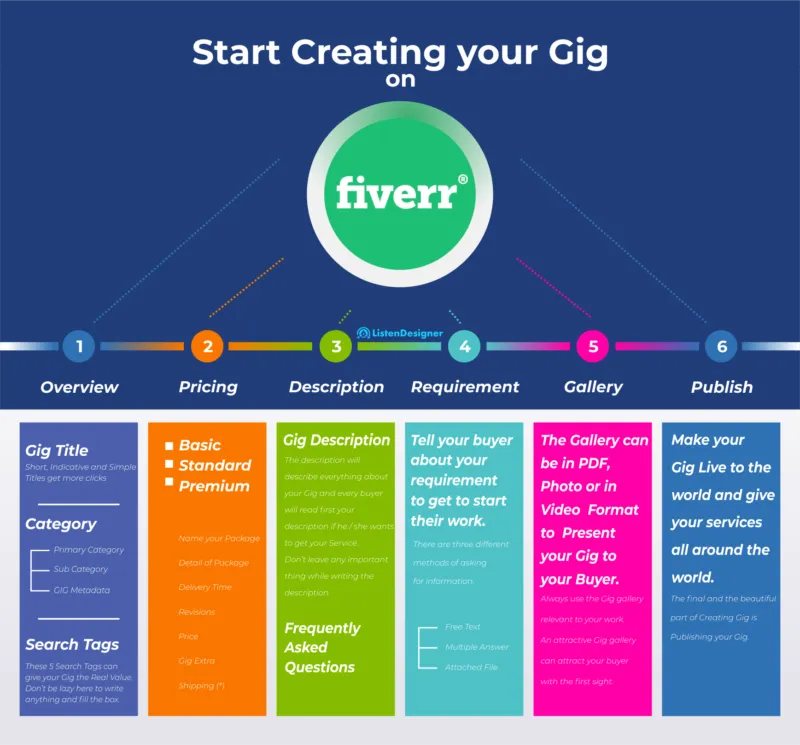
Step 5: Fill in Your Gig Details
Alright! You’re just a step away from launching your gig on Fiverr. Filling in your gig details is where you’ll really sell yourself and your service, so let’s make sure you get it right.
Here’s how to do it:
- Title: Start with a catchy title that clearly describes what you’re offering. Aim for about 60 characters and include relevant keywords.
- Category: Choose the right category and subcategory for your gig. This helps potential buyers find your service easily.
- Tags: Add up to five tags that relate to your gig. These could be keywords that potential buyers might use when searching for services like yours.
- Description: Write a compelling description that explains what you offer, why you’re the best at it, and any unique selling points. Be personable and confident in your skills!
- Pricing: Set your prices. You can offer multiple packages (Basic, Standard, Premium) that allow buyers to choose a price point that fits their needs.
- Delivery Time: Indicate how long it will take you to complete the gig. Be realistic here; you want to under-promise and over-deliver!
Once you’ve filled in all these details, double-check everything. Before you hit that 'Publish' button, ensure that your gig looks polished and professional. With the right details, you can attract your first customers and start your Fiverr journey!
Also Read This: Understanding the Initial Concepts Included in Fiverr
Step 6: Set Your Pricing and Packages
Setting the right pricing for your gig on Fiverr is crucial. It’s not just about making money; it’s also about positioning yourself in the marketplace. So, let’s break this down.
Fiverr allows you to create up to three different packages: Basic, Standard, and Premium. Each package can offer different levels of service and features, which gives potential clients options to choose from. Here’s how to set them:
- Basic Package: This is your entry-level offering. Set a price that is attractive yet reflects the value you provide. Think about what a client would expect for a cheaper option.
- Standard Package: This should offer more services or faster delivery. It’s your chance to upsell a bit. Price it higher than the Basic package but ensure it still feels like a great deal.
- Premium Package: This is your high-end offering, which should include everything your service entails. It should be priced the highest, showcasing the complete value and effort you’re willing to put in.
Consider using psychological pricing techniques where you price your packages just below a round number to make them seem cheaper (like $49 instead of $50). Also, be sure to check out what others are charging for similar services to get a feel for the market.
Also Read This: Understanding Fiverr Service Fees: How Much Will You Pay?
Step 7: Add Extras and Gig Gallery
Now, let’s jazz up your gig with some exciting extras and a killer gig gallery! This step is all about enhancing your offer and making your gig visually appealing.
Gig Extras are additional features you can offer for a fee. They can be game-changers for increasing your earnings. Think about what clients might want on top of your standard offering. For example:
- Faster delivery times
- Additional revisions
- Source files
When setting these extras, keep in mind that they should be complementary to your main package to entice buyers. A well-thought-out gig extra can significantly increase the overall value you provide.
Next up is your Gig Gallery. This is where you showcase your work. The images and videos you add here should reflect the quality of your service. Make sure to include:
- High-quality images that illustrate your work.
- A short promotional video about your gig, highlighting your skills and what you offer.
Remember, first impressions matter! A captivating gallery can make your gig stand out among hundreds of others.
Also Read This: How to Describe Your Gig on Fiverr: A Comprehensive Guide
Step 8: Review Your Gig
Alright, now that you've put in the effort to create your gig, it’s time for the all-important review step. This is where you take a moment to step back and really look at what you've crafted. After all, just like a fine piece of art, you want to ensure every detail is perfect!
Here are some things you should check out:
- Title: Is your gig title clear, concise, and engaging? Does it accurately represent what you're offering?
- Description: Make sure your gig description clearly outlines what you're providing, why someone should hire you, and any relevant details. Look out for typos or grammatical errors; your professionalism is on the line!
- Pricing: Have you set your prices competitively? Consider what similar gigs charge but also ensure you value your unique skills.
- Images and Videos: Do your visuals stand out? Remember, a great image can attract attention! Ensure they are high quality and relevant.
- Tags: Did you use effective tags that will help potential clients find your gig more easily? Think about keywords that relate directly to your service.
Once you've reviewed everything, don’t rush—take your time! Asking a friend for feedback can also provide fresh insights you might have missed. A little peer input can go a long way in making your gig shine.
Also Read This: Managing Social Media as a Freelance Manager
Step 9: Publish Your Gig
You've made it to the final step—congratulations! Publishing your gig on Fiverr is like sending your creation out into the world. But before you hit that "Publish" button, let’s quickly go over what you need to consider.
First things first, double-check your information. Make sure everything is in order: gig title, description, images, and pricing. Once you feel confident, you can proceed to publish. Here’s how:
- Go to your gig preview page. Take a deep breath—this is your moment!
- If you’re satisfied with your gig, look for the Publish button, usually at the bottom of the page.
- Once clicked, your gig will be processed. This usually takes just a few minutes.
- You can find your gig in your profile section under “Selling” > “Gigs.”
After publishing, keep an eye on your gig's performance. Fiverr provides analytics that can help you see how many views and orders you’re getting. Don’t forget to promote your gig around your social networks to get the ball rolling! Happy selling!
Also Read This: How to Improve Your Fiverr Gig: Tips and Strategies for Success
11. Tips for Optimizing Your Gig
Creating a gig on Fiverr is just the first step; optimizing it can make all the difference in attracting buyers. Here are some effective tips to help you stand out:
- Catchy Title: Your gig title should be engaging and descriptive. Think like a buyer—what would you search for? A title like “Professional Logo Design in 24 Hours” is more appealing than “Logo Design Services.”
- Compelling Description: Use the description section to showcase your skills and explain what buyers can expect. Be clear, concise, and persuasive. Aim to make your description engaging by using a conversational tone.
- Use Keywords: Research relevant keywords that potential buyers are searching for. Incorporate them naturally into your gig title and description to improve visibility.
- High-Quality Images: First impressions matter! Use high-quality images or a video that encapsulates what you offer. Consider including a thumbnail that is eye-catching and relevant to your service.
- Competitive Pricing: Check out similar gigs and set your prices competitively. You want to attract users without undervaluing your work. As you gain reviews and experience, you can adjust your pricing.
- Packages: Consider offering multiple packages (Basic, Standard, Premium). This allows buyers to choose the best fit for their needs, making your gig more appealing.
- Prompt Responses: Engage promptly with potential buyers, and maintain good communication throughout the gig. Quick responses can foster trust and lead to more sales.
- Encourage Reviews: After a successful delivery, kindly ask your clients to leave a review. Positive feedback boosts your credibility and can influence new buyers.
12. Conclusion
In summary, creating a gig on Fiverr using your phone is not only feasible, but it can also be a lucrative way to turn your skills into cash. From setting up your account to marketing your gig effectively, each step plays a vital role in your success on the platform.
Remember, the key to making your gig stand out lies in optimization. Invest time into crafting an appealing title and description, choose engaging visuals, and ensure you offer value through competitive packages. Communication is crucial, so prioritize quick responses and foster relationships with your buyers.
As you grow and learn from your experiences on Fiverr, don’t hesitate to tweak your gig based on market trends and feedback. Most importantly, enjoy the process of showcasing your skills and creativity. With determination and a little effort, you can create a successful gig that draws in clients from all over the world!


