Creating a Fiverr account is your first step towards offering or purchasing freelance services online. Whether you’re a creative looking for gigs or a business seeking talent, Fiverr provides a platform to connect. In this guide, we’ll walk you through the straightforward process of setting up your account so you can dive into the world of freelancing. Let’s break down the steps you need to take!
Step 1: Visit the Fiverr Website

Your journey begins by navigating to the Fiverr website. Simply open your preferred web browser and type in www.fiverr.com. You can also find Fiverr on mobile devices by downloading the app from the Apple App Store or Google Play Store. Once you’ve reached the homepage, you’ll find yourself surrounded by a vibrant community of freelancers and potential clients.
Here’s what you can expect when you visit the site:
- Clean Interface: The Fiverr homepage is user-friendly, displaying various services (called "gigs") that freelancers offer. You can explore categories like graphic design, writing, video editing, and programming.
- Search Bar: Located at the top of the page, the search bar allows you to quickly find specific services or freelancers based on keywords.
- Sign Up/Login Button: If you’re not yet a member, look for the 'Join' button prominently placed. If you already have an account, you’ll use the 'Sign In' option.
Before we continue to the next steps, take a moment to explore the available gigs. This will not only inspire you but also give you an understanding of the services you might want to offer or buy. Ready? Let’s move on to creating your account!
Also Read This: How to Pay Someone on Fiverr for Ghostwriting
Step 2: Click on the Sign-Up Button

Once you’ve landed on the Fiverr homepage, it’s time to kickstart your account creation by finding the Sign-Up button. It’s usually located at the top right corner of the page, easily noticeable and inviting. Clicking on it will take you to the account registration form.
Don’t worry, this part is as straightforward as it gets. Fiverr wants to make sure that the onboarding process is not only quick but user-friendly, so you won’t hit any roadblocks here. You’ll see that the sign-up interface is clean, so just take a moment to appreciate how easy they’ve made it for you!
After clicking the Sign-Up button, you’ll be prompted to either create an entirely new account or opt for an alternative method to register. But before we get into that, remember to think about your desired username—this will represent you in the Fiverr community. Here could be a few tips while signing up:
- Keep it professional: Your username reflects your brand. A catchy, easy-to-spell name can attract more clients!
- Think long-term: Avoid using numbers or trends that might not be relevant in a few years.
- Stay authentic: Choose a name that resonates with your skills or services.
So go ahead and click that Sign-Up button—it’s your first step toward diving into the exciting world of freelancing on Fiverr!
Also Read This: How to Build a Career as a Freelance Online Sales Consultant
Step 3: Choose Your Sign-Up Method

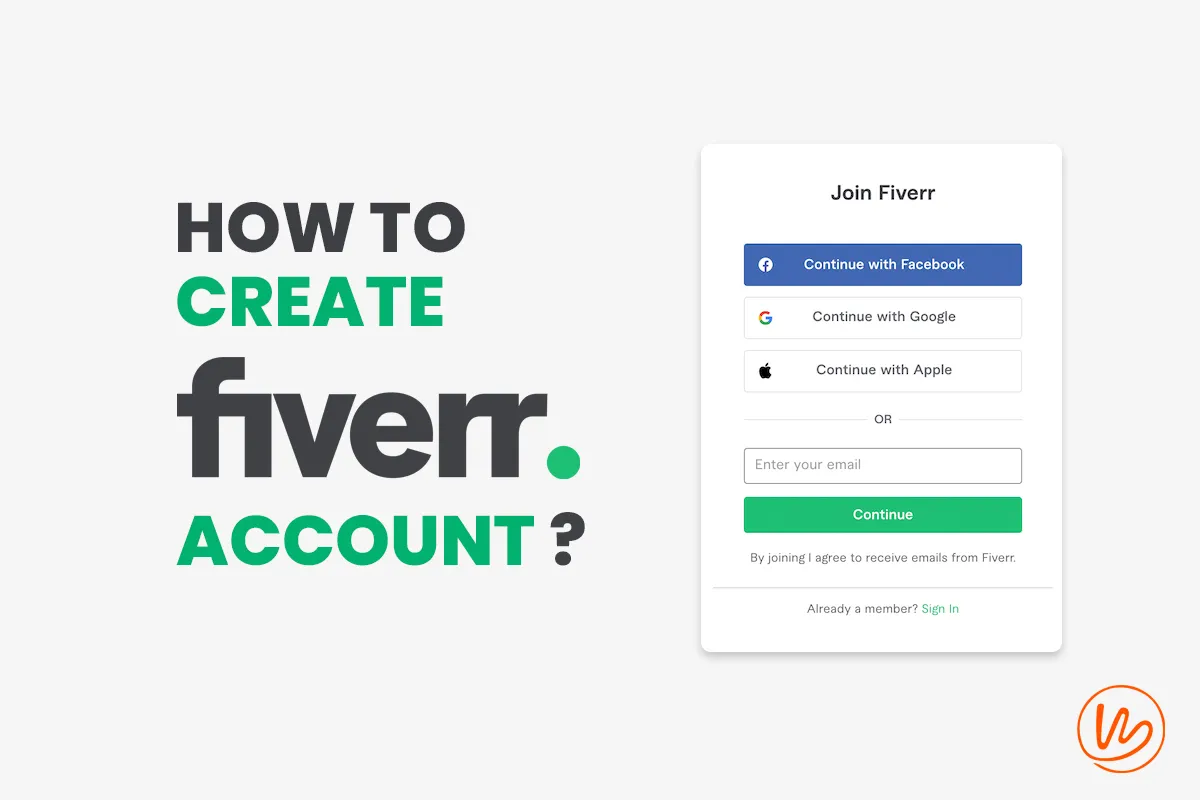
Now that you’ve clicked the Sign-Up button, it's time to pick your preferred method for creating your Fiverr account. Fiverr offers a couple of easy options to get you started. You can either sign up using:
- Email: This is the traditional approach. You’ll simply enter your email address, create a password, and voilà— your account is on its way to being set up!
- Social Media: If you prefer a quicker route, you can link your Facebook or Google accounts. A single click and you’re good to go!
Here’s a little breakdown of each method:
| Method | Pros | Cons |
|---|---|---|
|
|
|
| Social Media |
|
|
Whichever method you choose, make sure that the information you provide is accurate! This ensures a smoother experience as you start seeking gigs or offering your services. So, what are you waiting for? Choose your sign-up method and let's keep this journey rolling on Fiverr!
Also Read This: How to Share Your Fiverr Gig on Facebook
Step 4: Complete Your Profile Information

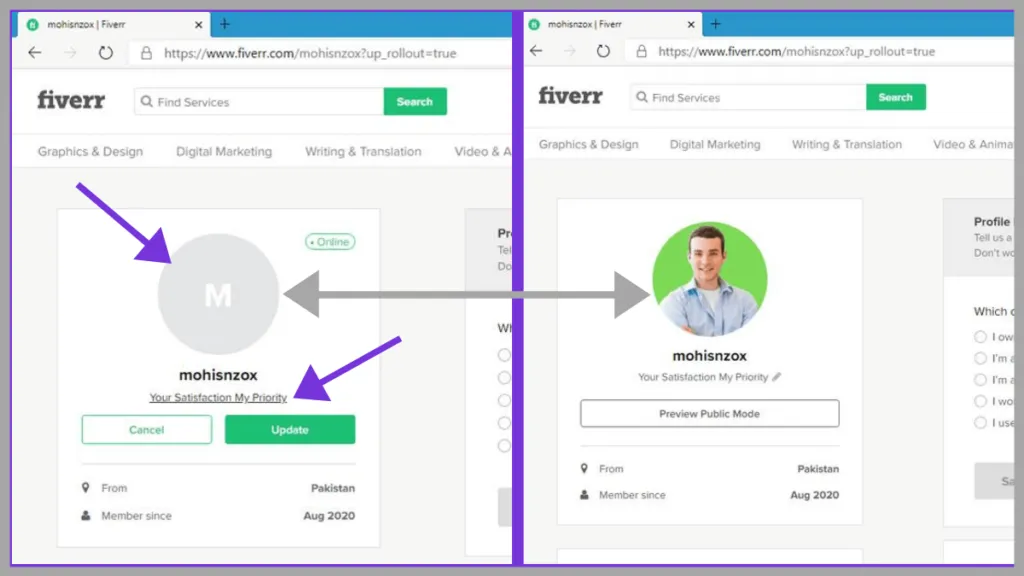
Congratulations on making it this far! Now that you've signed up for your Fiverr account, it's time to give it some personality. Filling out your profile information is crucial because it helps potential clients get to know you and understand what you can offer. A well-crafted profile can significantly increase your chances of landing gigs.
Here’s what you should focus on:
- Profile Photo: Choose a clear, professional-looking profile picture. A smiling photo can make you appear more approachable!
- Username: Pick a catchy username that represents your skills. Make it memorable, but avoid anything overly complicated.
- Bio: Write a compelling bio that highlights your skills, experience, and what makes you unique. Include specifics—clients love details! Aim for around 150-200 words.
- Languages: List any languages you speak, as this can widen your client base considerably.
- Skills: Fiverr allows you to list specific skills. Choose up to 15 that are relevant to the services you’re offering.
Completing your profile with thorough information is essential. It's not just about filling out the fields; it’s about showcasing yourself in the best light. A fully completed profile can help you stand out in a crowded marketplace, so take your time with it!
Also Read This: How to Work as a Freelance Mechanical Engineer
Step 5: Verify Your Account
Now that you have your profile set up and looking sharp, it’s time for the next step: verification. Verifying your Fiverr account is essential for building trust with potential clients. It shows that you’re a legitimate seller and not just a random account created in the middle of the night!
Here’s how to go about it:
- Email Verification: Check your inbox for a verification email from Fiverr. Click the link inside to confirm your email address. This step usually takes just a few minutes.
- Phone Verification: Fiverr may ask you to verify your phone number. Simply enter your phone number, and you’ll receive a text message with a verification code. Enter that code on the site, and you’re all set!
- ID Verification (if required): Sometimes, Fiverr may request additional verification, such as a copy of your ID. This helps maintain security on the platform, so don’t be alarmed. Just follow the instructions provided.
Once your account is verified, you’ll have a badge next to your profile name, indicating to clients that you’re a trusted seller. This small step can make a huge difference in your Fiverr journey, making clients feel more comfortable hiring you!
Also Read This: What Kind of Stuff to Put on Fiverr: A Comprehensive Guide
Step 6: Set Up Your Payment Method
Now that you’ve completed the initial steps of creating your Fiverr account, it's time to set up your payment method. This is a crucial step because it's how you'll receive payments for your hard work. Don't worry; Fiverr makes this process straightforward.
To set up your payment method, follow these steps:
- Log in to your Fiverr account and navigate to the Settings section.
- Click on the Billing tab. Here, you'll find options for your payment settings.
- Select your preferred payment method. Fiverr offers several options, including:
- PayPal: Connect your PayPal account for quick transactions.
- Bank Transfer: You can also opt for direct bank transfers if you prefer that route.
- Fiverr Revenue Card: This prepaid Mastercard allows you to access your earnings easily.
It’s always a good idea to double-check your payment details to avoid any future hiccups with receiving your earnings. Plus, Fiverr has a couple of security measures in place to protect your information. Setting this up correctly will set you on the right path to start earning!
Also Read This: Excelling in Freelancing
Step 7: Create Your First Gig
Creating your first gig is where the fun really begins! This is your opportunity to showcase your skills and attract buyers. A gig is essentially your offering—it should represent what you can do best. Let’s break down how to create a compelling gig step by step.
Follow these simple steps to launch your first gig:
- From your Fiverr dashboard, click on the “Selling” dropdown menu, and select “Gigs.”
- Click on the “Create a New Gig” button.
- Now, fill out the necessary details. Here are the key components you'll need to focus on:
- Include high-quality images or videos to make your gig stand out.
- Before you publish, review everything to ensure it's just right.
- Finally, hit the Publish button!
| Component | Description |
|---|---|
| Title: | Make it catchy and clear! |
| Category: | Choose the category that best fits your service. |
| Pricing: | Decide how much you'll charge, including different packages if needed. |
| Description: | Write a detailed description of your service. |
| Extras: | Offer additional services for an extra fee. |
And there you have it! Your first gig is live and ready for buyers to discover. Remember, you can always return to tweak your gig as you gain more experience or feedback. Exciting times ahead!
How to Create a Fiverr Account in 2020
Creating a Fiverr account is a straightforward process that enables you to offer your services or hire freelancers for your projects. Here's a step-by-step guide to help you set up your account easily.
Follow these steps to create your Fiverr account:
- Visit the Fiverr website: Open your web browser and go to www.fiverr.com.
- Sign Up: Click on the "Join" button located at the top right corner of the homepage.
- Create your account: You can sign up using:
- Your email address
- Your Facebook account
- Your Google account
| Profile Section | Description |
|---|---|
| Profile Picture | Upload a clear and professional photo. |
| Description | Write a brief summary of your skills and experience. |
| Skills | Add relevant skills that reflect your expertise. |
Once you've completed these steps, you're all set to start your Fiverr journey, whether that's buying services or selling your own!
In conclusion, creating a Fiverr account in 2020 is a simple yet rewarding process that opens doors to countless opportunities for freelancers and clients alike. Follow the steps above, and you'll be ready to thrive on the platform in no time.


