
Changing your email address on Fiverr may seem like a daunting task, but it’s easier than you might think! Whether you’ve outgrown your old email, want to consolidate your accounts, or have security concerns, updating your email is a straightforward process. In this blog post, we’ll walk you through the reasons you might want to make this change, and how to do it seamlessly.
Why You Might Want to Change Your Email Address
There are several reasons why you may find yourself needing to change your email address on Fiverr. Let’s dive into some of the most common scenarios:
- Outdated Email Addresses: Perhaps you've been using an old email that you no longer check regularly. By updating your Fiverr account with a more current email, you'll ensure you receive important notifications and messages.
- Consolidation of Accounts: It’s not uncommon to have multiple email addresses for different purposes. If you're looking to streamline your online presence, changing to an email that you use frequently can make it easier to manage your Fiverr account alongside other platforms.
- Security Concerns: With cyber threats on the rise, it’s vital to maintain the security of your online accounts. If you suspect that your current email is compromised, updating it can add an extra layer of security to your Fiverr account.
- Professionalism: If your Fiverr projects require a more professional appearance, you might want to switch to a business email. This can enhance your credibility and make communication with clients more effective.
- Changing Providers: Whether you’ve switched internet service providers or prefer a different email service, you might need to update your email address to reflect this change.
Ultimately, changing your email address can help you stay organized, secure, and professional in your Fiverr endeavors. Isn't it time to take that step? In the next sections, we’ll guide you through the process of making this change with ease!
Also Read This: How to Publish a Fiverr Gig: A Step-by-Step Guide
3. Step-by-Step Guide to Changing Your Email Address
Changing your email address on Fiverr is a straightforward process, and I'm here to walk you through it step by step. So grab a comfy seat, and let's dive in!
- Log into Your Fiverr Account:
First things first, head over to the Fiverr website and log in using your current credentials. It's like unlocking the door to your digital workspace.
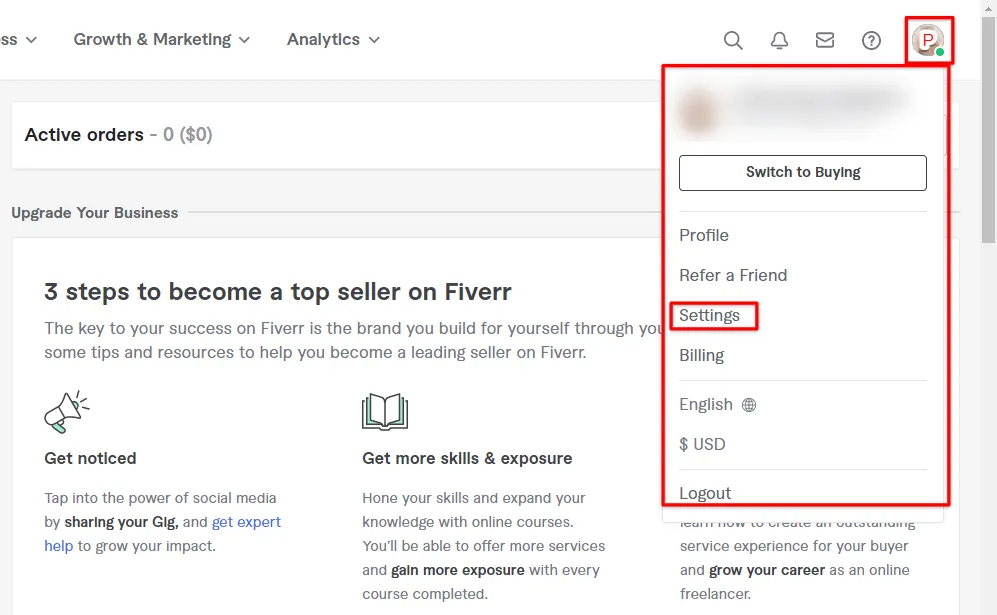
- Access Your Profile Settings:
Once logged in, click on your profile icon in the top right corner. From the dropdown menu, select "Settings." This is where all the magic happens.
- Navigate to the Email Section:
In the settings menu, look for the "Account" tab. Under that tab, you'll find the "Email" section. This is your gateway to changing your email!
- Update Your Email:
Here, you'll see your current email address. Simply type in your new email address that you'd like to use and make sure you double-check for any typos—nobody wants to miss important notifications!
- Save Your Changes:
After entering your new email, be sure to hit the "Save" button. It's like sealing the deal!
- Logout and Login (Optional):
While not strictly necessary, logging out and then back in can help refresh your settings. It’s also a good way to confirm that everything is working as it should.
And there you go! Your email address on Fiverr is now updated. Simple, right?
Also Read This: How to Work as a Freelance Coder
4. How to Verify Your New Email Address
So, you've updated your email address—awesome! But before you can fully enjoy your Fiverr experience with your new email, you'll need to verify it. Here’s how you can do that:
- Check Your Inbox:
After you changed your email, Fiverr usually sends a verification email to your new address. Make sure to check your inbox (and that pesky spam folder) for an email from Fiverr.
- Open the Verification Email:
Once you locate the email, open it up to find the verification link. It's usually a big, inviting button or a highlighted link that says "Verify Email" or something similar.
- Click the Verification Link:
Go ahead and click that link. This action is what connects your new email address to your Fiverr account and confirms that you own it.
- Log Back into Fiverr:
After clicking the link, you may be prompted to log back into your Fiverr account. This is just a security measure to ensure everything is in check.
- Confirmation:
Once logged back in, you should receive a confirmation that your email address has been successfully verified. And just like that, you’re all set!
And there you have it! Verifying your new email address is a crucial step. It ensures you’ll receive updates and notifications promptly. Happy Fiverring!
Also Read This: How to Post a Job on Fiverr App
Troubleshooting Common Issues
Changing your email address on Fiverr can be a straightforward process, but sometimes you might run into a few bumps along the way. Here are some common issues you might face, and how to tackle them:
- Verification Emails Not Received: If you're not receiving the verification email after making changes, check your spam or junk folder. If it’s not there, ensure you have entered your new email address correctly.
- Access Denied: If you’ve forgotten your password or are unable to access your Fiverr account, you can reset your password. Look for the 'Forgot Password?' link on the login page and follow the instructions.
- Email Address Already In Use: If you attempt to add an email address that's already linked to another Fiverr account, the system won't allow you to proceed. You’ll need to decide which account you want to keep and either delete the unused account or use a different email.
- Slow Account Updates: Sometimes, changes may take a little longer to reflect. Give it a few hours and check back. If you still can’t see the changes, contact Fiverr support for assistance.
Remember, troubleshooting is a part of the process. Stay patient and keep trying, and you’ll navigate through any hiccups that come your way!
Also Read This: Getting Started as a Freelance Videographer
Tips for Managing Multiple Email Addresses
Managing multiple email addresses can be quite a task, but with a few smart strategies, it can become manageable and even efficient! Here are some tips that can help you streamline your email activities, especially when working with platforms like Fiverr:
- Use Unique Email Aliases: Many email providers allow you to create aliases that redirect to a primary inbox. For instance, if your primary email is [email protected], you could create aliases like [email protected] for Fiverr-related activities.
- Organize with Folders: Create specific folders in your email inbox for different platforms. This way, you can easily locate Fiverr notifications, updates, and messages without sifting through everything else.
- Set Email Filters: Use filters to automatically sort incoming emails based on content or sender. This can help keep your inbox clutter-free and focused on crucial communications.
- Regularly Check Activity: Make it a habit to check all your email addresses regularly. This helps you stay updated with any notices or updates from Fiverr without letting anything slip through the cracks.
Managing multiple email addresses can seem daunting, but with these tips, you'll find that it’s all about good organization and efficient habits!
Also Read This: How is Fiverr Not a Scam? Understanding the Platform’s Integrity
How to Change Your Email Address in Fiverr
If you need to update your email address on Fiverr, whether due to a change in your personal email or for security reasons, the platform makes the process straightforward. Follow the steps below to ensure a seamless transition.
Before starting the process, ensure you have access to your current email as well as the new email you wish to use. Here’s how you can change your email address:
- Log into Your Fiverr Account
Go to the Fiverr website and log in with your existing credentials.
- Access Your Profile Settings
Click on your profile picture located in the top right corner of the page. A drop-down menu will appear. Select Your Profile.
- Navigate to Settings
In the profile section, find and select the Settings option. This will take you to your account settings page.
- Edit Email Address
Look for the Email Address field. Click on the Edit button next to it and input your new email address.
- Verify Your New Email
After entering your new email, Fiverr will send a verification email to that address. Open the email and click on the verification link provided.
- Confirmation
Once verified, your new email address will be updated in your Fiverr account.
Ensure that you also update any linked accounts or notifications associated with your old email address. It's crucial for account security and ensures you don't miss any important updates from Fiverr.
Conclusion
Changing your email address on Fiverr is a simple yet vital task that enhances your account security and ensures effective communication. By following these steps carefully, you can successfully keep your account information up to date.


