If you're diving into the freelance world on Fiverr, you might have noticed the little option for adding tags when you're setting up your gigs. But what exactly are tags, and why should you care? Well, tags are crucial in helping your gigs reach potential buyers. Think of them as keywords that enhance your visibility on the platform. In this guide, we’ll walk you through how to effectively add tags to your Fiverr gigs to maximize your reach and potentially boost your sales. Let's get started!
Understanding the Importance of Tags

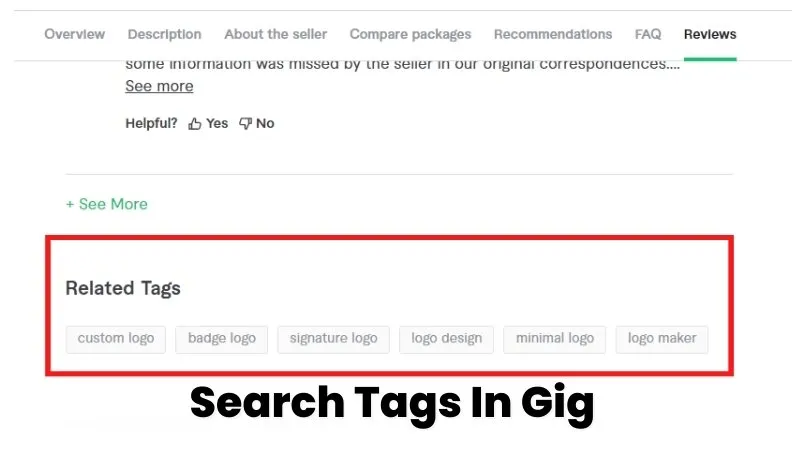
Tags are like magic words that enhance your gig’s discoverability on Fiverr. They are essential for connecting your services with the right audience, and here's why they matter:
- Enhanced Visibility: By using relevant tags, you're making it easier for buyers to find your gig. Tags act as signs pointing to your services, increasing your chances of appearing in search results.
- Keyword Relevance: Tags are essentially keywords that potential buyers might use when searching for your services. If you understand what your target audience is searching for and incorporate those keywords into your tags, you stand a better chance of being noticed.
- Competition Edge: With countless freelancers on Fiverr, using the right tags gives you a competitive advantage. You can distinguish yourself from others offering similar services by being specific with your tags.
- SEO Boost: Much like search engine optimization for websites, utilizing the right tags can improve your gig’s ranking within Fiverr. This means more exposure and, ideally, more orders.
- Easier Navigation: Tags help streamline the experience for users searching for specific services on the platform. When you choose tags wisely, it provides clarity about what you offer, leading to a better match between sellers and buyers.
In summary, tags are not just an afterthought; they are a vital component of your Fiverr gig that can make a huge difference in attracting the right clients. Understanding how to use them effectively can significantly impact your freelancing success.
Also Read This: What Are Impressions in Fiverr?
Step 1: Creating Your Fiverr Account

So, you’ve decided to dive into the exciting world of Fiverr! First things first, you need to create an account. Don’t worry; it’s a pretty straightforward process. Here’s how you can get started:
- Go to Fiverr's Website: Open your web browser and navigate to www.fiverr.com.
- Click on 'Join': Look for the ’Join’ button at the top right corner of the homepage. Click it, and you’ll be greeted with a sign-up form.
- Select Your Sign-Up Method: You can choose to join using your email address, Google account, Facebook, or Apple ID. Just pick the method that feels most comfortable for you!
- Fill Out Your Information: If you choose to sign up via email, you’ll need to provide your email address, create a username, and set up a password. Make sure your username is catchy but professional, as it represents you on the platform.
- Verify Your Email: After you’ve completed your registration, Fiverr will send a verification email. Go to your inbox, find the email, and click the verification link to confirm your account.
- Profile Setup: Once verified, you can start building your profile. Fill in your skills, experiences, and a quick bio. This is your chance to shine and attract potential buyers!
And just like that, you’re now part of the Fiverr community!
Also Read This: What Happened to Fiverr 5?
Step 2: Navigating to Your Gig

Now that you have created your account, it's time to set the foundation for your gigs! A gig is your service offering on Fiverr, and navigating to it is pretty simple. Here’s how you can do it:
- Log In: Head back to Fiverr and log in with the credentials you used while creating your account.
- Access Your Profile: Click on your profile picture in the top right corner of the page. This will open a drop-down menu.
- Select 'Selling': From the drop-down menu, click on ‘Selling’. This will redirect you to your seller dashboard.
- Go to 'Gigs': In the seller dashboard, you’ll see various options on the left side. Click on ‘Gigs’ to view all the gigs you’ve created or want to create.
- Creating a New Gig: If you’re starting fresh, look for the ‘Create a New Gig’ button. It’s often prominently displayed. Just click it to start setting up your service.
And there you have it! Navigating to your gig is as easy as pie. Remember, the more detailed and appealing your gig is, the more likely you are to attract buyers!
Also Read This: How Many Gigs Can I Create on Fiverr?
Step 3: Adding Tags to Your Gig

Now that you've created your gig and you're feeling pretty excited about it, it’s time to add tags! Tags play a crucial role in helping potential buyers find your offerings on Fiverr. So let’s get to it.
Here’s how to add tags to your gig:
- Navigate to your Gig: From the Fiverr dashboard, click on “Selling” in the top menu. Then select “Gigs.” You’ll see a list of your existing gigs. Choose the gig you want to edit.
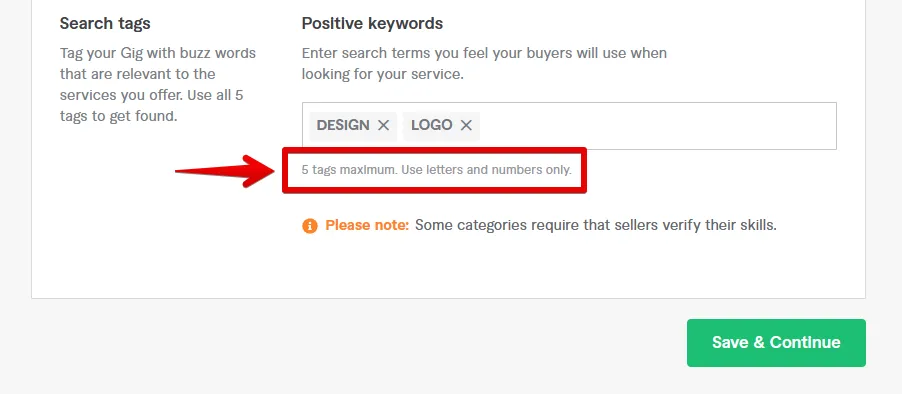
- Scroll to the Tags Section: When you’re in the gig editing screen, keep scrolling down until you reach the “Tags” section. It’s usually under the “Description & FAQ” part.
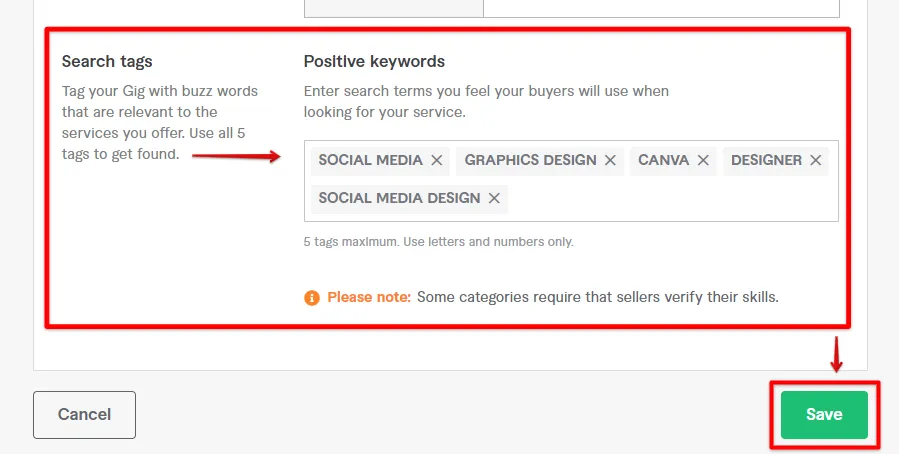
- Add Your Tags: In the tags section, you’ll see a space for up to five tags. Think of relevant keywords related to your service. For example, if you’re selling logo design services, you could use tags like “logo design," “graphic design,” “branding,” and “custom logos.”
- Save Your Changes: After you’ve added your tags, don’t forget to click on the “Save” button at the bottom of the page. This ensures that your tags are applied to your gig!
That’s all there is to it! You’ve successfully added tags to your gig, making it easier for potential buyers to find you in the vast Fiverr marketplace.
Also Read This: How to Change Email on Fiverr
Step 4: Tips for Choosing Effective Tags
Choosing the right tags can make or break your gig's visibility. Here are some handy tips to guide you in selecting the most effective tags:
- Be Specific: Instead of generic tags, opt for more specific keywords. For instance, rather than just “design,” consider using “minimalist logo design” if that accurately represents your service.
- Consider Buyer Intent: Think about what potential buyers might search for. Put yourself in their shoes—what terms would you use? This can help you craft tags that resonate.
- Research Your Competition: Take a look at similar gigs in your category. Check out what tags top sellers are using. This can give you inspiration and help you understand market trends.
- Mix It Up: Use a combination of broad and niche tags. Broad tags may attract more views, while niche tags may connect you with buyers looking for exactly what you offer.
- Stay Relevant: Ensure that your tags are relevant to your gig. Using misleading tags may lead to confusion and can adversely affect your gig’s performance.
By following these tips, you can enhance your chances of being seen by the right audience on Fiverr, which ultimately leads to more orders and success!
Also Read This: How to Get Login Info for Social Media on Fiverr
Common Mistakes to Avoid
When adding tags in Fiverr, it's crucial to be aware of common pitfalls that can hinder your visibility and effectiveness in attracting the right clients. Here are several mistakes to watch out for:
- Using Irrelevant Tags: One of the biggest blunders is choosing tags that don’t accurately represent your service. This can confuse potential buyers and diminish your gig's relevance. Always pick tags that directly relate to the service you're offering.
- Overloading Tags: Fiverr allows you to add a specific number of tags, so avoid the temptation to fill them with too many keywords. A list of 10 unrelated tags is less effective than a concise set of 5-7 focused ones. Quality trumps quantity!
- Neglecting Long-Tail Keywords: While general keywords might seem appealing, long-tail keywords can attract more targeted traffic. Consider phrases that your ideal clients are likely to search for, and include them as tags.
- Ignoring Market Trends: Staying updated with the latest trends in your niche can give you a competitive edge. Keywords can shift over time, so regularly revisiting your tags is essential to adapt to changing demands.
- Inconsistent Tag Use: If you're running multiple gigs, ensure your tags reflect a unified branding strategy. Inconsistent tagging can confuse buyers about what you truly specialize in.
By avoiding these common mistakes, you can optimize your Fiverr gigs and enhance your chances of attracting the right clients!
Conclusion
In conclusion, properly adding tags in Fiverr can significantly impact your gig’s visibility and attract the right clients. It's not just about filling in a blank space; it’s about strategically selecting keywords that resonate with your target audience. To recap the key points:
- Relevance is Key: Always ensure your tags accurately reflect your service.
- Be Specific: Use long-tail keywords for better-targeted traffic.
- Stay Updated: Regularly review and update your tags based on market trends.
- Avoid Common Mistakes: Steer clear of overloading tags and using irrelevant keywords.
Taking the time to carefully consider your tags can lead to better visibility, more clicks, and ultimately increased sales on Fiverr. Don’t underestimate this small but crucial element of your gig setup. Happy tagging, and good luck on your Fiverr journey!


