If you're looking to showcase your skills and make some extra cash, Fiverr is a fantastic platform to do just that. With millions of users worldwide, it’s a hub for freelancers offering various services, known as "gigs." But you might be wondering how to get started. In this post, we’ll guide you through the simple steps to add gigs on the Fiverr app, ensuring you’re all set to reach potential buyers with your unique offerings.
Step 1: Downloading and Installing the Fiverr App

The first step to adding gigs on the Fiverr app is, of course, getting the app installed on your device. Here's how you can do it:
- Choose Your Device: The Fiverr app is available for both Android and iOS. Make sure your device meets the required specifications to run the app smoothly.
- Visit Your App Store:
- If you're using an Android device, head over to the Google Play Store.
- If you're on iOS, navigate to the Apple App Store.
- Search for Fiverr: In the search bar, type in "Fiverr" and hit enter. The official app should appear at the top of the search results.
- Download the App: Click on the Install button. The app is free to download, making it easy for anyone to get started.
- Open the App: Once the installation is complete, you can find the Fiverr app icon on your home screen. Tap to open it.
- Create an Account or Log In: If you’re new to Fiverr, you’ll need to create an account. Simply follow the on-screen prompts to set up your profile.
And there you have it! You’ve successfully downloaded and installed the Fiverr app. Now that you’re ready to dive in, let’s move forward and learn how to create those gigs that can attract buyers excited about your services!
Also Read This: How to Find and Get Salesforce Developer Remote Jobs in USA
Step 2: Creating Your Fiverr Account

Before you can start adding gigs to your Fiverr profile, you need to create your account. The process is pretty straightforward—let's walk through it together!
First things first, head over to the Fiverr app. If you haven’t downloaded it yet, you can find it on the App Store for iOS or the Play Store for Android. Once you have the app, follow these simple steps:
- Open the app: Tap on the Fiverr icon to get started.
- Sign Up: You’ll see the option to sign up or log in. Since we’re creating a new account, select "Sign Up." Fiverr gives you various options for signing up, including using your email address, Google account, or Facebook. Choose what suits you best.
- Fill in your details: If you’re signing up with email, you’ll need to enter your name, email address, and a secure password. Make sure your password is something you can remember but difficult for others to guess!
- Verify your email: After signing up, Fiverr will send a verification link to your provided email. Check your inbox (and your spam folder just in case), click the link, and voila—you’re verified!
- Complete your profile: Once verified, you’ll be prompted to complete your profile. This includes adding a profile picture, a brief bio, and your skills. A well-crafted profile makes a great first impression.
And just like that, you’re all set with your Fiverr account! Now, let’s move on to the next step.
Also Read This: How to See Fiverr Requests: A Complete Guide
Step 3: Navigating to the Gigs Section

Great! Now that you have your Fiverr account up and running, it’s time to dive into the Gigs section. This is where the magic happens, and your creativity can really shine!
So, how do you get there? Follow these easy steps:
- Open the Fiverr App: Start by launching the app on your mobile device. It's as easy as tapping the icon!
- Log In: If you’re not already logged in, enter your credentials—the same email and password you used to create your account.
- Access the menu: Look for the menu icon, usually located in the top left or right corner of the screen. Tap on it to open a list of options.
- Select “Selling”: In the menu, you’ll see options like “Buying” and “Selling.” Tap on “Selling” to access your seller dashboard. This is where you manage all your gigs and orders.
- Find “Gigs”: Once in the Selling section, you’ll notice a “Gigs” tab. Click on that to view any existing gigs or to start creating new ones. You might see buttons labeled “Create New Gig” or something similar—tap that!
And just like that, you’re in the Gigs section! You can now start adding your services and showcasing what you have to offer. Let’s move on to the fun part—creating your gigs!
Also Read This: Can I Stop a Job in Fiverr? A Comprehensive Guide
Step 4: Writing an Engaging Gig Title

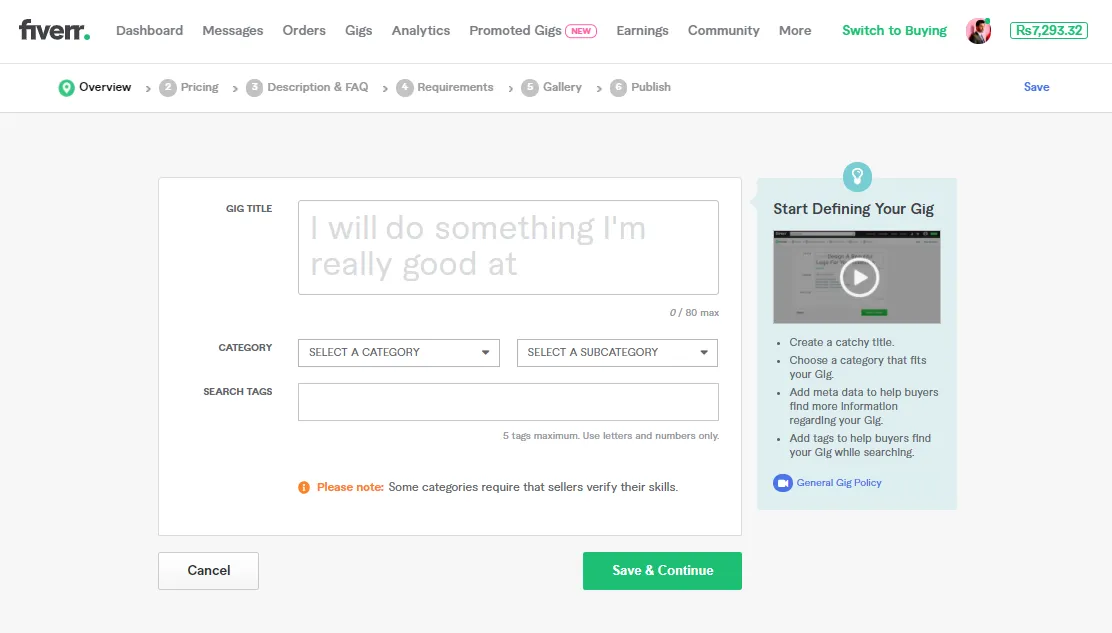
Creating an eye-catching gig title is essential for grabbing potential buyers’ attention. Think of the gig title as your first impression – it needs to be memorable, clear, and relevant to what you’re offering. Here are some tips on how to craft a winning gig title:
- Be Descriptive: Use specific words that accurately describe your service. If you’re offering copywriting services, a title like “Professional SEO Copywriting for Your Website” is far more effective than just “Copywriting.”
- Keep It Concise: Fiverr allows for up to 80 characters in your gig title, but shorter is often sweeter. Aim for something that’s snappy yet clear, making it easy for potential buyers to understand your offer at a glance.
- Use Keywords Wisely: Incorporate relevant keywords that potential buyers might search for. Think about what they would type into the search bar and make sure those terms appear in your title.
- Avoid Jargon: Unless your audience is familiar with industry-specific terms, try to use simple language. Your title should be easily understandable to anyone, regardless of their background.
- Highlight Unique Selling Points: If there’s something special about your gig, like a fast turnaround or unique expertise, include that in the title.
Ultimately, a well-crafted title can lead to increased visibility and more clicks on your gig. Don’t underestimate the power of a great title!
Also Read This: Can You Sell Nudes on Fiverr? Exploring the Possibilities
Step 5: Crafting a Compelling Gig Description
Your gig description is the place where you can shine. This is where you can tell potential clients all about your services, your experience, and why they should choose you. Here are some essential elements to include in your gig description:
- Start with a Hook: Begin with an engaging sentence that captures interest. Ask a question or make a bold statement that resonates with your target audience.
- Clearly Outline Your Services: Describe what you’re offering in detail. Break down the aspects of your service and explain what buyers can expect when they order from you.
- Showcase Your Expertise: Share a bit about your background, skills, or previous successes. This builds credibility and lets buyers know they are in capable hands.
- Address Client Needs: Remember, you’re solving a problem for your client. Use phrases like “I can help” or “You will get” to align your services with their needs.
- Include Call to Action: End your description with a strong call to action. Encourage potential buyers to reach out with questions or to place an order.
Lastly, make sure your description is clear and free from typos or grammatical errors. A well-written, engaging description can set you apart from the competition and lead to more orders!
Also Read This: What Does Fiverr Mean? Understanding the Popular Freelance Marketplace
Step 6: Setting Pricing and Packages
Alright, you’re getting close! The next step in adding your gigs on the Fiverr app is all about setting your pricing and packages. This is where you decide how much you want to charge for your services and how they are structured. Let’s break it down:
When you're in the pricing section, you'll usually have a few options:
- Basic Package: This is your entry-level offering. It should provide good value to attract new buyers but at a lower price point.
- Standard Package: This one can include additional features or faster delivery times compared to the Basic. Think of it as a mid-tier option.
- Premium Package: This is your top-tier offering, featuring all the bells and whistles. Price it higher, but make sure it's worth it!
Here’s how to set your prices effectively:
- Consider your competition. Look at similar gigs to gauge a reasonable price.
- Factor in the complexity of your service. If it requires more time and skill, don't shy away from charging a bit more.
- Offer discounts for bulk orders or loyal customers to encourage repeat business.
Once you’ve set your prices, keep track of how your gigs perform. You can always adjust them later based on demand and feedback!
Also Read This: Is Fiverr Easy? A Comprehensive Guide for Freelancers
Step 7: Adding Relevant Tags and Categories
Now, we're nearing the final touches! Adding relevant tags and categories is crucial in making your gig easy to find. Think of it as putting your gig in the right aisle of a massive store. You want your potential customers to stumble upon your offerings effortlessly.
Here’s what to keep in mind:
- Categories: Choose the right category that best fits your service. Fiverr has numerous categories from graphic design to digital marketing. Make sure to select one that accurately represents your gig.
- Subcategories: Many main categories have subcategories. Dig deeper to find a subcategory that’s even more specific to your service.
- Tags: Use 5 to 10 relevant tags that are specific to your gig. Think about keywords potential buyers might use when searching for services like yours. For example, if you're a graphic designer creating logos, tags might include “logo design,” “branding,” or “graphic artist.”
Be sure to avoid overly generic tags as they won’t help your gig stand out. Instead, focus on specific terms that truly capture what you offer.
After adding tags and categories, you’re almost ready to launch your gig! Properly labeling it this way helps the Fiverr algorithm understand where to place your gig, which can drive more traffic your way. Let’s keep going!
Also Read This: Hourly Rates for Freelance Writers
Step 8: Uploading Eye-catching Gig Images or Videos
When it comes to creating a standout gig on Fiverr, visuals play a crucial role. Uploading eye-catching images or videos can significantly increase your chances of grabbing a buyer's attention. So, let’s dive into the nitty-gritty!
First things first, make sure your images are clear and high-quality. Blurry or pixelated images give off a less professional vibe, which is something you definitely want to avoid. Here are some tips for selecting the perfect visuals:
- Use Bright Colors: Bold colors often catch the eye. Make sure your images are vibrant and visually appealing.
- Showcase Your Work: If you’re offering graphic design or photography services, include samples of your best work.
- Include Text Overlays: A catchy title or brief description can help convey what you offer at a glance.
- Aspect Ratio Matters: Fiverr recommends an aspect ratio of 1:1 for images. Make sure your images fit neatly into this format.
- Consider Adding a Video: Videos can increase engagement by up to 80%! A short, engaging video explaining your gig helps potential buyers connect.
Once you’ve prepared your awesome visuals, it’s time to upload. Fiverr allows you to add up to three images and one video, so make sure each one showcases your gig effectively. A well-made gig with stunning visuals can make all the difference in drawing potential customers!
Also Read This: Where to Find the Fiverr List
Step 9: Setting Delivery Time and Revisions
Delivery time is another crucial aspect of your Fiverr gig. It not only shows potential buyers how quickly you can complete their orders but also sets their expectations. Along with delivery time, you’ll need to think about how many revisions you’re willing to provide. Let’s walk through this step!
When setting your delivery time, consider the complexity of the tasks you’re offering. Here are some pointers:
- Be Realistic: Don’t set an unachievably short delivery time just to attract buyers. It’s better to under-promise and over-deliver!
- Standard Delivery: Think about what’s typical for your industry. For example, graphic design might take longer than simple data entry.
- Customization Options: You can offer express delivery for an additional fee. This can appeal to clients who are in a hurry.
Next up is revisions. Buyers appreciate the option to request changes, but you don’t want to get stuck in an endless cycle of edits. Here’s how to handle it:
- Specify Your Revision Policy: Clearly state how many revisions you’ll provide in your gig description. Common options include 1, 2, or unlimited.
- Communicate Effectively: Encourage buyers to share their vision clearly upfront to minimize revisions later.
- Consider Additional Charges: If a client repeatedly requests significant changes beyond the agreed number, consider setting a fee for extra revisions.
By thoughtfully setting your delivery time and revision policy, you'll establish a professional image and create a positive experience for your buyers on Fiverr.
Also Read This: Have You Ever Gotten a Review Removed on Fiverr?
Step 10: Publishing Your Gig
Congratulations! You've made it to the final step in creating your Fiverr gig. This is the moment when all your hard work comes to fruition and your gig is ready to showcase to the world. But before you hit that publish button, let’s make sure everything is just right.
First, take a moment to review the details of your gig. Look over the title, description, pricing, and any extras you’ve added. Make sure they align with your niche and reflect the high quality of service you intend to provide. Here’s a quick checklist for you:
- Gig Title: Is it catchy and keyword-rich?
- Description: Does it clearly explain what you offer and how it benefits buyers?
- Pricing: Are your prices competitive yet fair for the services you provide?
- Image/Video: Do you have high-quality visuals that attract attention?
- Tags: Are the tags well-researched and relevant to your offering?
Once you’re happy with everything, go ahead and click the Publish button. Your gig will now be live on Fiverr, ready for potential buyers to discover. Once published, it’s a good idea to share your gig on social media and networking platforms to gain initial visibility. Remember, the more exposure your gig gets, the higher the chances of making sales!
Don’t forget to monitor your gig regularly. You can tweak the title, description, and even your prices based on the feedback you receive and the performance analytics provided by Fiverr. Good luck!
Conclusion
Creating and adding gigs on the Fiverr app might seem like a daunting task at first, but with this step-by-step guide, you now have all the tools and knowledge necessary to set yourself up for success. Remember, building a gig is just the first part of your journey—what you do next is equally important!
As you refine your services and interact with your buyers, you'll become more adept at understanding the market and meeting the needs of your customers. Here are a few key takeaways:
- Keep Learning: The Fiverr platform is always evolving, so stay updated on new features and trends.
- Engage with Buyers: Communication is key. Prompt responses and excellent customer service can help you stand out.
- Optimize Regularly: Don’t hesitate to update your gig based on performance analytics.
- Stay Authentic: Be true to yourself and your skills. Authenticity attracts genuine buyers.
With persistence and creativity, your Fiverr gigs can turn into a thriving business, opening doors to exciting opportunities and financial independence. So, get out there and start making your mark on Fiverr! Happy gigging!


