
Adding watermarks to your designs in Canva serves multiple purposes, each contributing to the overall protection and branding of your visual content. Here's a closer look at why you should consider using watermarks:
Deter Unauthorized Use
Watermarks act as a visual deterrent, discouraging individuals from using your images without permission. They serve as a virtual signature, making it clear that the content is protected by copyright or ownership rights. This can be crucial in preventing unauthorized use and potential misuse of your creative work.
Enhance Brand Recognition
For businesses and individuals looking to establish a strong brand presence, watermarks are an effective way to enhance brand recognition. By incorporating your logo or brand name as a watermark, you ensure that your audience associates your visual content with your brand. This subtle form of branding can significantly contribute to building brand identity over time.
Protect Intellectual Property
Your creative work is valuable, and watermarks provide a layer of protection for your intellectual property. Whether you're a photographer, graphic designer, or artist, adding watermarks can help safeguard your creations from unauthorized reproduction or distribution. It's an essential step in maintaining control over how your work is used in the digital space.
Establish Credibility
Watermarks can also play a role in establishing credibility and professionalism. When your audience sees well-placed and thoughtfully designed watermarks, it conveys a sense of authority and attention to detail. This is particularly important for businesses and individuals who want to be taken seriously in their respective industries.
Build Trust with Clients
For freelancers, photographers, or anyone providing visual content to clients, using watermarks can build trust. It reassures clients that the work they are previewing is a sample or draft, encouraging them to finalize the transaction before receiving the high-resolution, watermark-free version of the content.
In summary, incorporating watermarks into your Canva designs is a strategic decision that goes beyond mere visual embellishment. It's a practical and valuable tool for protecting your creations, promoting your brand, and maintaining control over your intellectual property in the digital landscape.
Getting Started with Canva
If you're new to Canva, getting started is a breeze. Follow these step-by-step instructions to create an account and initiate your journey into the world of easy and accessible design:
1. Create a Canva Account
Begin by visiting the Canva website and signing up for a free account. Provide the necessary information, including your email address and a secure password. Alternatively, you can sign up using your Google or Facebook account for added convenience.
2. Explore Canva's Dashboard
Upon logging in, you'll be greeted by Canva's user-friendly dashboard. Take a moment to explore the various design options available, including social media graphics, presentations, posters, and more. Canva offers a wide range of templates to suit your creative needs.
3. Start a New Design
Click on the "Create a design" button to initiate a new project. Here, you can specify the dimensions of your design based on your intended use—whether it's for a social media post, a flyer, or any other purpose. Canva provides preset dimensions for common design types, or you can enter custom dimensions.
4. Choose a Template or Blank Canvas
Opt for a template that aligns with your design goals, or start with a blank canvas if you prefer complete creative freedom. Canva's templates are professionally designed and can be customized to suit your preferences. This step sets the stage for adding your watermark later in the design process.
5. Add Elements and Text
Begin building your design by adding elements, images, and text. Canva's drag-and-drop interface makes it easy to experiment with different layouts and styles. Customize the colors, fonts, and overall aesthetic to match your brand or personal preferences.
6. Save Your Work
Regularly save your progress as you work on your design. Canva automatically saves your projects, but it's a good practice to manually save to ensure you have the latest version accessible whenever you need it.
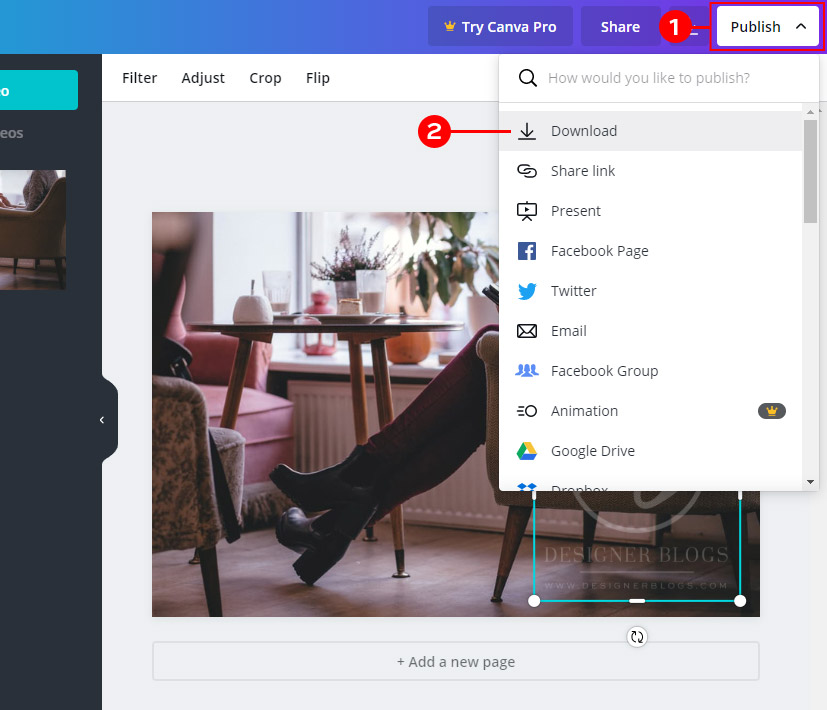
7. Preview and Download
Before adding a watermark, use the preview feature to review your design. Once satisfied, click the "Download" button to save your design to your computer.
Now that you've successfully started your design journey with Canva, you're ready to move on to the next step: adding a watermark to protect and enhance your creations.
Also Read This: How Do You Rate on Fiverr? A Comprehensive Guide
Importance of Watermark Placement
Choosing the right placement for your watermark in Canva is crucial, as it can significantly impact the effectiveness of its purpose. Let's explore the importance of strategic watermark placement:
1. Visibility and Deterrence
Visible and prominent: Place your watermark in a location that is easily visible and not easily cropped or removed. This enhances its deterrence effect, discouraging potential unauthorized use as viewers readily identify the protected content.
2. Balancing Aesthetics
Aesthetically pleasing: While visibility is key, it's equally important to ensure that the watermark doesn't compromise the overall aesthetics of your design. Choose a placement that integrates seamlessly with the composition, allowing the design to remain visually appealing.
3. Avoiding Critical Elements
Avoid critical content: Ensure the watermark doesn't cover crucial elements of your design, such as key visuals or text. Find a balance between visibility and the preservation of essential components, maintaining the overall integrity of your creative work.
4. Consistency Across Designs
Consistency: If you frequently use watermarks across various designs, maintain a consistent placement. This not only reinforces brand recognition but also establishes a uniform approach that your audience can come to expect.
5. Transparency and Blend
Transparency and blending: Experiment with the transparency of your watermark to strike the right balance. Depending on the design, you may want the watermark to be subtle or more pronounced. Canva allows you to adjust transparency levels easily.
6. Positioning for Branding
Strategic branding: For business-oriented designs, consider placing your watermark strategically to enhance branding. This may involve incorporating your logo into the watermark, reinforcing your brand identity while protecting your intellectual property.
7. Multiple Watermarks for Complex Designs
Multiple watermarks: In designs with complex layouts, using multiple watermarks can be effective. This ensures coverage across various elements, providing comprehensive protection without overcrowding a single area.
In conclusion, thoughtful watermark placement is an art that combines visibility, aesthetics, and brand consistency. By strategically positioning watermarks in your Canva designs, you maximize their impact in deterring unauthorized use while preserving the visual appeal and integrity of your creative work.
Also Read This: Starting a Career as a Freelance 3D Artist
Adding a Watermark in Canva
Now that you've set the stage with your design in Canva, it's time to add a watermark to protect your work. Follow these straightforward steps to seamlessly incorporate a watermark into your Canva creations:
1. Upload Your Watermark Image
Choose or create a watermark: Begin by selecting the watermark image you want to use. This can be your logo, a signature, or any graphic that represents your brand. Ensure the image has a transparent background for optimal integration.
2. Insert Watermark into Your Design
Drag and drop: Canva's user-friendly interface allows you to easily insert your watermark. Simply drag and drop the chosen image onto your design canvas. Position it where you want the watermark to appear.
3. Adjust Size and Placement
Resize and position: Use Canva's resizing handles to adjust the size of your watermark. Experiment with different placements to find the optimal position that balances visibility and aesthetics. Canva's grid and alignment tools can assist in precise placement.
4. Explore Transparency Options
Transparency settings: Fine-tune the transparency of your watermark to achieve the desired effect. Canva allows you to adjust transparency easily, ensuring your watermark is noticeable but doesn't overpower the overall design.
5. Duplicate for Consistency
Consistency across designs: If you use the same watermark across multiple designs, consider duplicating it for consistency. This maintains a uniform look and reinforces brand recognition, especially if your watermark includes your logo or brand elements.
6. Group and Lock Elements
Group and lock: Once satisfied with the placement and appearance of your watermark, use Canva's grouping and locking features. This ensures that the watermark stays in place and maintains its relative position to other elements as you continue working on your design.
7. Save Your Watermarked Design
Save and download: Before finalizing your design, save your work. Canva allows you to download your design in various formats. Choose the appropriate format for your intended use, keeping in mind any resolution or file size requirements.
By following these steps, you've successfully added a watermark to your Canva design, combining protection with a polished visual presentation. Now, your creations are not only visually appealing but also safeguarded against unauthorized use.
Also Read This: Top 10 Augmented Reality Developers on Fiverr in 2024
Customizing Your Watermark
Now that you've added a watermark to your Canva design, it's time to make it uniquely yours. Customization allows you to enhance the visual appeal of the watermark while ensuring it aligns perfectly with your brand or personal style. Here's how you can customize your watermark in Canva:
1. Adjusting Transparency
Transparency levels: Canva offers easy-to-use sliders for adjusting the transparency of your watermark. Finding the right balance is crucial – make it visible enough to serve its purpose but subtle enough not to distract from the main content. Experiment with different transparency settings until you achieve the desired effect.
2. Resizing and Scaling
Size and proportion: Resize your watermark to ensure it complements your overall design. Canva provides handles that allow you to easily scale your watermark while maintaining its original proportions. Consider the dimensions of your design and the prominence you want your watermark to have.
3. Changing Colors
Color adjustments: Customize the colors of your watermark to match your brand palette or design aesthetics. Canva allows you to change the color of your watermark elements with a few clicks. Experiment with different color schemes to find the combination that best suits your overall design.
4. Adding Effects
Special effects: Canva offers a range of effects that can add a creative touch to your watermark. Experiment with shadows, glows, or other effects to make your watermark stand out. However, exercise caution to maintain a professional and cohesive look that aligns with the overall design.
5. Incorporating Brand Elements
Brand integration: If your watermark represents your brand, ensure it includes essential brand elements such as logos, symbols, or taglines. This reinforces brand identity and helps in building brand recognition over time. Make sure these elements are clear and easily distinguishable within the watermark.
6. Testing Variations
Multiple variations: Create several versions of your watermark with different customization options. This allows you to compare and choose the one that best complements your design. Consider factors like visibility, subtlety, and harmony with the overall composition.
7. Saving Customized Watermark
Save as a template: Once you've perfected your customized watermark, save it as a template in Canva. This way, you can easily apply the same watermark to future designs, ensuring consistency and a professional touch across all your visual content.
By customizing your watermark in Canva, you not only enhance its functionality but also make it an integral and visually pleasing part of your designs. This level of personalization contributes to a more professional and cohesive brand image, reinforcing the impact of your visual content.
Also Read This: How to Search Fiverr for Top Ranked Sellers
Frequently Asked Questions (FAQ)
As you embark on adding watermarks in Canva, you may have some common questions. Here's a compilation of frequently asked questions to guide you through the process:
1. Can I Add a Watermark to an Existing Canva Design?
Yes, you can add a watermark to an existing Canva design. Open the design in Canva, upload your watermark, and follow the steps mentioned earlier to insert, customize, and save your watermarked design.
2. Is It Possible to Remove the Watermark Later?
No, once you save your design with a watermark in Canva, the watermark becomes a permanent part of the image. It cannot be removed using Canva's editing tools. Make sure your design is final before saving with the watermark.
3. What File Formats Can I Download with a Watermark?
Canva allows you to download your watermarked design in various formats, including JPG, PNG, and PDF. Choose the format that suits your needs and consider the specific requirements of your intended use.
4. Can I Adjust the Watermark Position After Saving?
No, once a design is saved in Canva, the watermark position becomes fixed. To make adjustments, you need to go back to the design, reposition the watermark, and save the updated version.
5. How Do I Ensure the Watermark Is Clearly Visible?
To ensure your watermark is clearly visible, choose a prominent location and adjust the transparency levels appropriately. Experiment with different placements and transparency settings until you achieve the desired visibility without compromising the overall design.
6. Can I Use Canva for Commercial Watermarking?
Yes, you can use Canva for commercial watermarking. Whether you're protecting your professional portfolio or branding your business designs, Canva provides the tools to add watermarks effectively for commercial use.
7. What Are the Recommended Dimensions for a Watermark?
There's no strict rule for watermark dimensions, but it's advisable to keep it proportionate to your design. A watermark that is too small may be easily overlooked, while an excessively large one may distract from the main content. Find a balance that suits your design aesthetics.
These FAQs should address common queries you may encounter while adding watermarks in Canva. If you have additional questions, Canva's support resources and community forums are valuable sources of information and assistance.
Also Read This: How to Send a Buyer Request on Fiverr
Tips and Best Practices
Make the most out of adding watermarks in Canva with these tips and best practices. Enhance the effectiveness of your watermarks while maintaining the quality and appeal of your designs:
1. Choose a Distinctive Watermark:
Opt for a watermark that is unique and easily recognizable. Whether it's a logo, signature, or symbol, make sure it stands out and represents your brand or personal identity effectively.
2. Balance Visibility and Subtlety:
Find the right balance between making your watermark visible for protection and ensuring it doesn't overpower the main content. Adjust transparency levels and placement to achieve a harmonious blend.
3. Consistent Placement Across Designs:
Maintain consistency in watermark placement across your designs. This not only reinforces brand recognition but also provides a cohesive look to your portfolio or content collection.
4. Test Different Watermark Positions:
Experiment with various watermark positions to determine the most effective one for your specific design. Consider the composition and layout to ensure the watermark enhances rather than distracts from the overall aesthetics.
5. Use High-Quality Watermark Images:
Ensure the watermark image you use is of high quality. A pixelated or low-resolution watermark can diminish the overall professionalism of your design. Opt for crisp, clear images that scale well.
6. Customize for Different Platforms:
Customize your watermark based on the platform or purpose of your design. Tailor the size, transparency, and placement to suit the specific requirements of social media, websites, or print materials.
7. Consider Copyright Information:
Include relevant copyright information in your watermark if applicable. This adds an extra layer of protection and communicates the ownership of your creative work to viewers.
8. Regularly Update Watermark Designs:
Keep your watermark designs fresh and updated. If your branding evolves or you create a new logo, make sure to incorporate these changes into your watermark for a consistent and current representation.
9. Test Watermark on Various Backgrounds:
Before finalizing your watermark, test it on different backgrounds to ensure visibility and legibility. This is especially important if your designs may be displayed on various platforms with diverse color schemes.
10. Protect Sensitive Content:
If your designs contain sensitive or confidential information, strategically place the watermark to protect such content. Ensure the watermark covers any critical elements that need safeguarding.
By following these tips and best practices, you can maximize the impact of your watermarks in Canva, providing both protection and a polished visual presentation to your designs.
Conclusion
Congratulations! You've completed the journey of learning how to add watermarks in Canva through this quick tutorial. Let's recap the key points and insights gained along the way:
Embracing Watermarks for Protection and Branding
We delved into the significance of adding watermarks, understanding how they serve as a powerful tool for protecting your creative work and enhancing brand identity. The deterrence factor, brand recognition, and intellectual property protection were highlighted as key benefits.
Seamless Start with Canva
You learned the basics of getting started with Canva, from creating an account to exploring the dashboard and initiating a new design. Whether you're a novice or experienced user, these foundational steps set the groundwork for adding watermarks effectively.
Strategic Importance of Watermark Placement
The importance of where you place your watermark in a design was explored in detail. Balancing visibility, avoiding critical elements, and ensuring consistency across designs were key considerations to maximize the impact of your watermark.
Step-by-Step Guide to Adding Watermarks
A step-by-step guide was provided to walk you through the process of adding a watermark in Canva. From uploading your watermark image to adjusting size, placement, and transparency, you now have the skills to seamlessly incorporate watermarks into your designs.
Personalization through Customization
You discovered the art of customizing watermarks in Canva to make them uniquely yours. Whether adjusting transparency, resizing, changing colors, or adding special effects, customization allows you to align your watermark with your brand or personal style.
Addressing FAQs and Implementing Best Practices
Common questions were answered in the Frequently Asked Questions (FAQ) section, providing clarity on topics like removing watermarks, file formats, and adjusting positions. Additionally, valuable tips and best practices were shared to help you make the most out of adding watermarks in Canva.
Empowering Your Designs with Tips and Best Practices
The Tips and Best Practices section offered insights into choosing distinctive watermarks, achieving a balance between visibility and subtlety, maintaining consistency, and optimizing customization. These tips empower you to create watermarks that are both functional and visually appealing.
Final Thoughts and Ongoing Protection
In conclusion, by incorporating watermarks into your Canva designs, you not only safeguard your creative work but also enhance its professional presentation. Remember to regularly update your watermarks, test variations, and adapt them for different platforms to ensure ongoing protection and a consistent brand image.
Thank you for joining us on this journey to master the art of adding watermarks in Canva. May your designs flourish with both creativity and protection!


